Tags: No tags assigned

Alignment Kit 1 For Tesla Model S/X Pre-Refresh (02/2012- 01/2021)

FREE HATS to all orders above $100! ? Add any hat to your cart. At checkout, enter
coupon code:  HAT4FREE  for a 100% OFF the hat!
Matte Natural Anodized
$1,653.00
Matte Natural Anodized
Matte Red Anodized
$1,653.00
Matte Red Anodized
Matte Black Anodized: Multi-Alignment Kit + LIFETIME WARRANTY
$2,075.00
Matte Black Anodized: Multi-Alignment Kit + LIFETIME WARRANTY
minus
1
plus
? Add any hat to your cart. At checkout, enter
coupon code:  HAT4FREE  for a 100% OFF the hat!
FREE HATS to all orders above $100!

N2ITIVE’s Alignment Kit 1 is designed to address both the common acceleration shudder and inner tire wear issues that plague the Tesla Model S and X.  Our latest design is easy to install and allows for the quickest alignments!

More information about the product

Description

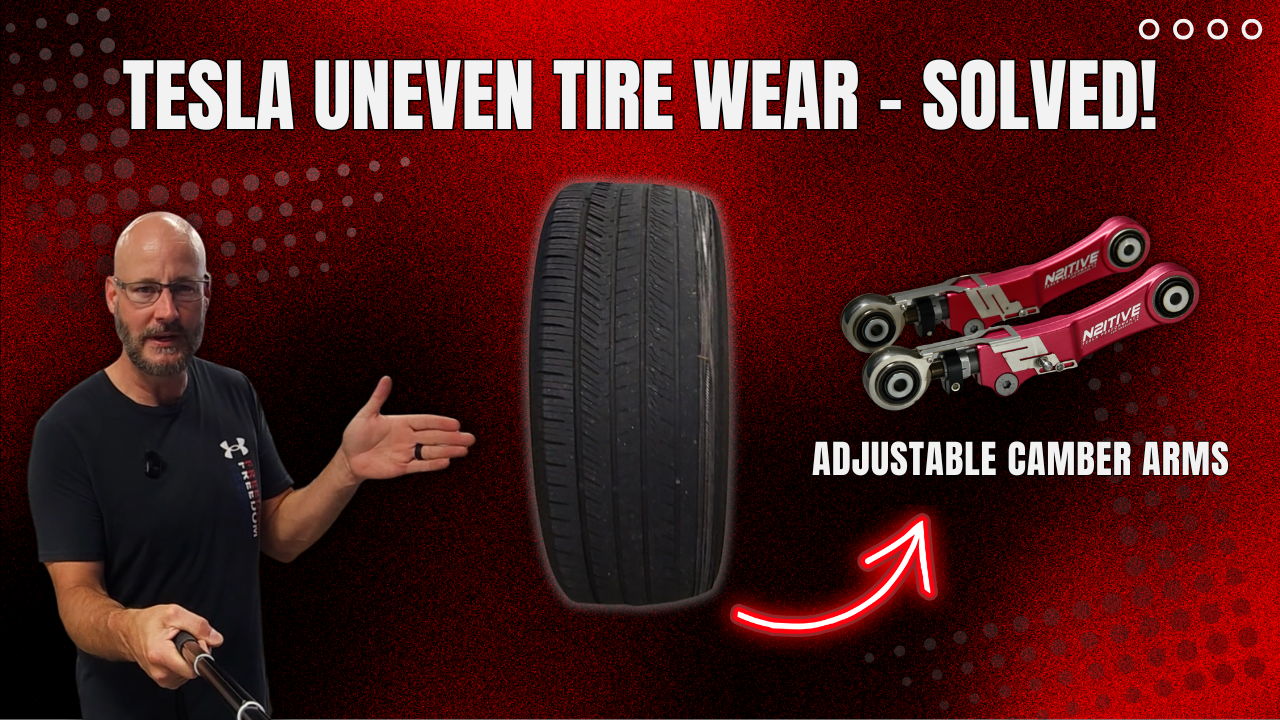
If your Tesla X or S suffers from the common inner tire wear or acceleration shudder issues, this kit will completely eliminate these problems and allow you to both achieve up to 2-5x more life out of your rear tires as well as prevent premature half shaft wear.  Simultaneously, improved handling, responsiveness, aerodynamics, and efficiency can all be seen after the installation of this kit.  All our products are made with the highest quality materials and craftsmanship for years of endurance and are backed by a 3-year or lifetime warranty.

Acceleration Shudder & Inner Tire Wear On The Model S and X

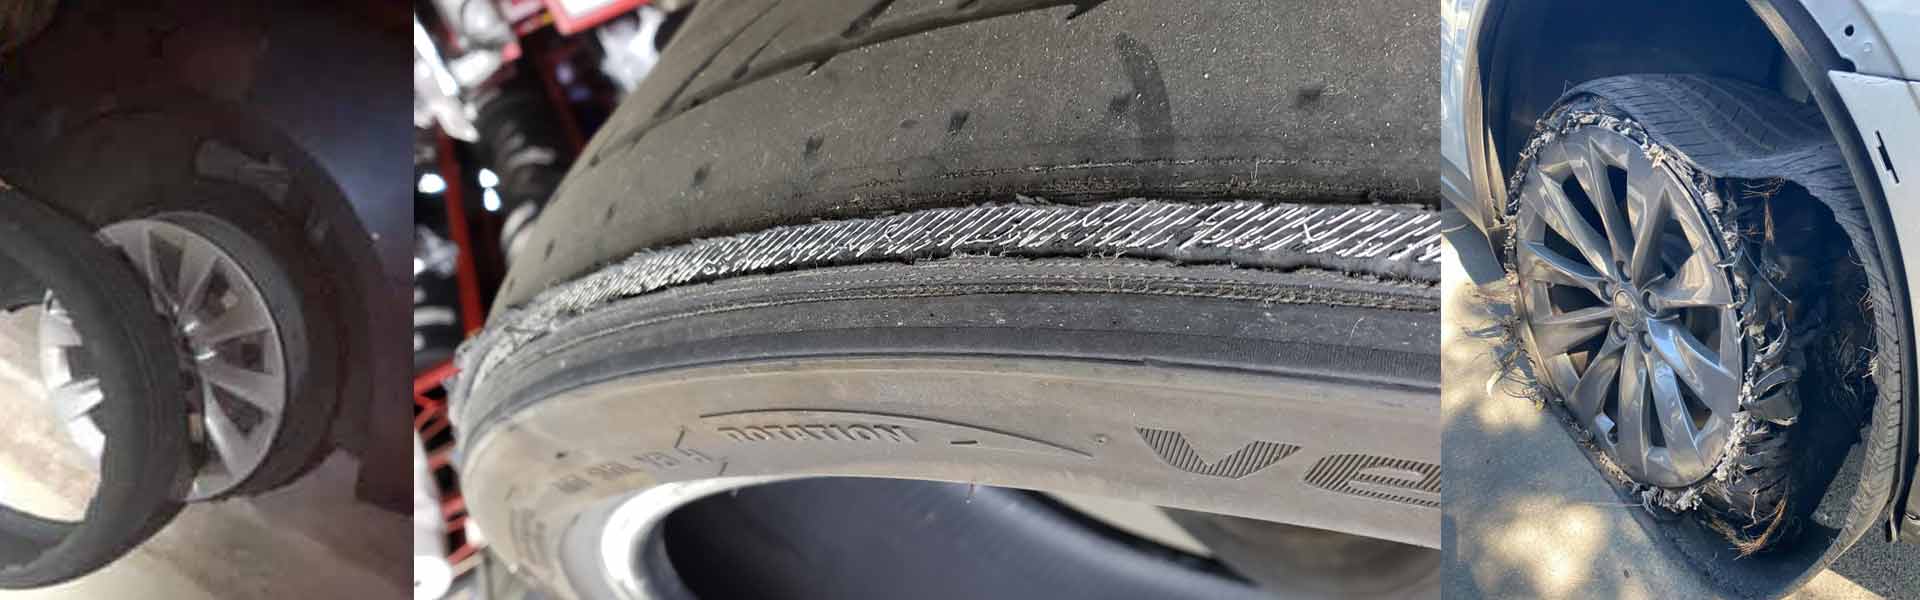
Many all-wheel drive versions of the Tesla Model S and X suffer from what has come to be known as “acceleration shudder” or vibration that comes from the front end of the vehicle while accelerating at around 35 miles per hour.  This problem can also present itself as a clicking or clunking sound from the front of the vehicle also while accelerating through a turn and is symptomatic of premature wear on the front half shafts.  It is important to note that vibration in the front of the vehicle could also be coming from another source such as unbalanced tires or Tesla’s built in lane-departure warning, but this type of vibration will likely occur consistently and not only through acceleration.

The source of this problem stems from the outer CV joints in your Tesla’s front half-shafts, which help transmit power from the motor to the front wheels.  The chassis for the current day Model S and X are still based on the original Model S in 2012, which only had the rear wheel drive option in mind.  During the development of the all wheel drive versions, Tesla made a compromise to mount the front motor in a sub-optimal position rather than redesign the whole chassis ground up, which causes the half shafts to be positioned at an angle that is too extreme for smooth rotation.  The front motor  sits up much higher than the front wheels so that the half-shafts have to transfer power at a steep angle down to the wheels below which are well off-axis from the motor.  Combining such a heavy car with high torque motors and the steep angle of the half-shafts, over time certain parts inside the half-shaft will fatigue and become marred.  Once damaged, the half-shafts rolling over the imperfections are then felt as the “acceleration shudder”.  Our Alignment Kit 1 lessens the angle of the half-shafts to reduce binding, which both remedies damaged half shafts from worsening and will prevent the damage in the first place if installed before the shudder is felt.

Tesla themselves do not have a permanent fix for this, as they will likely replace both half shafts and also install a new left front drive unit clevis mount in the event that you bring your car in for service.  This will typically solve the shudder problem for a little while but not forever, as Tesla owners report the shudder coming back as quickly as 500 miles and up to 10,000 miles.  Tesla may not cover this repair under warranty, as they consider it a “wear and tear” issue much like worn tires or brakes.  It is possible to have them replace these parts under warranty, but you may need to put up a fight in order for them to do so.

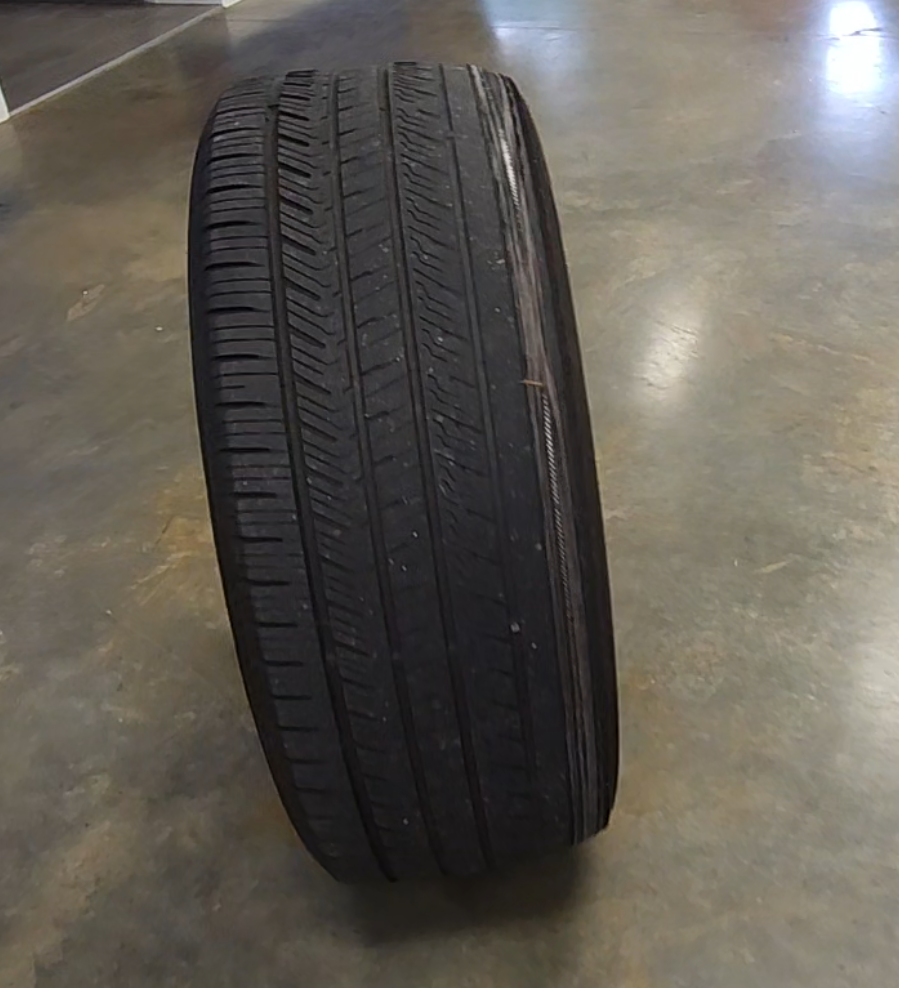
Excessive negative camber and inner tire wear are the other problems you hear with Teslas, with some owners running through tires in as little as 6,000 miles while staying in Tesla’s alignment specifications.  If you suffer from this inner tire wear that so many owners experience, you could easily double or triple your tire life as your tires will now be perfectly symmetrical in alignment and wear evenly.  Our arms will pay for themselves over the span of a few tires, as our customers usually multiply their tire life by 2-5x after proper installation and alignment.  The arms are direct drop-ins for the factory counterparts, meaning they can be installed with ease by an alignment shop or even at home for those who are mechanically inclined.  Our installation instructions and videos will also guide you through the process, and we’re always here to help get your Tesla aligned right and driving safe.

Tesla X and S tire blowout images

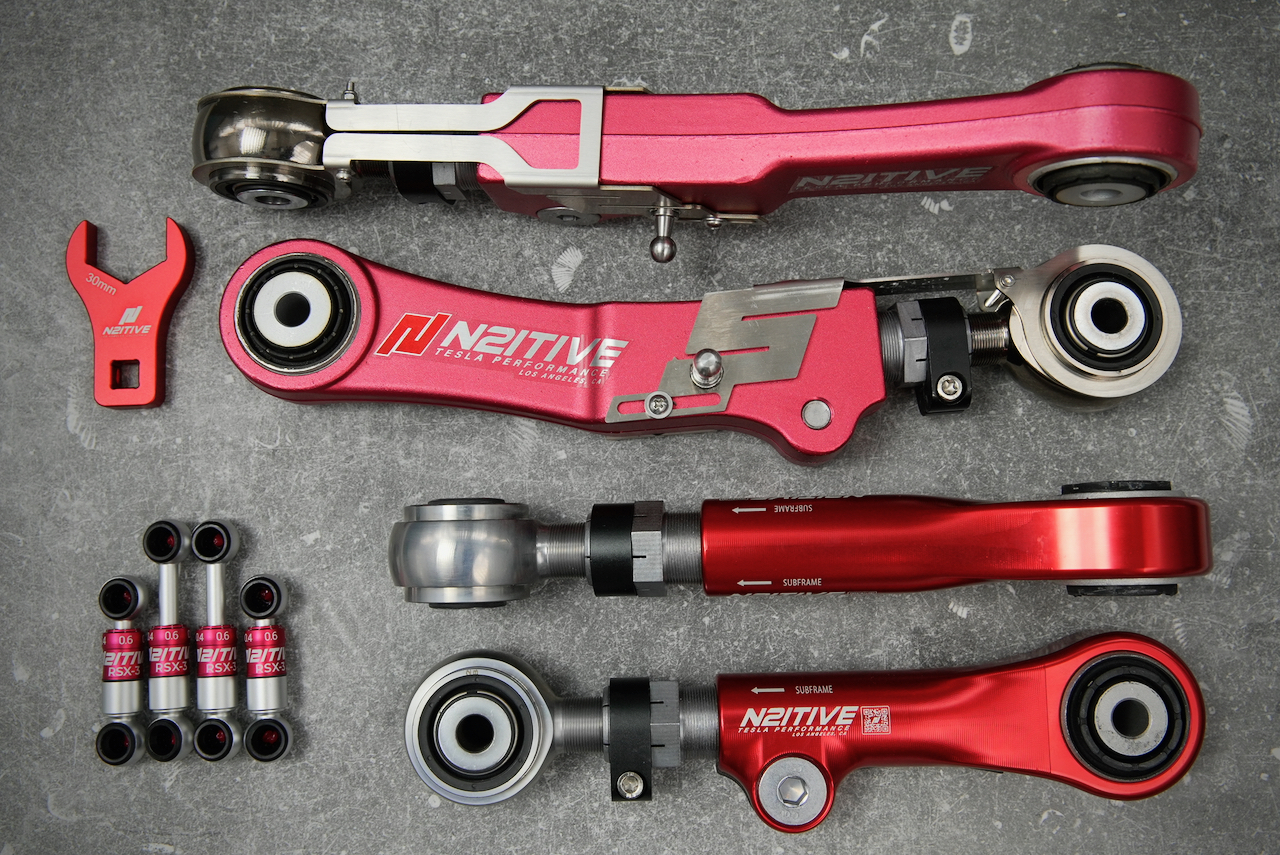
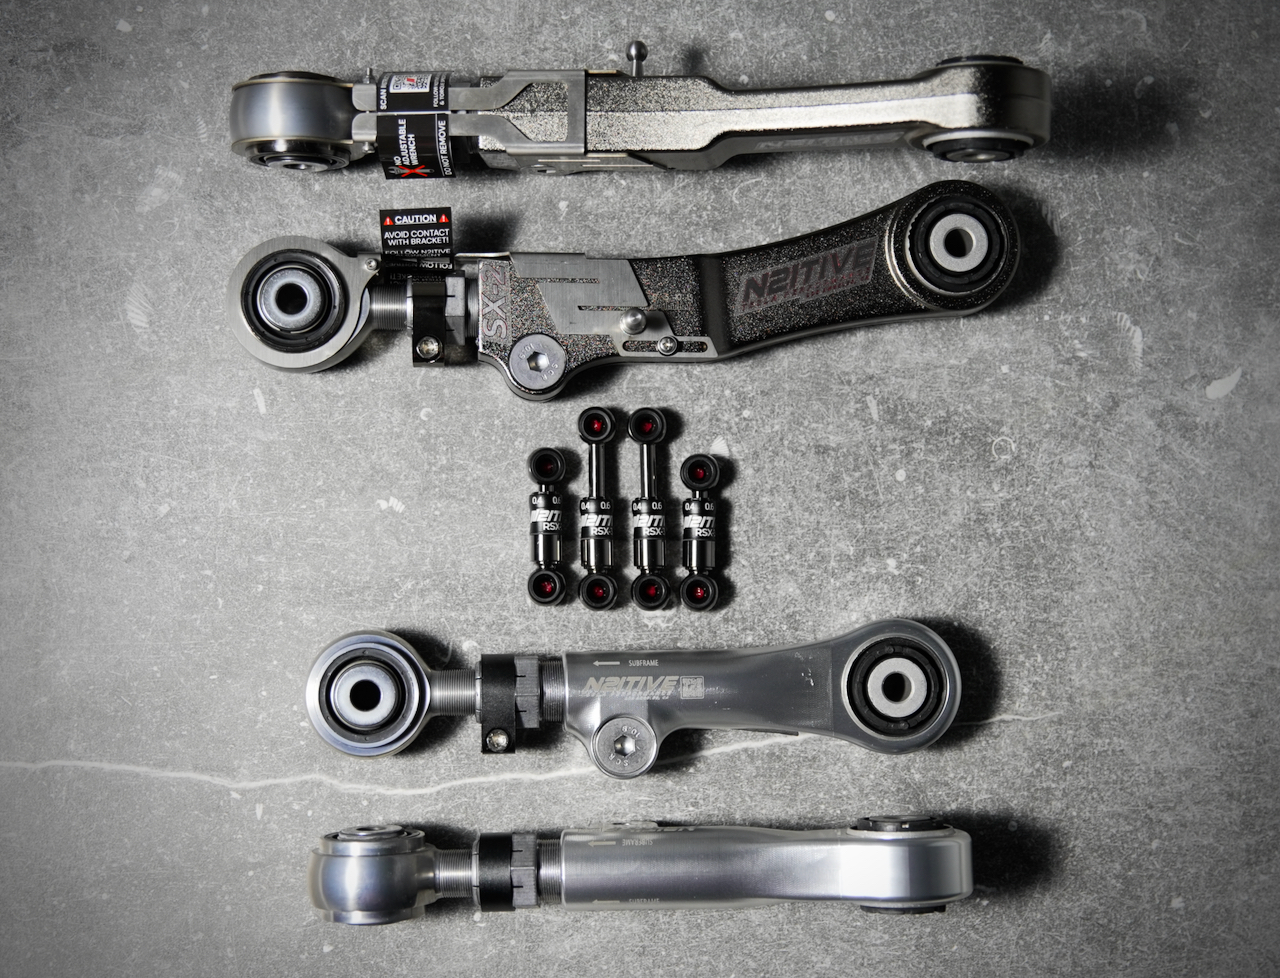
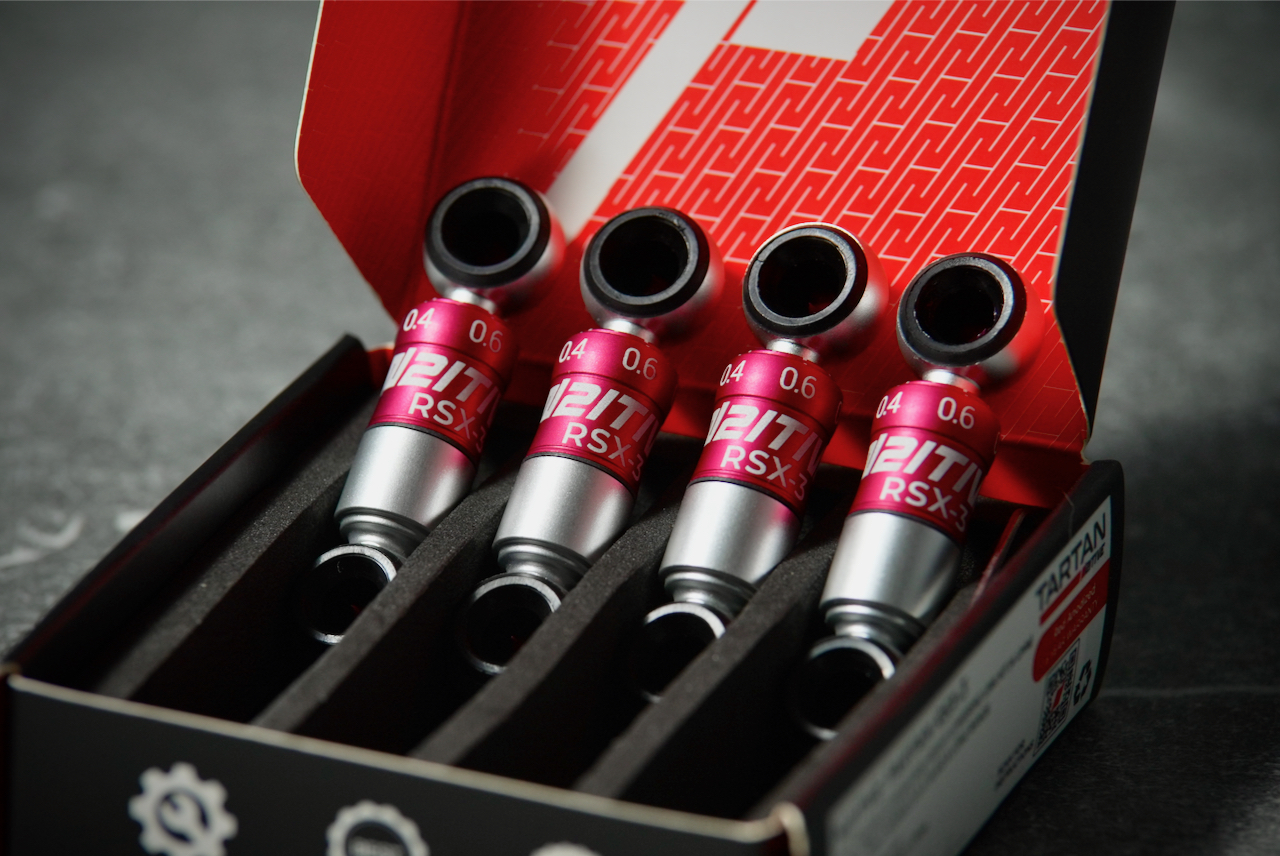
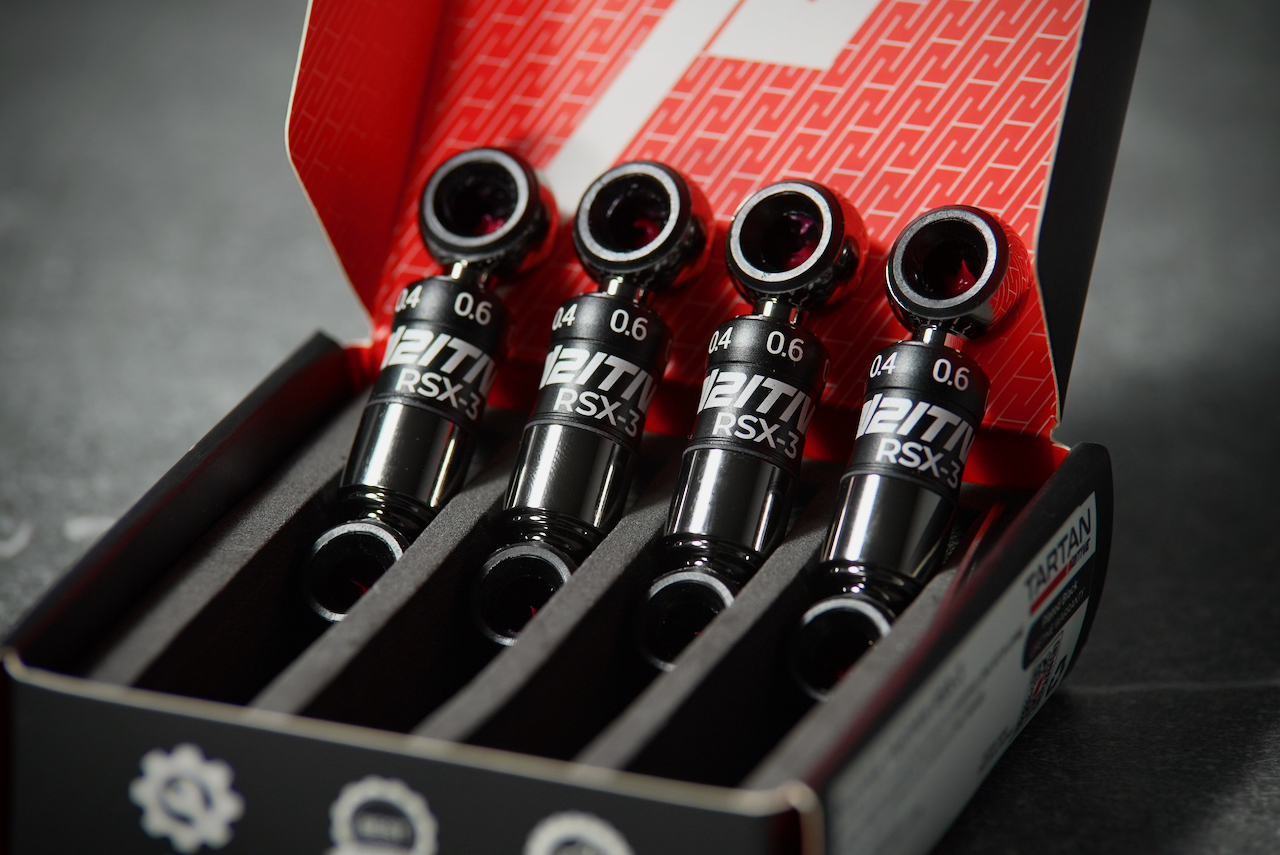
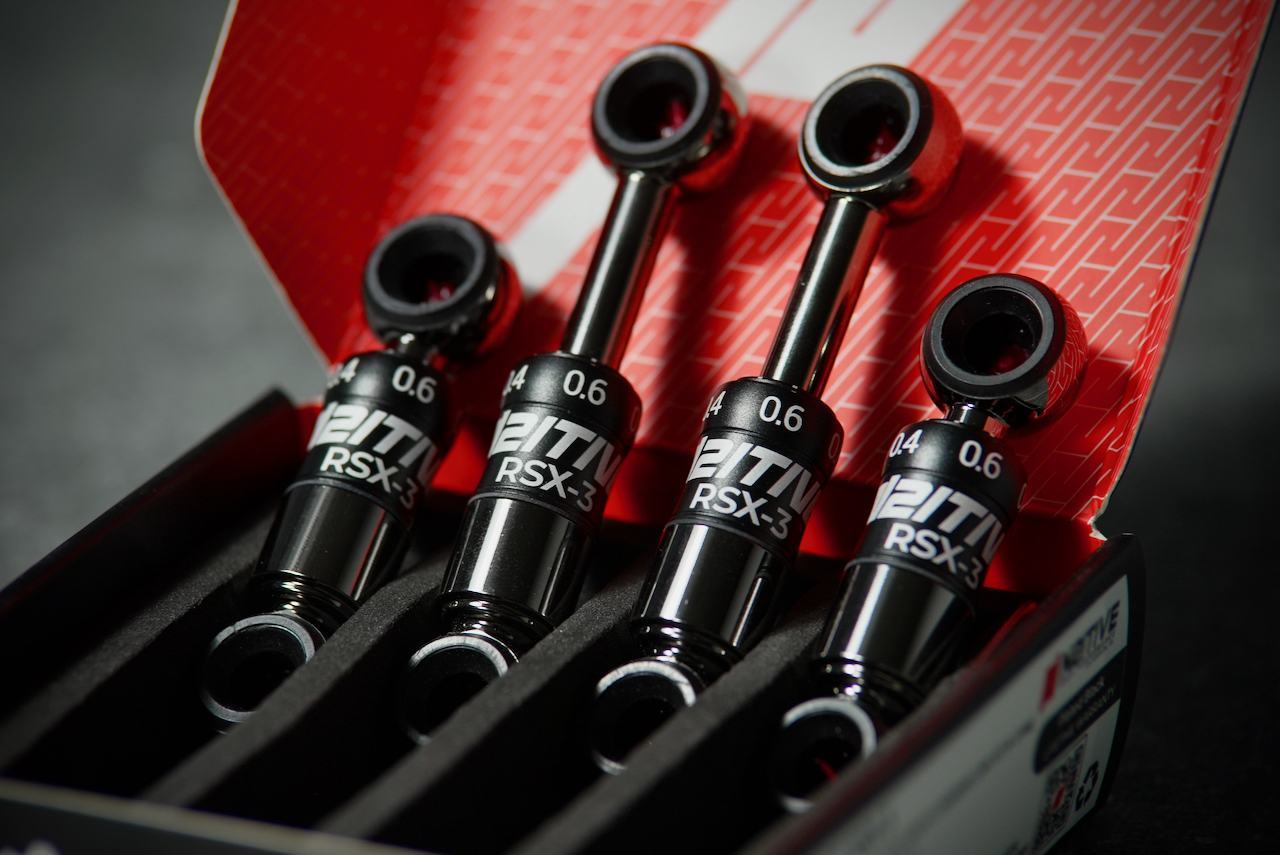
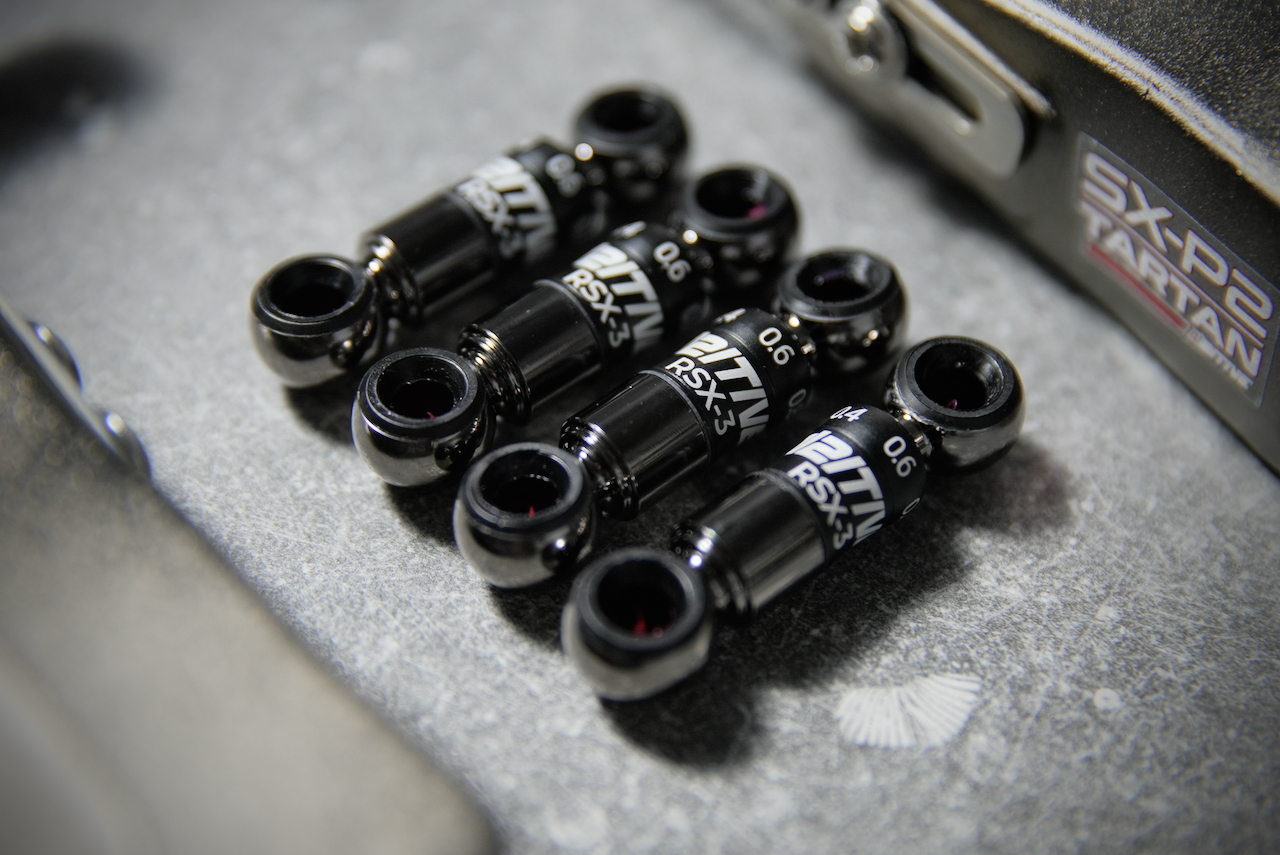
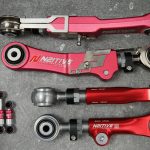
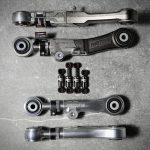
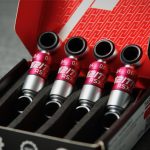
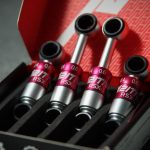
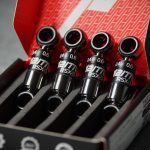
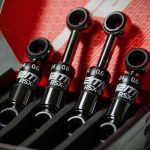
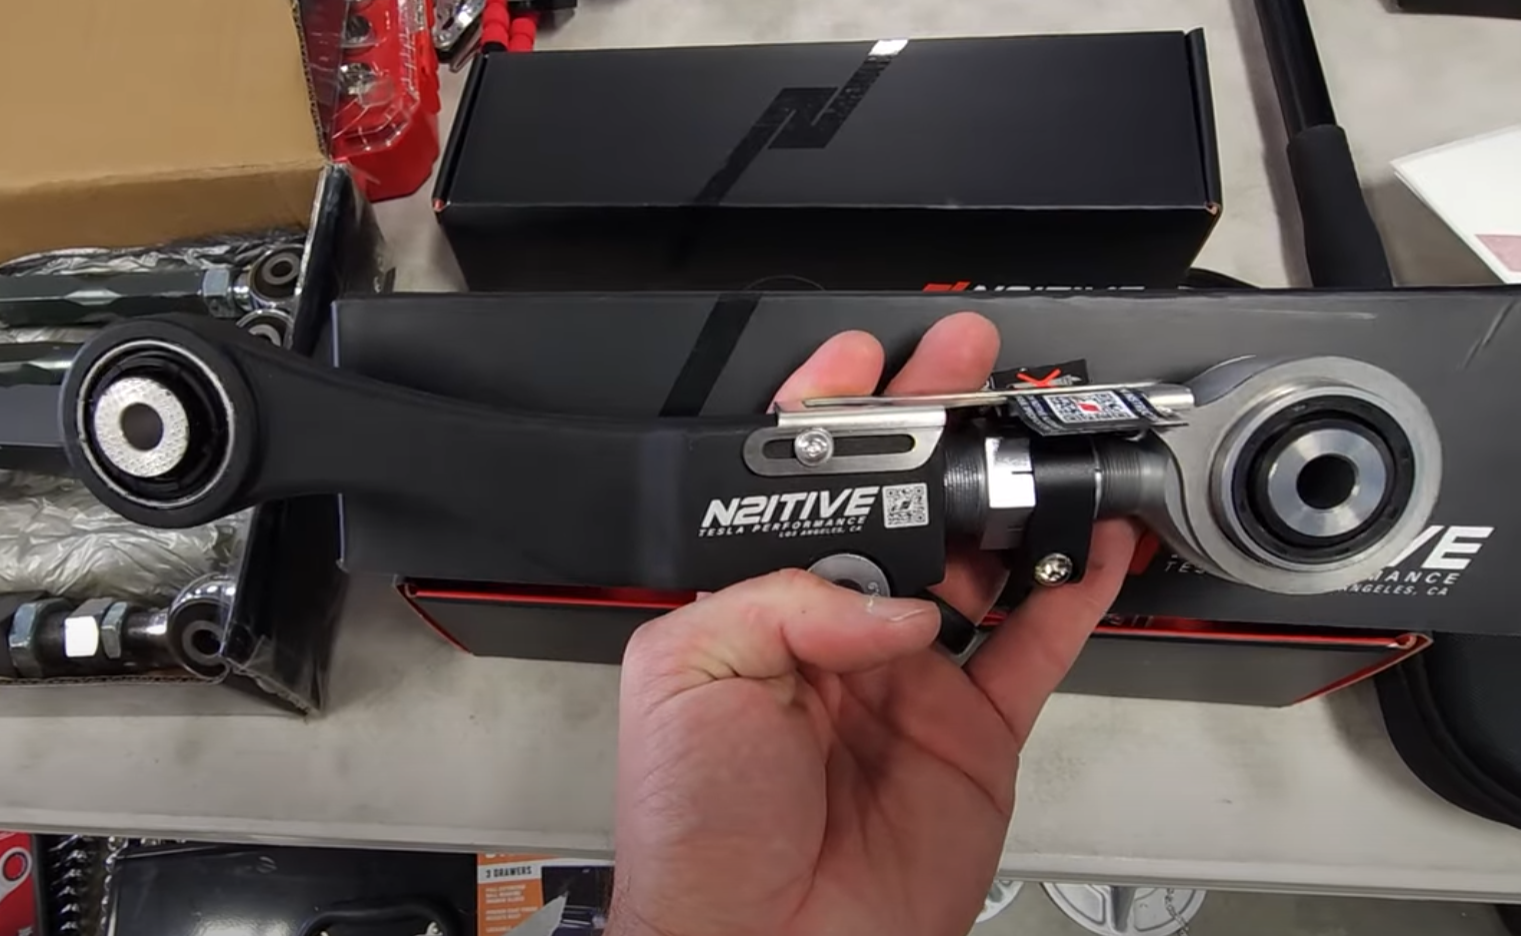
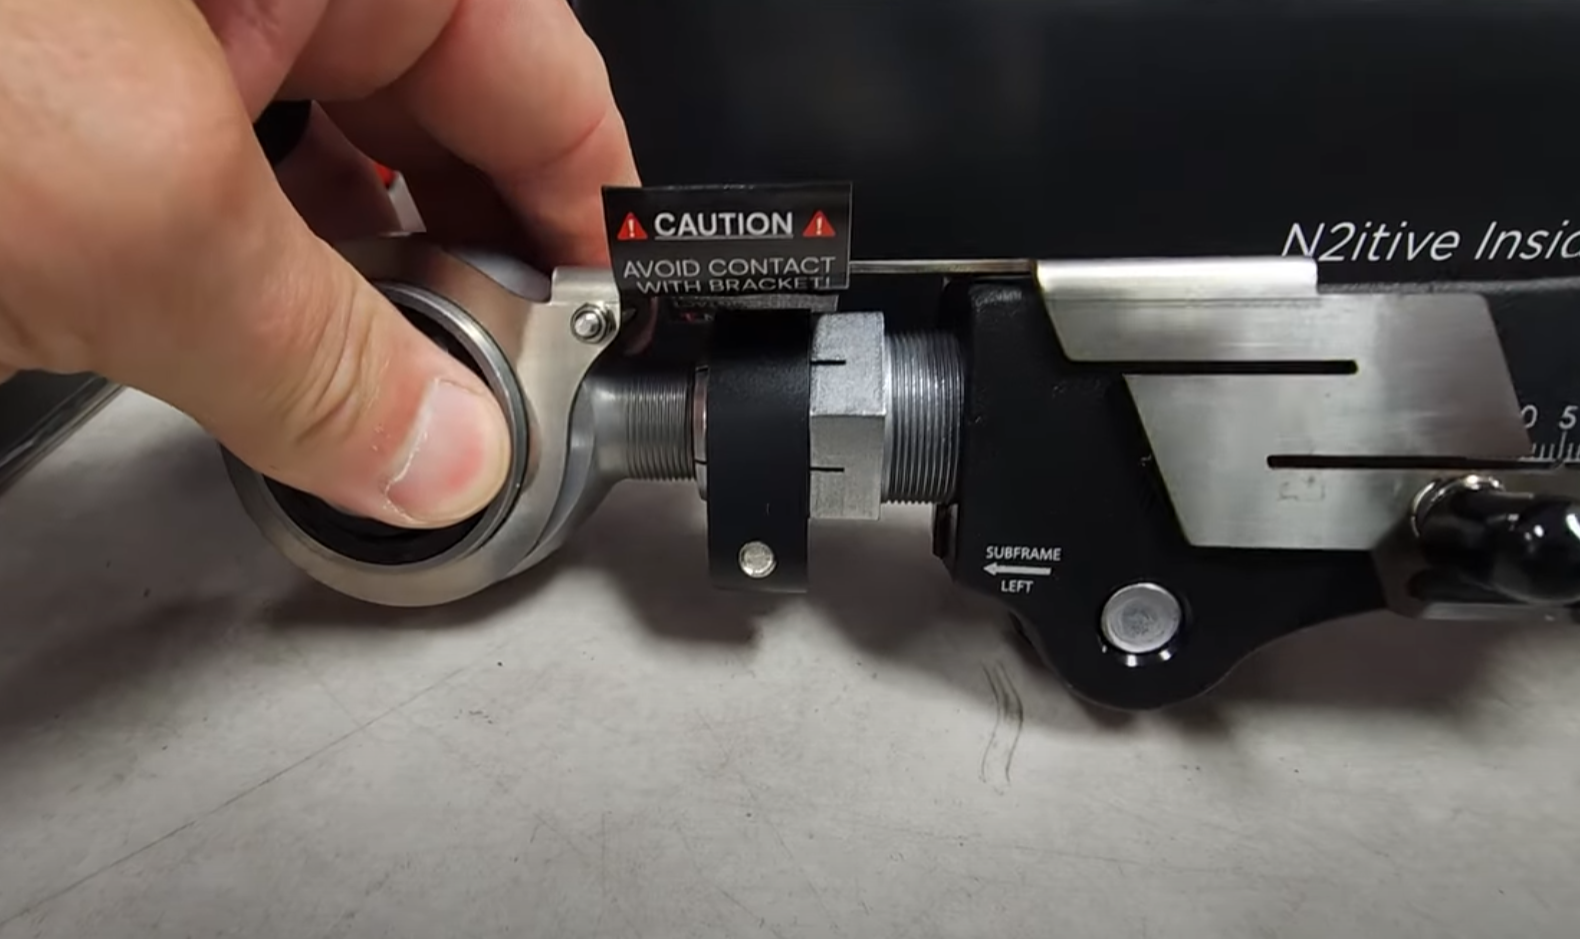
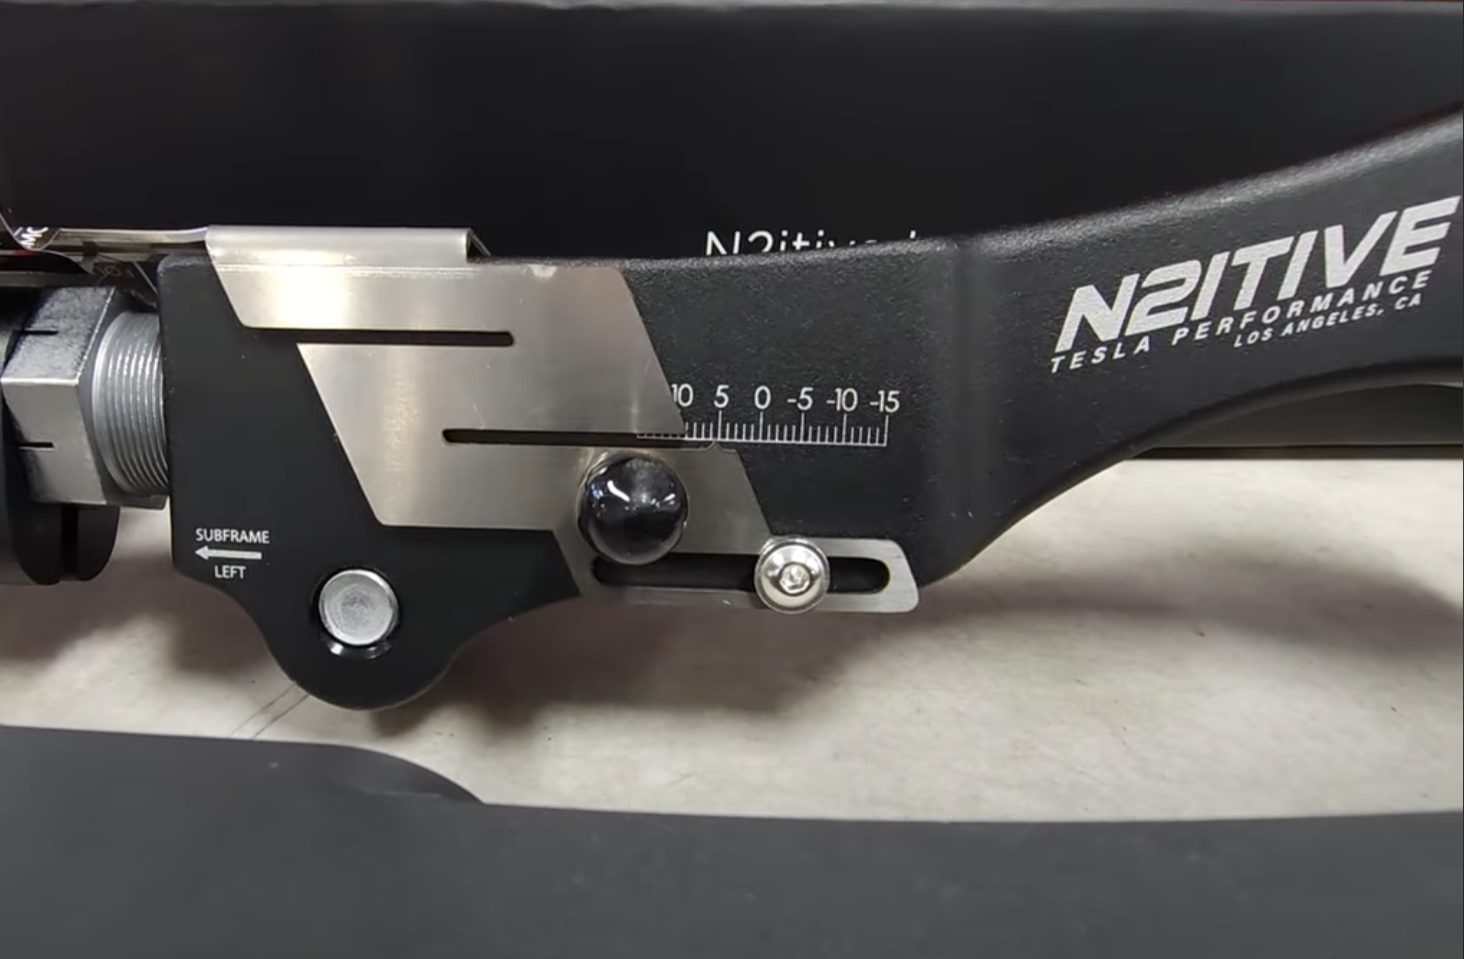
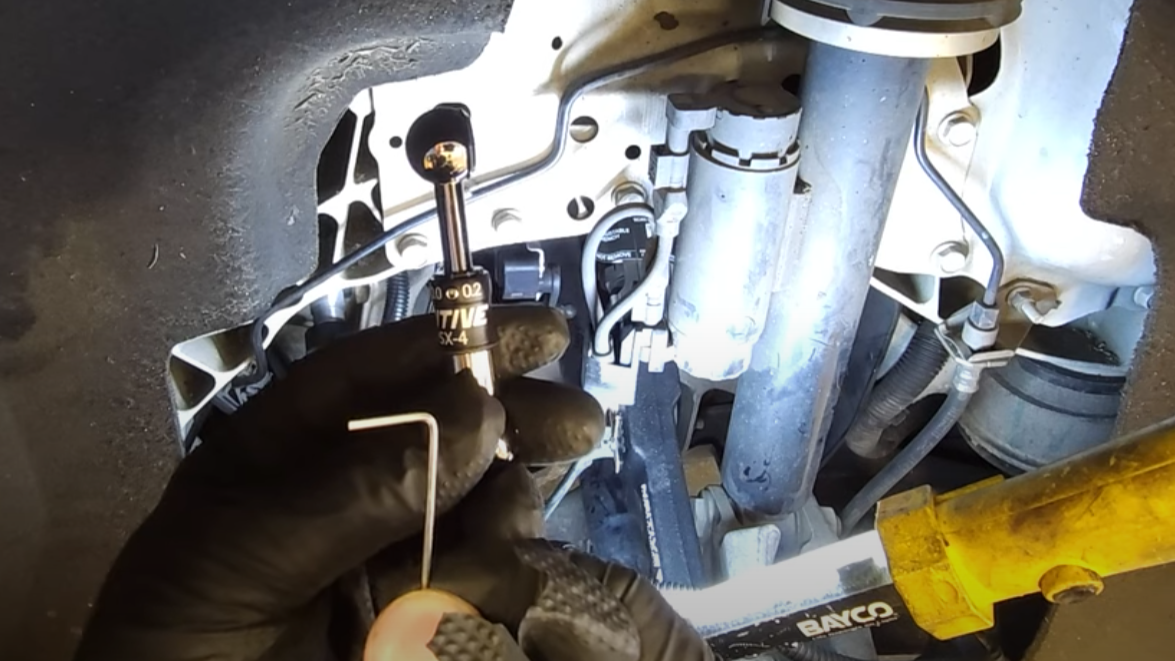
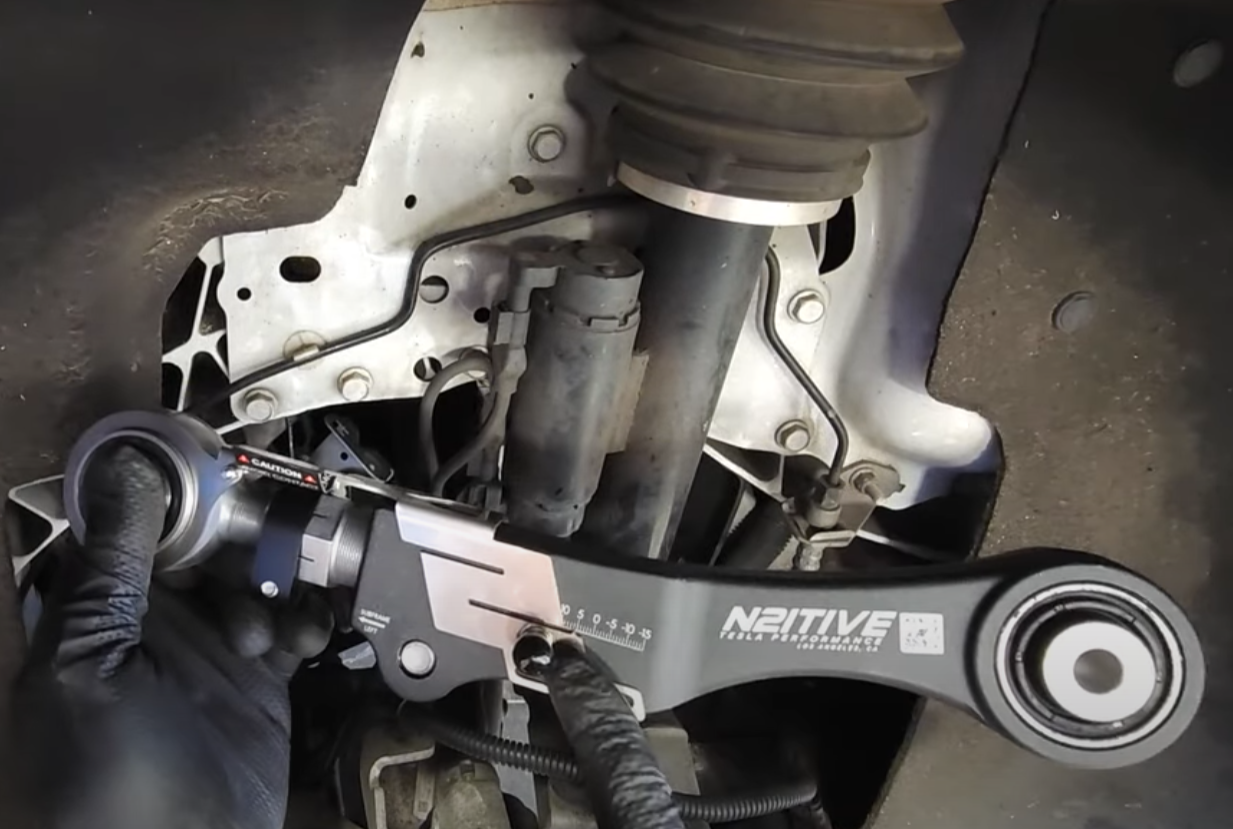
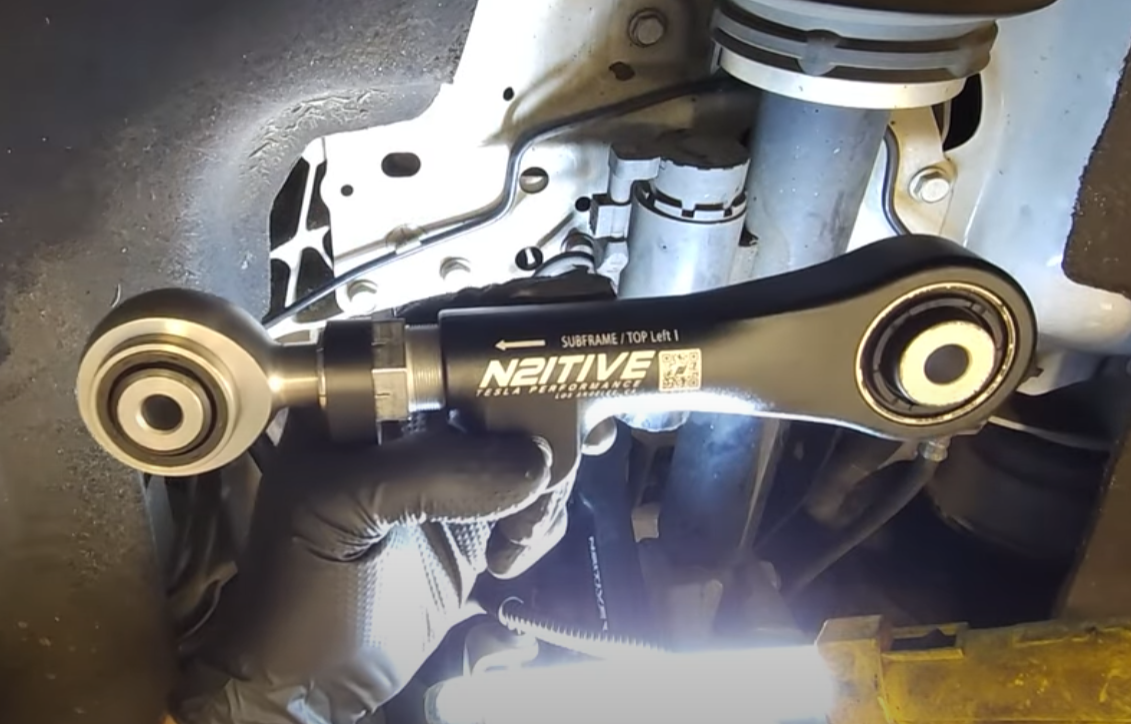
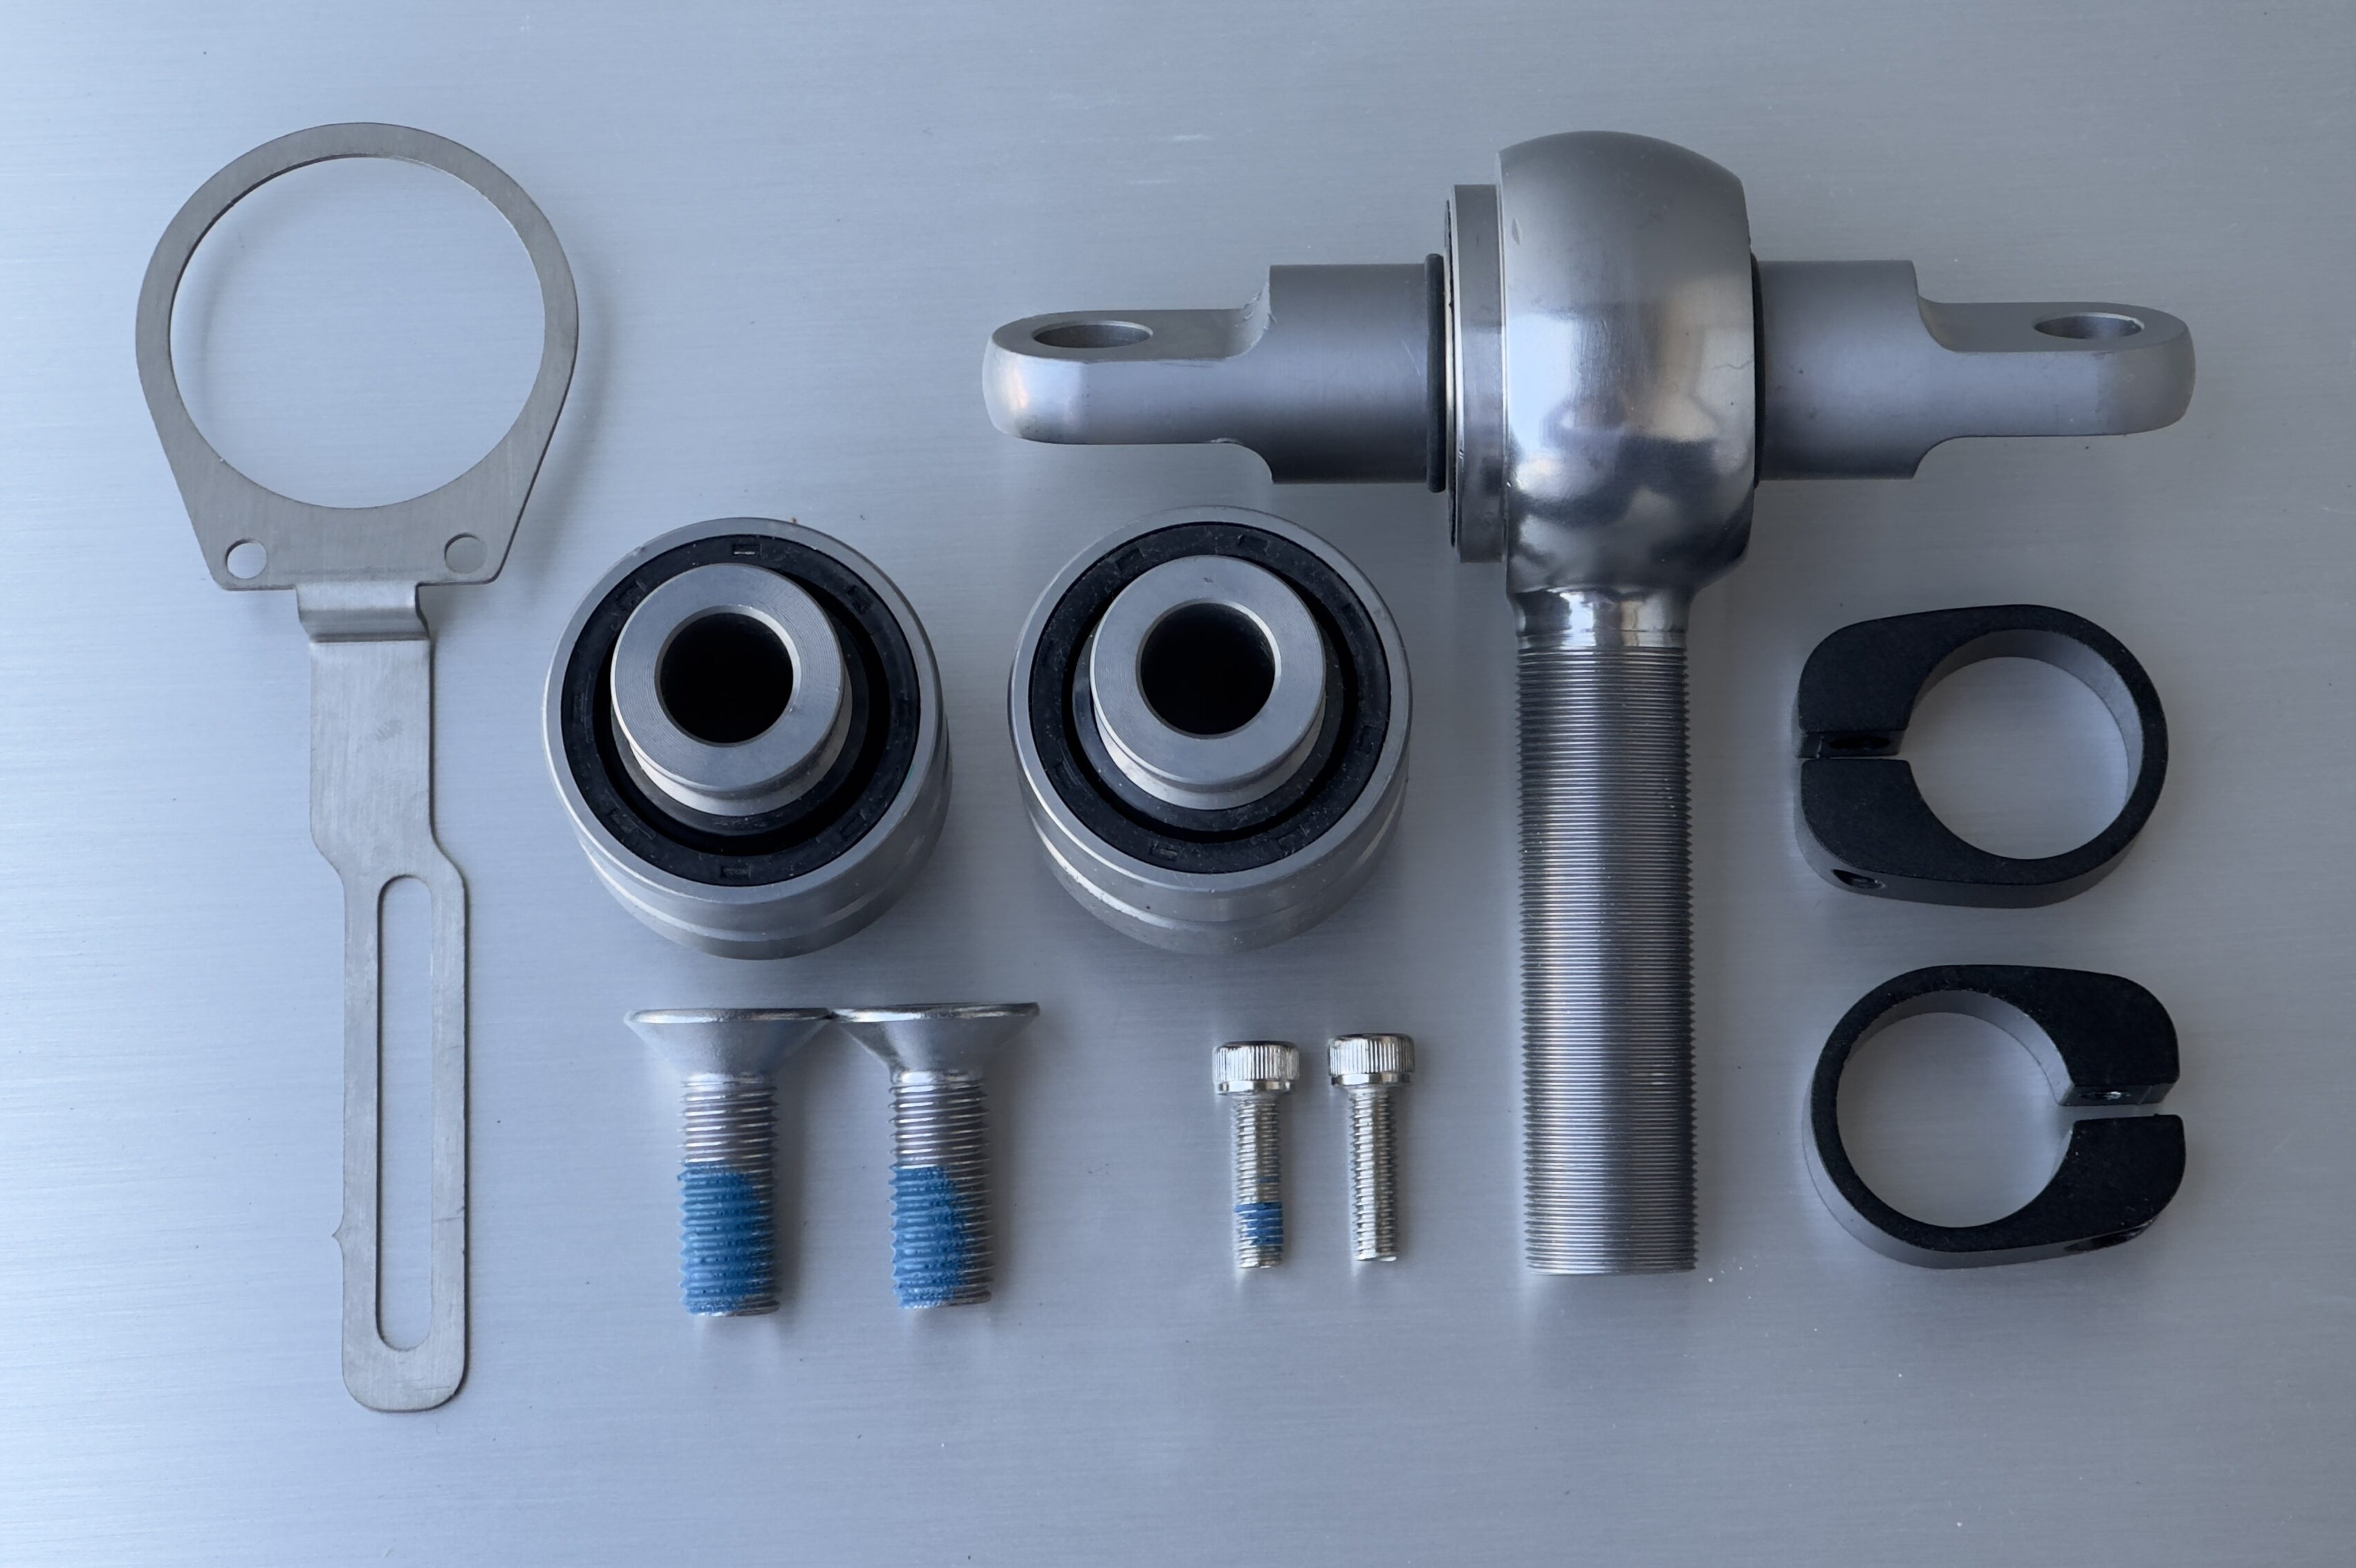
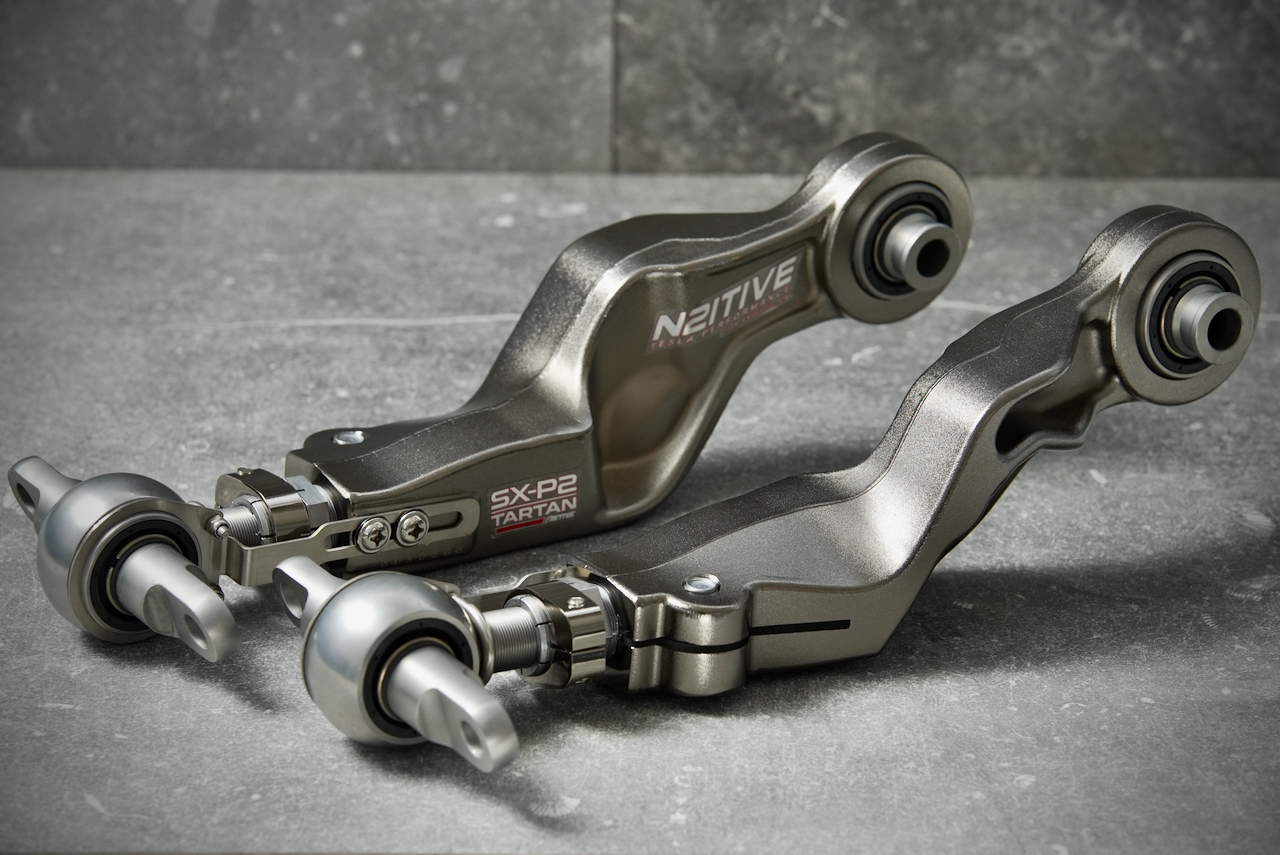
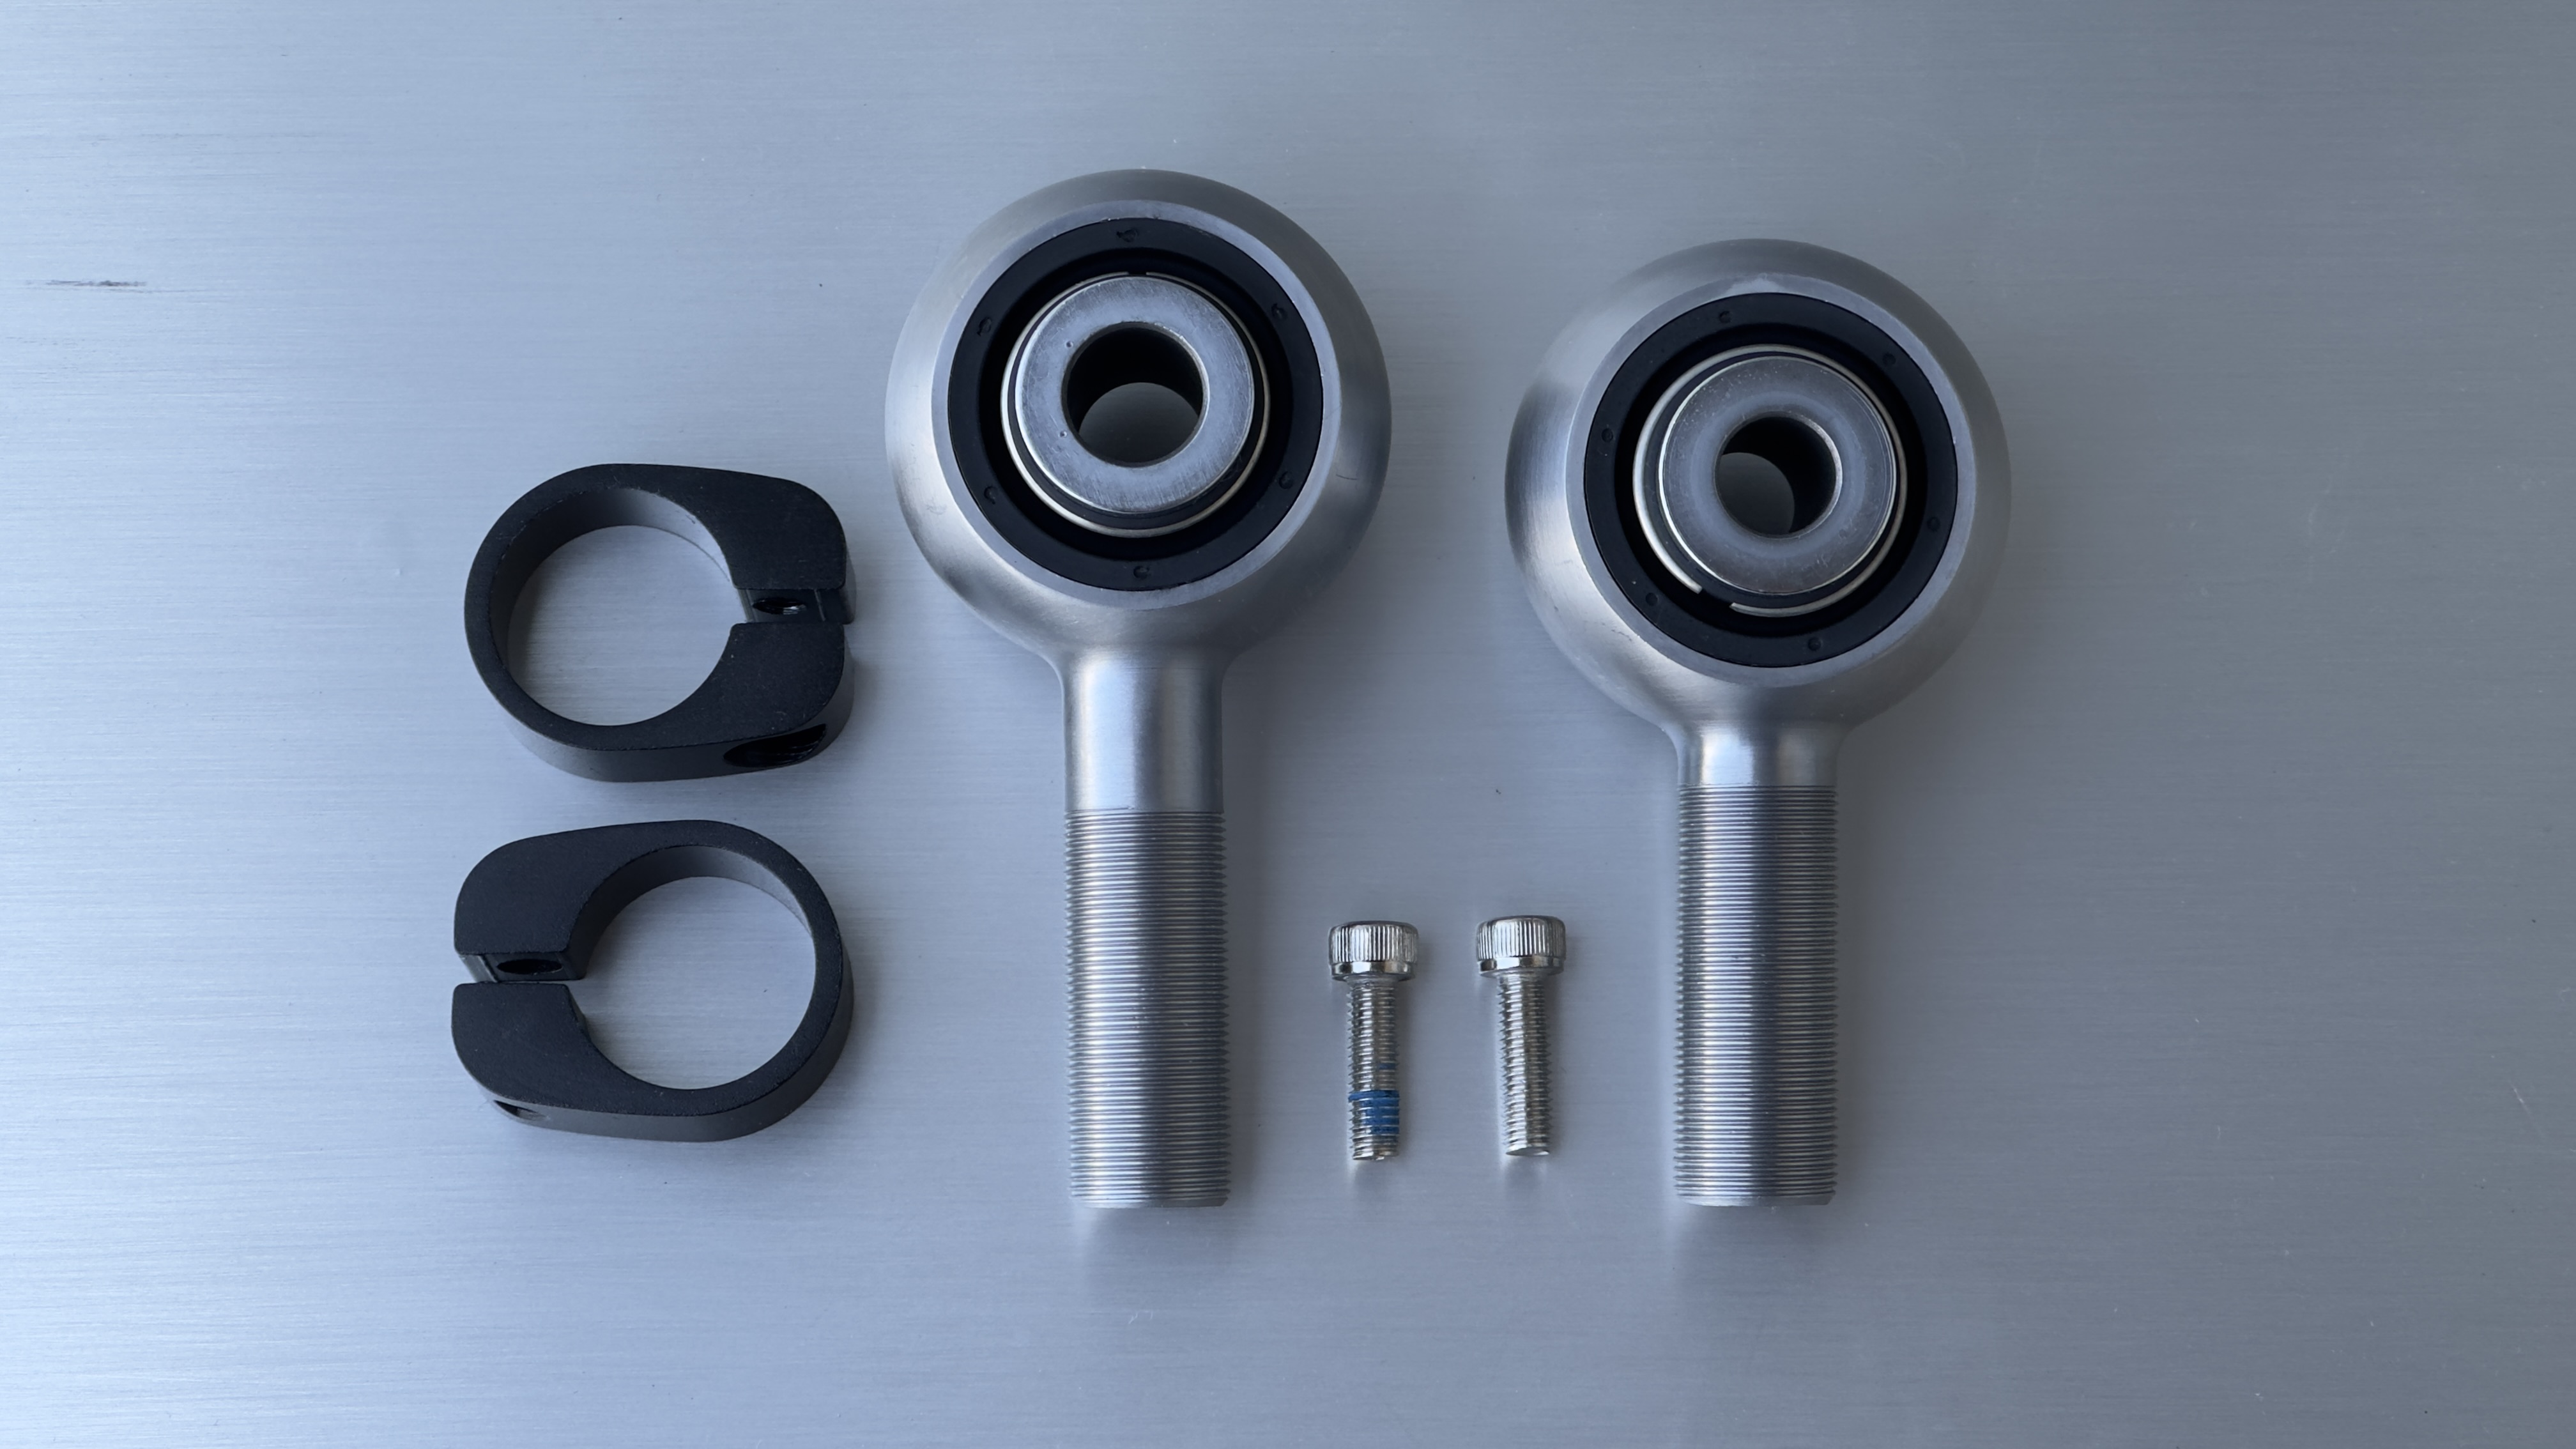
Our Alignment Kit 1 for the Tesla Model S/X includes 3 main pieces for the 2012- 01/2021 models.  We start with a set of our RSX series ultra-precision lowering links, which allow you to easily and precisely lower your Tesla to help level the angle of the half shaft and reduce binding.  We recommend setting them to the -4 setting for half shaft protection, but our links are able to adjust down to -20 for those who are chasing the look.  You may notice a drop in ride quality past the -6 setting, and only a slight drop in height is required to reduce wear on your half-shafts.  Also in the kit are our new SX-2 and TSX-2 adjustable camber and toe arms.  Both of these arms are installed in place of your current rear control arms to allow you to set a perfect alignment.

Our Kits come in three variations, fabricated primarily of a forged and heat treated high grade aluminum and anodized in the matte red, natural, and black finishes for great corrosion resistance.  The red and natural versions come with a 3-year warranty, while the black version comes with lifetime warranty.  The lifetime warranty version also comes with our new patent pending multi-alignment recall scale, allowing the user to preset multiple alignments and then recall them without the need to revisit an alignment shop.  These are both firsts in the automotive world and quite helpful for those who like to race their cars on the weekends.  With our multi-alignment kit installed, you can set alignment for the track, drag strip, and the street at any time.

Why Choose N2ITIVE

At N2ITIVE we give you the highest quality parts and craftsmanship at a reasonable price. Everything we create is meticulously thought-out, precision engineered and tested in both FEA and the real world!  All of our components are custom made, nothing off the shelf.  Our bushings for example are made in a dedicated factor with high strength steel that’s been electroless nickel plated for amazing wear and corrosion resistance.  Each bushing incorporates a Teflon infused Delrin liner for a lifetime of trouble-free, maintenance-free use.  You can count on us to only give you the best with our parts, backed with a hassle-free warranty to the original purchaser. Our products are the strongest, safest and most durable aftermarket Tesla parts you can buy, guaranteed!  Not to mention that they look incredible…
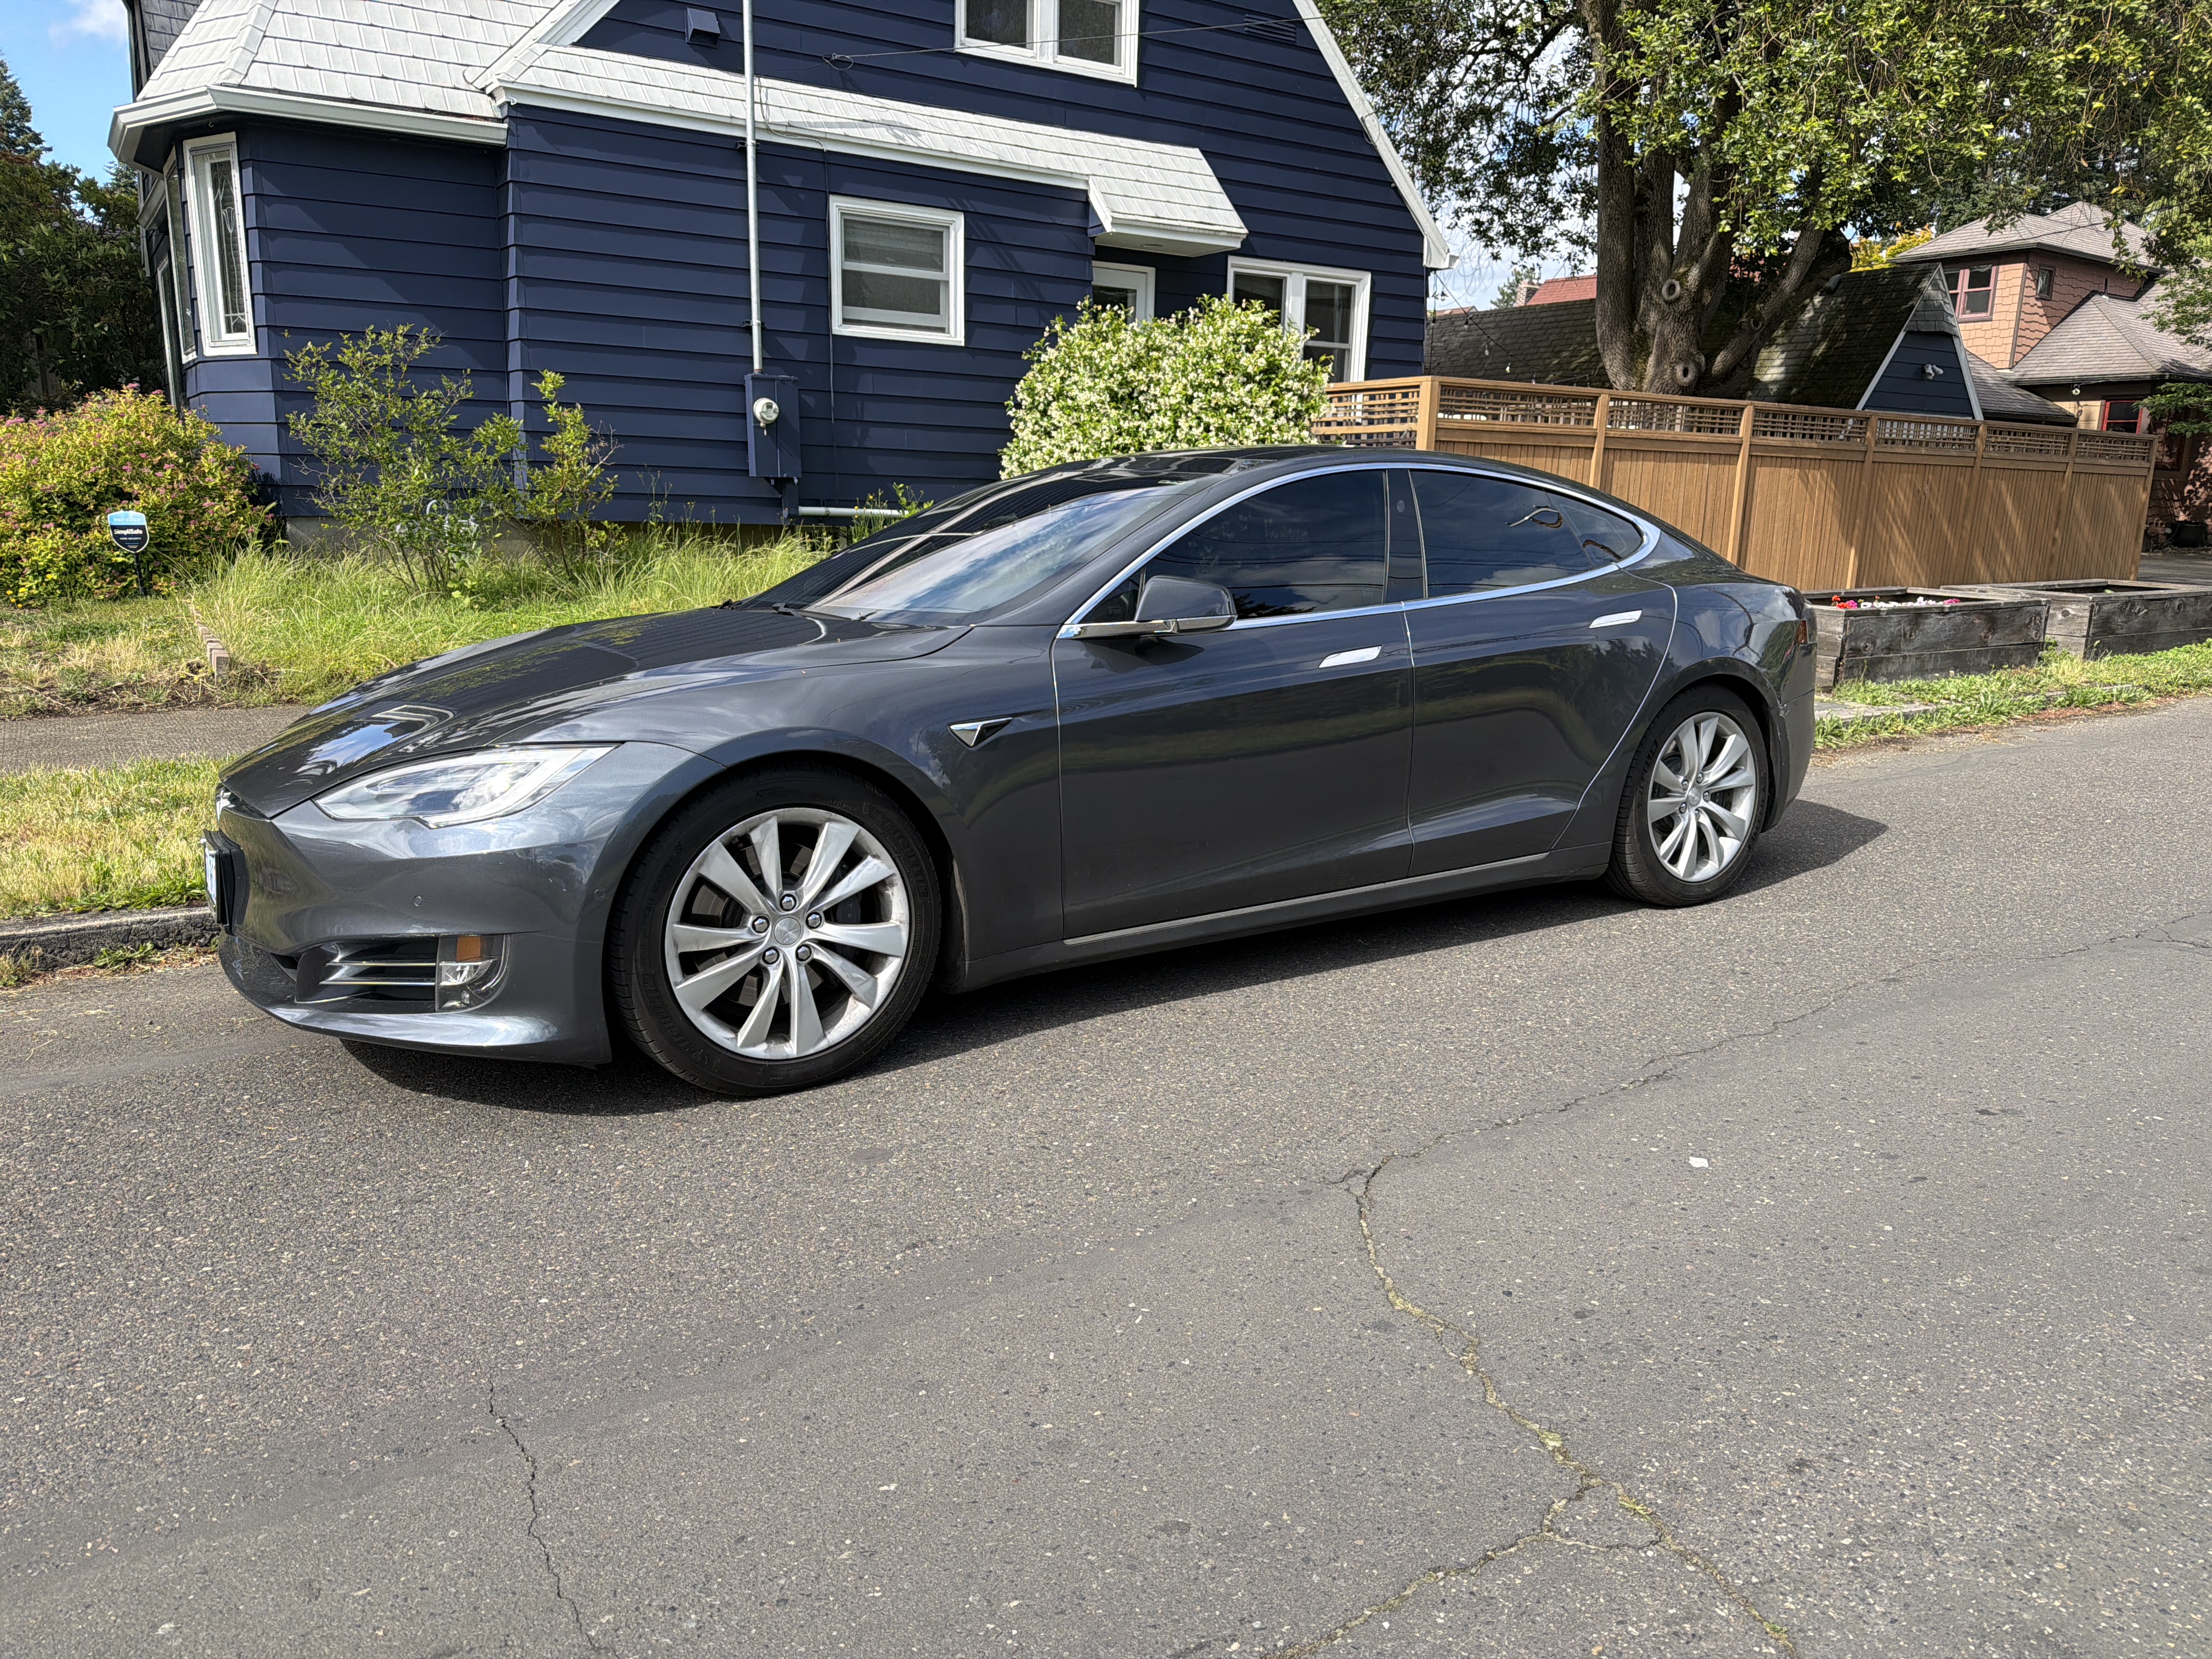
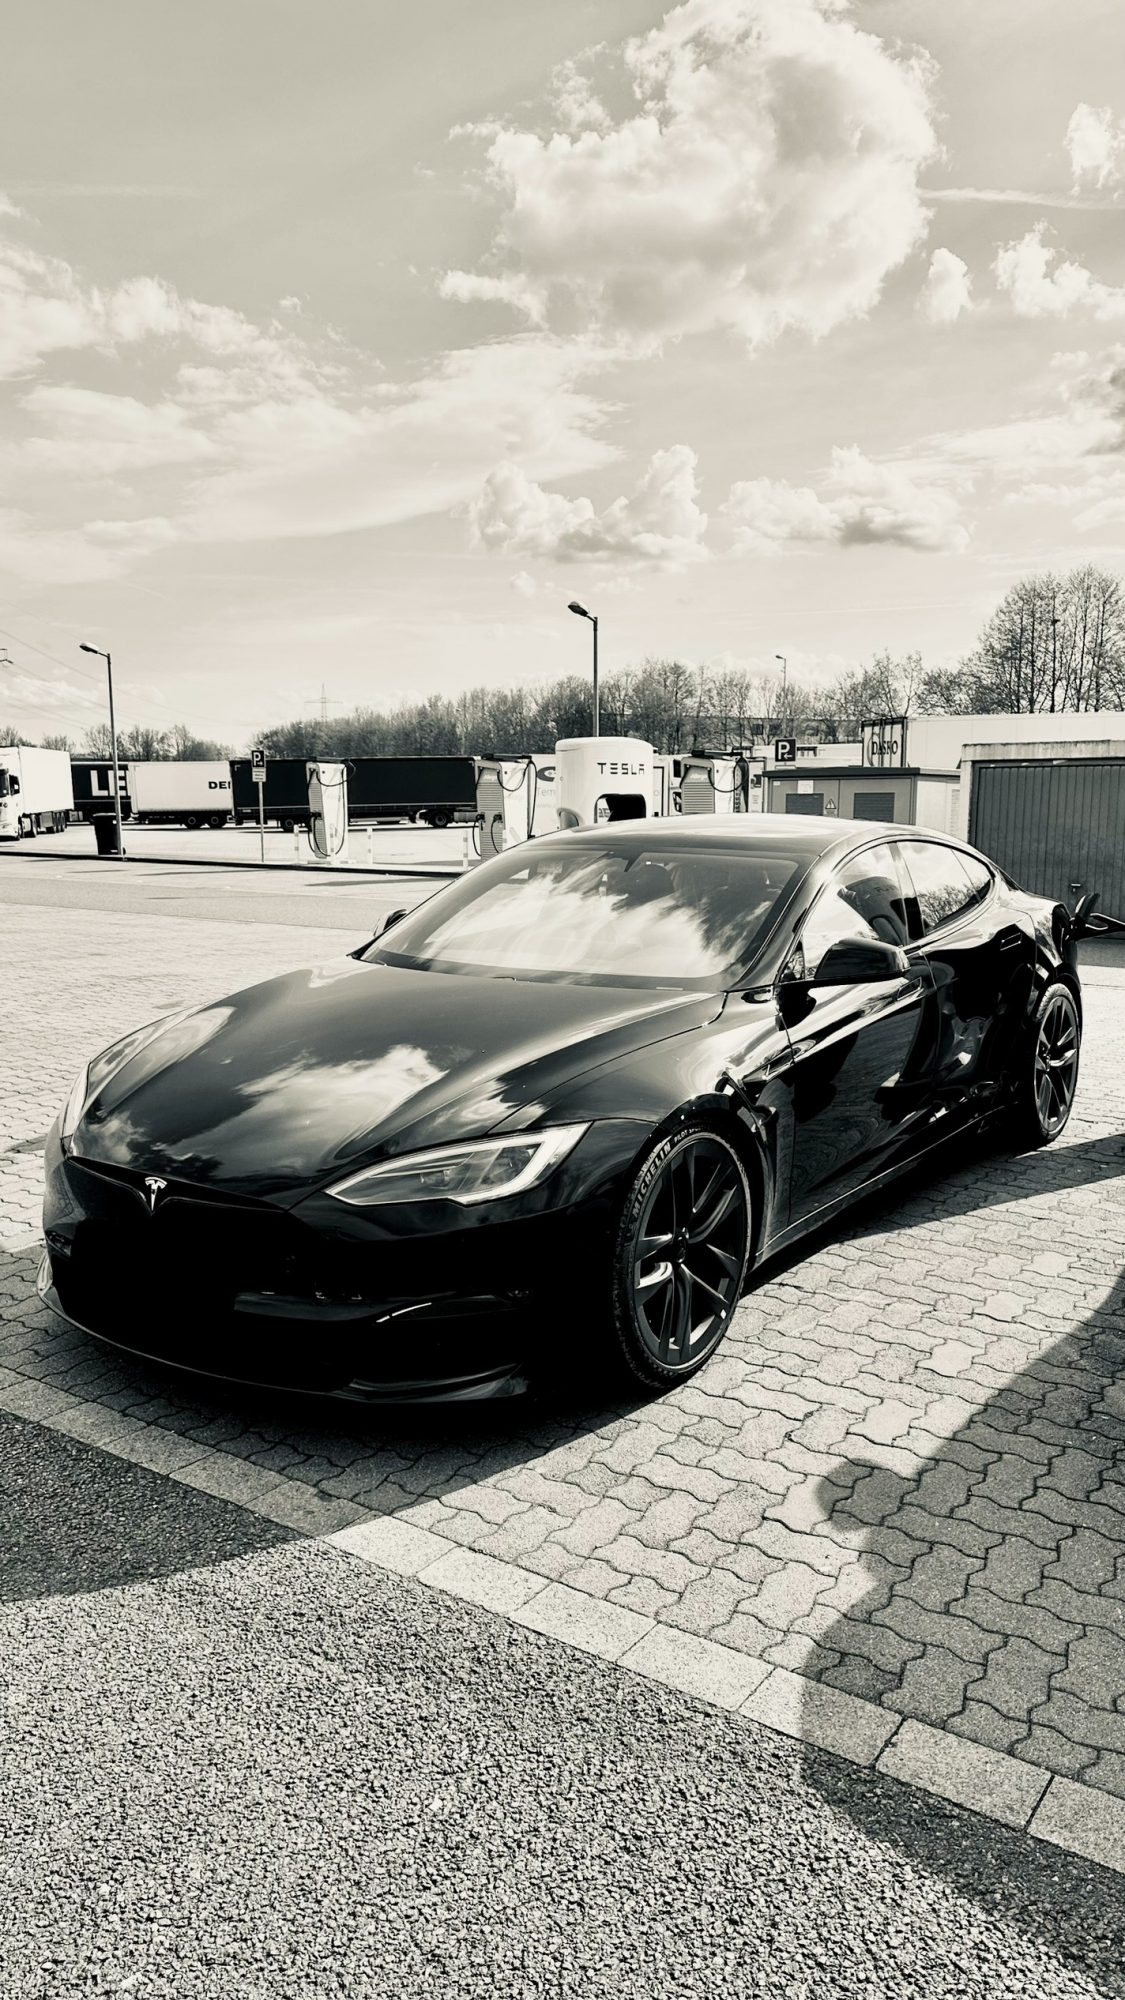
Installation

INSTALLATION INSTRUCTIONS: SX-2

Estimated Labor: 1-2 hours
Parts and Tools Necessary:
-15mm, 18mm, 21mm wrenches and sockets
-T30 Torx bit
-8mm Allen key
-Screwdriver or other small prying device
-Torque Wrench
-Nylon lock nut (Part #2007076, Tesla recommendation)

BEFORE INSTALL:
-If the vehicle is equipped with air suspension, activate “Jack Mode” through the touchscreen before lifting the vehicle. The air suspension will attempt to self-level otherwise, which may cause serious damage, bodily injury, or death.
-Make yourself familiar with the proper way to jack and lift your Tesla before attempting installation.

REMOVAL:
1. Jack the vehicle up from the appropriate lift areas, as shown below. Using lift pads between the jack and the vehicle’s frame is highly recommended in order to avoid damaging the vehicle.
2. Loosen the lug nuts (21mm) and remove the wheel.
* Take note of the position that the sensor link sits at. The link must be re-installed in the same position, as the vehicle may not read the ride height correctly otherwise.
3. Pry off the short sensor link from the ball attached to the original camber arm. This can be done with a large flat head screwdriver or small pry bar, gently using the original camber arm as a fulcrum point. Always exercise caution when dealing with the links, as they have many points of failure.
4. Remove the bolt that connects the camber arm to the knuckle (15mm).
5. Remove the nut and bolt that connect the camber arm to the subframe (18mm).
6. Remove the camber arm from the vehicle. If you are having trouble removing the camber arms, rocking the knuckle/hub may aid in loosening and removing the arm.

INSTALLATION:
1. Verify that the arm being installed is correct, as the SX-2 is mirrored for the driver and passenger sides. The SX-2 should be around the same length of your stock arm, which can be verified by passing a bolt through both bushings. The rod-end bushing is to be installed on the subframe side, and the ball stud for the sensor link should be facing forward.
2. Realign and hand-tighten the nuts and bolts in their original positions. DO NOT torque the nuts or bolts at this stage. Note that aligning the hub side first will result in an easier install.
3. Preload the suspension before torquing down the bolts. This can be done by jacking the knuckle up until the suspension is fully loaded. The car itself should feel like it is about to lift and the hub should be positioned as if the car was sitting on the floor. This step is critical in ensuring the bushings are correctly positioned when you drive the car.
4. Once preloaded, torque the bolts down to their appropriate settings. The bolt towards the subframe should be torqued to 96 ft/lbs (130Nm), and the knuckle side to 103 ft/lbs (140Nm).
5. If installing back original links, apply a small amount of white lithium or other appropriate automotive grease in the socket. Carefully press the link back onto the camber arm. N2itive RSX-3 links come pre-greased so there would be no need to apply extra grease if installing them.
6. Remount the wheels back on the vehicle and torque down the lug nuts to 129 ft/lbs (175 Nm). Make sure to remove all jack stands and tools from under the vehicle before you let it down.

ADJUSTMENT:
-Adjustment of the SX-2 is to be made using the 30mm wrench provided along with the arms. Other wrenches will likely be too large and damage the bracket, which may result in an inaccurate reading on the engraved scale.
-Loosen the T30 Torx bolt on the black collar as well as the 8mm allen bolt on the body of the arm. Both of these bolts must be loose for adjustment to be made.
-Tighten or rotate the adjuster clockwise in order to increase negative camber. Loosening or rotating the adjuster counter-clockwise will reduce negative camber.
-Once you are done adjusting, torque the 8mm and T30 bolts to spec. The 8mm allen should be tightened to 24 ft/lbs or 32.5 Nm, and the T30 Torx to 8 ft/lbs or 11 Nm. Make sure the collar with the T30 is aligned with the rod end to avoid damage while driving.

INSTALLATION INSTRUCTIONS: TSX-2

Estimated Labor: 1-2 hours
Parts and Tools Necessary:
-18mm, 19mm, 21mm wrenches and sockets
-T30 Torx bit
-8mm Allen key
-Torque Wrench
– Nylon Lock Nut (Part #2007063-00-B, Tesla recommendation)
*Electric saw (may not be necessary depending on model)

BEFORE INSTALL:
-If the vehicle is equipped with air suspension, activate “Jack Mode” through the touchscreen before lifting the vehicle. The air suspension will attempt to self-level otherwise, which may cause serious damage, bodily injury, or death.
-Make yourself familiar with the proper way to jack and lift your Tesla before attempting installation.

REMOVAL:
1. Jack the vehicle up from the appropriate lift areas, as shown below. Using lift pads between the jack and the vehicle’s frame is highly recommended in order to avoid damaging the vehicle.
2. Loosen the lug nuts (21mm) and remove the wheel.
3. Release the clip that holds the electronic parking brake harness to the toe arm.
4. Remove the bolt that connects the toe arm to the knuckle (18mm).
5. Remove the eccentric bolt that connects the toe arm to the subframe (18mm nut side, 19mm bolt side).
* Some models may not be able to remove the eccentric bolt on the subframe without dropping the subframe for clearance. If you are unable to remove the bolt by moving the toe arm upward with the washer removed, then proceed to the next step.
6. Rather than dropping the subframe, we recommend that you cut the end of the bolt instead. Use vise grips to prevent the bolt from rotating and carefully saw off the head on the other side. Use caution to not damage the adjacent brake line, and now you should be able to safely remove the arm from the vehicle.

INSTALLATION:
1. Verify that the arm being installed is correct, as the TSX-2 is mirrored for the driver and passenger sides. The TSX-2 should be around the same length of your stock arm, which can be verified by passing a bolt through both bushings. The rod-end bushing is to be installed on the subframe side, and the adjustment allen bolt should be facing towards the rear of the vehicle.
2. Fit the rod-end bushing between the subframe clevis first and begin reassembly using the provided hardware. The square washers, bolts, and nuts will replace the factory eccentric setup. Make sure that the bolt is inserted from the front of the vehicle, opposing the subframe and the original setup.
2. After fitting the toe arm back into the knuckle side, realign and hand-tighten the nuts and bolts in their original positions. DO NOT torque the nuts or bolts at this stage.
3. Preload the suspension before torquing down the bolts. This can be done by jacking the knuckle up until the suspension is fully loaded. The car itself should feel like it is about to lift and the hub should be positioned as if the car was sitting on the floor. This step is critical in ensuring the bushings are correctly positioned when you drive the car.
4. Once preloaded, torque the bolts down to their appropriate settings. The bolt towards the subframe should be torqued to 59 ft/lbs (80 Nm), and the knuckle side should be torqued to 96 ft/lbs (130 Nm).
5. Reattach the electronic parking brake harness to the side of the TSX-2 using the provided zip tie. Attaching the harness to the top may result in harness damage if the air shock bottoms out.
6. Remount the wheels back on the vehicle and torque down the lug nuts to 129 ft/lbs (175 Nm). Make sure to remove all jack stands and tools from under the vehicle before you let it down.

ADJUSTMENT:
-Adjustment of the TSX-2 is to be made using a 30mm or crescent wrench via the adjustor below the clamp.
-Loosen the T30 Torx bolt on the black collar as well as the 8mm allen bolt on the body of the arm. Both of these bolts must be loose for adjustment to be made.
-Tighten or rotate the adjuster clockwise in order to increase negative camber. Loosening or rotating the adjuster counter-clockwise will reduce negative camber.
-Once you are done adjusting, torque the 8mm and T30 bolts to spec. The 8mm allen should be tightened to 24 ft/lbs or 32.5 Nm, and the T30 Torx to 8 ft/lbs or 11 Nm. Make sure the collar with the T30 is aligned with the rod end to avoid damage while driving.

INSTALLATION INSTRUCTIONS: RSX-3

Estimated Labor: 0.5-1 hour(s)
Parts and Tools Necessary:
-21mm wrench and socket
-1.5mm allen key (included)
-Flat head screwdriver or other prying tool
-Channellocks (preferably taped to prevent damage)
-Torque Wrench
Recommended Settings: -4 mm on each lowering link

BEFORE INSTALL:
-If the vehicle is equipped with air suspension, activate “Jack Mode” through the touchscreen before lifting the vehicle. The air suspension will attempt to self-level otherwise, which may cause serious damage, bodily injury, or death.
-Make yourself familiar with the proper way to jack and lift your Tesla before attempting installation.
-For vehicles pre-refresh: the shorter 50mm links are to be installed in the front of the car, and the 70mm links in the rear. Keep note of how the links currently sit on the car, as this will be important for reassembly.

REAR REMOVAL/INSTALLATION:
1. Jack the vehicle up from the appropriate lift areas, as shown below. Using lift pads between the jack and the vehicle’s frame is highly recommended in order to avoid damaging the vehicle.
2. Loosen the lug nuts (21mm) and remove the rear wheel.
* Before removal of the lowering links, take pictures of the links as reference for reassembly. Improper positioning of the links will lead to error codes when you finish the install.
3. Pry off the sensor link from the ball attached to the camber arm. This can be done with a large flat head screwdriver or small pry bar, gently using the original camber arm as a fulcrum point. Always exercise caution when dealing with the links, as they have many points of failure.
4. Once one side is free, you may peel the link back until it pops off of the green arm attached to the ride height sensor. Again, use caution as the plastic can be brittle on the sensor side.
5. Using either your fingers or a channellock, press the N2itive lowering links back onto the studs. If using channellocks, it is advised to put a layer of cloth or tape between the link and the channellock to avoid damage on the finish.
* For customers with the RSX-2 links, please re-grease the links annually to ensure that there is adequate lubrication. Failure to do so may result in seized links, which may break off and cause errors in the suspension system.
6. Remount the wheels back on the vehicle and torque down the lug nuts to 129 ft/lbs (175 Nm). Make sure to remove all jack stands and tools from under the vehicle before you let it down.

FRONT REMOVAL/INSTALLATION:
1. Raise the air suspension to the “Very High” setting and activate “Jack Mode” through the vehicle’s screen. Some refreshed models may find the process easier with the wheel off.
2. Pry off the short sensor link from the ball attached to the camber arm. This can be done with a large flat head screwdriver or small pry bar, gently using the original camber arm as a fulcrum point. Use extreme caution in the front, as the arm and stud attachment are made of plastic.
3. Once one side is free, you may peel the link back until it pops off of the green arm attached to the ride height sensor. Again, use caution as the plastic can be brittle on the sensor side.
4. Some older models may require the fender liner to be trimmed. Test the range of motion that the green arm has, and if it seems to get stuck in the liner, trim accordingly to fit the longer links on the car. Please use caution to not cut the wiring behind the liner.
4. Using either your fingers or a channellock, press the N2itive lowering links back onto the studs. If using channellocks, it is advised to put a layer of cloth or tape between the link and the channellock to avoid damage on the finish.

ADJUSTMENT:
-Adjustment of the RSX-3 is to be made using the 1.5mm allen key as provided alongside the links.
-Loosen the allen screw one rotation to allow the neck to move freely. Tighten or rotate the link clockwise to lengthen the link, thus lowering the car. Loosening or rotating the link counter-clockwise will shorten the link and raise the car.
-Once you are done adjusting, tighten the set screw until it is snug. Do not overtorque the set screw, as it may strip or damage the neck.
-Adjustments can be made while the links are on or off the vehicle. We recommend you figure your preferred ride height before getting an alignment.

Reviews

Additional information
Your email address will not be published. Required fields are marked *
Add a review

Your email address will not be published. Required fields are marked *

30 reviews for Alignment Kit 1 For Tesla Model S/X Pre-Refresh (02/2012- 01/2021)

Customer Images

Image #1 from Tory Hornsby
Image #2 from Tory Hornsby
Image #3 from Tory Hornsby
Image #4 from Tory Hornsby
Image #5 from Tory Hornsby
Image #6 from Tory Hornsby
Image #7 from Tory Hornsby
Image #8 from Tory Hornsby
Image #1 from Philipp Krone
Image #2 from Philipp Krone
Image #1 from Tory Hornsby

Tory Hornsby

My 2020 Model X Performance wore out the inside edge of my rear tires at an alarming rate due to negative camber. I got tired of wasting money replacing tires that still had 60% tread left, but was showing thread/steel on the inner edge, so I ordered adjustable camber arms from another company only to have the bushings quickly fail. My research brought me to N2itive, and I installed their Alignment Kit and Lowering Links. The quality of their components and the adjustability are impressive, and I couldn't be happier with them. Not only did it solve my negative camber tire-wear issue, the shuddering I sometimes felt when accelerating in Ludicrous mode is gone, and it just seems to drive better. Check out my install video: https://youtu.be/32iYH0HZvgI Tory Hornsby Tesla Tips & Tricks - Group Admin

(1) (0)
Image #2 from Tory Hornsby

Tory Hornsby

My 2020 Model X Performance wore out the inside edge of my rear tires at an alarming rate due to negative camber. I got tired of wasting money replacing tires that still had 60% tread left, but was showing thread/steel on the inner edge, so I ordered adjustable camber arms from another company only to have the bushings quickly fail. My research brought me to N2itive, and I installed their Alignment Kit and Lowering Links. The quality of their components and the adjustability are impressive, and I couldn't be happier with them. Not only did it solve my negative camber tire-wear issue, the shuddering I sometimes felt when accelerating in Ludicrous mode is gone, and it just seems to drive better. Check out my install video: https://youtu.be/32iYH0HZvgI Tory Hornsby Tesla Tips & Tricks - Group Admin

(1) (0)
Image #3 from Tory Hornsby

Tory Hornsby

My 2020 Model X Performance wore out the inside edge of my rear tires at an alarming rate due to negative camber. I got tired of wasting money replacing tires that still had 60% tread left, but was showing thread/steel on the inner edge, so I ordered adjustable camber arms from another company only to have the bushings quickly fail. My research brought me to N2itive, and I installed their Alignment Kit and Lowering Links. The quality of their components and the adjustability are impressive, and I couldn't be happier with them. Not only did it solve my negative camber tire-wear issue, the shuddering I sometimes felt when accelerating in Ludicrous mode is gone, and it just seems to drive better. Check out my install video: https://youtu.be/32iYH0HZvgI Tory Hornsby Tesla Tips & Tricks - Group Admin

(1) (0)
Image #4 from Tory Hornsby

Tory Hornsby

My 2020 Model X Performance wore out the inside edge of my rear tires at an alarming rate due to negative camber. I got tired of wasting money replacing tires that still had 60% tread left, but was showing thread/steel on the inner edge, so I ordered adjustable camber arms from another company only to have the bushings quickly fail. My research brought me to N2itive, and I installed their Alignment Kit and Lowering Links. The quality of their components and the adjustability are impressive, and I couldn't be happier with them. Not only did it solve my negative camber tire-wear issue, the shuddering I sometimes felt when accelerating in Ludicrous mode is gone, and it just seems to drive better. Check out my install video: https://youtu.be/32iYH0HZvgI Tory Hornsby Tesla Tips & Tricks - Group Admin

(1) (0)
Image #5 from Tory Hornsby

Tory Hornsby

My 2020 Model X Performance wore out the inside edge of my rear tires at an alarming rate due to negative camber. I got tired of wasting money replacing tires that still had 60% tread left, but was showing thread/steel on the inner edge, so I ordered adjustable camber arms from another company only to have the bushings quickly fail. My research brought me to N2itive, and I installed their Alignment Kit and Lowering Links. The quality of their components and the adjustability are impressive, and I couldn't be happier with them. Not only did it solve my negative camber tire-wear issue, the shuddering I sometimes felt when accelerating in Ludicrous mode is gone, and it just seems to drive better. Check out my install video: https://youtu.be/32iYH0HZvgI Tory Hornsby Tesla Tips & Tricks - Group Admin

(1) (0)
Image #6 from Tory Hornsby

Tory Hornsby

My 2020 Model X Performance wore out the inside edge of my rear tires at an alarming rate due to negative camber. I got tired of wasting money replacing tires that still had 60% tread left, but was showing thread/steel on the inner edge, so I ordered adjustable camber arms from another company only to have the bushings quickly fail. My research brought me to N2itive, and I installed their Alignment Kit and Lowering Links. The quality of their components and the adjustability are impressive, and I couldn't be happier with them. Not only did it solve my negative camber tire-wear issue, the shuddering I sometimes felt when accelerating in Ludicrous mode is gone, and it just seems to drive better. Check out my install video: https://youtu.be/32iYH0HZvgI Tory Hornsby Tesla Tips & Tricks - Group Admin

(1) (0)
Image #7 from Tory Hornsby

Tory Hornsby

My 2020 Model X Performance wore out the inside edge of my rear tires at an alarming rate due to negative camber. I got tired of wasting money replacing tires that still had 60% tread left, but was showing thread/steel on the inner edge, so I ordered adjustable camber arms from another company only to have the bushings quickly fail. My research brought me to N2itive, and I installed their Alignment Kit and Lowering Links. The quality of their components and the adjustability are impressive, and I couldn't be happier with them. Not only did it solve my negative camber tire-wear issue, the shuddering I sometimes felt when accelerating in Ludicrous mode is gone, and it just seems to drive better. Check out my install video: https://youtu.be/32iYH0HZvgI Tory Hornsby Tesla Tips & Tricks - Group Admin

(1) (0)
Image #8 from Tory Hornsby

Tory Hornsby

My 2020 Model X Performance wore out the inside edge of my rear tires at an alarming rate due to negative camber. I got tired of wasting money replacing tires that still had 60% tread left, but was showing thread/steel on the inner edge, so I ordered adjustable camber arms from another company only to have the bushings quickly fail. My research brought me to N2itive, and I installed their Alignment Kit and Lowering Links. The quality of their components and the adjustability are impressive, and I couldn't be happier with them. Not only did it solve my negative camber tire-wear issue, the shuddering I sometimes felt when accelerating in Ludicrous mode is gone, and it just seems to drive better. Check out my install video: https://youtu.be/32iYH0HZvgI Tory Hornsby Tesla Tips & Tricks - Group Admin

(1) (0)
Image #1 from Philipp Krone

Philipp Krone

The products I’ve been looking for. When you hold the camber arms in your hands you might think these parts are sent from godfather CNC. High quality look and fit. Concerning the lowering links (they sent me the newest V3) I can tell you this is precision stuff we are talking about. A lot of MS come with a big difference in height on every wheel and Tesla seems to have a high tolerance on this issue when delivering those MS. So was my Plaid but not any longer since the lowering links have been installed and every corner could be set to same level.

(2) (0)
Image #2 from Philipp Krone

Philipp Krone

The products I’ve been looking for. When you hold the camber arms in your hands you might think these parts are sent from godfather CNC. High quality look and fit. Concerning the lowering links (they sent me the newest V3) I can tell you this is precision stuff we are talking about. A lot of MS come with a big difference in height on every wheel and Tesla seems to have a high tolerance on this issue when delivering those MS. So was my Plaid but not any longer since the lowering links have been installed and every corner could be set to same level.

(2) (0)
Image #3 from Philipp Krone

Philipp Krone

The products I’ve been looking for. When you hold the camber arms in your hands you might think these parts are sent from godfather CNC. High quality look and fit. Concerning the lowering links (they sent me the newest V3) I can tell you this is precision stuff we are talking about. A lot of MS come with a big difference in height on every wheel and Tesla seems to have a high tolerance on this issue when delivering those MS. So was my Plaid but not any longer since the lowering links have been installed and every corner could be set to same level.

(2) (0)
Image #4 from Philipp Krone

Philipp Krone

The products I’ve been looking for. When you hold the camber arms in your hands you might think these parts are sent from godfather CNC. High quality look and fit. Concerning the lowering links (they sent me the newest V3) I can tell you this is precision stuff we are talking about. A lot of MS come with a big difference in height on every wheel and Tesla seems to have a high tolerance on this issue when delivering those MS. So was my Plaid but not any longer since the lowering links have been installed and every corner could be set to same level.

(2) (0)
Image #1 from Tory Hornsby
Image #2 from Tory Hornsby
Image #3 from Tory Hornsby
Image #4 from Tory Hornsby
Image #5 from Tory Hornsby
Image #6 from Tory Hornsby
Image #7 from Tory Hornsby
Image #8 from Tory Hornsby
Image #1 from Philipp Krone
Image #2 from Philipp Krone
Image #3 from Philipp Krone
Image #4 from Philipp Krone
4.9 Rating
1-5 of 30 reviews
  1. Review left

    My 2020 Model X Performance wore out the inside edge of my rear tires at an alarming rate due to negative camber. I got tired of wasting money replacing tires that still had 60% tread left, but was showing thread/steel on the inner edge, so I ordered adjustable camber arms from another company only to have the bushings quickly fail. My research brought me to N2itive, and I installed their Alignment Kit and Lowering Links. The quality of their components and the adjustability are impressive, and I couldn’t be happier with them. Not only did it solve my negative camber tire-wear issue, the shuddering I sometimes felt when accelerating in Ludicrous mode is gone, and it just seems to drive better. Check out my install video: https://youtu.be/32iYH0HZvgI

    Tory Hornsby
    Tesla Tips & Tricks – Group Admin

    Image #1 from Tory Hornsby
    Image #2 from Tory Hornsby
    Image #3 from Tory Hornsby
    Image #4 from Tory Hornsby
    Image #5 from Tory Hornsby
    Image #6 from Tory Hornsby
    Image #7 from Tory Hornsby
    Image #8 from Tory Hornsby
    (1) (0)
  2. Review left

    N2tive arms (toe and camber) for my 2016 Model X are what I installed. Quality is super and the range for adjustment is far more than normally is needed.
    Adjustment is also easy. I also installed lowering links and my car now moves so smoothly.

    (0) (0)
  3. Review left

    Can whole heartedly endorse the n2itive solution for any Tesla with shuddering or tire wear issues. Don is no joke, he takes his solution very seriously and delivers iwith expertise, commitment and passion. It has been about 2 years since implementing the solution and the inner tire wear problem is gone.

    (1) (0)
  4. Review left

    I bought the kit 1 that comes with the toe and Camber rear arms as well as the lowering links. Install was fairly easy with basic wrenches and torque wrench. They have a youtube video that takes you step by step through the whole process. I used -10 settings all around with 245 45 19 tires. No rubbing on lowest settings. You will however scrape speed bumps if you drive too fast, setting it to medium seems to clear speed bumps easily if you have air suspension in your Model S. My car is the 2016 Model S P100D. Customer support is great! I was able to message them via fb for questions regarding alignment and they were very responsive. I would highly recommend this kit as it got rid of the shudder that you get on full acceleration and it gives the car a low and aggressive look! Thank you for making a solid product!

    (1) (0)
  5. Review left

    After discovering that our Tesla X had severe negative camber issues, we were forced to buy brand new tires after only six months of use. We tried to find a solution to the problem, that Tesla couldn’t fix and we stumbled upon the high-end products by In2itive. Don at intuitive has been with us every step of the way. He’s been a valuable resource and not only finding a reputable, experienced and trusted mechanic to install the products, but also helps in finding a local alignment shop that was up to the challenge. He even went as far as looking at the alignment measurements print outs. Thanks to this suggestions, we were able to return the vehicle to the alignment shop in order to get the camber issue dialed in even more effectively. I would highly recommend these aftermarket parts and the customer service experience with In2itive has been bar none.

    (1) (0)