


N2itive RSX Series Ride Height Adjustment Lowering Links For Tesla Model S & X
How To Install N2itive RSX series Adjustable Ride Height Lowering Links
Before we begin it’s important to understand that installing lowering links on your Tesla could cause inner tire wear if you don’t also install adjustable control arms to reduce the negative camber that occurs when lowering the car. Inner tire wear can cause an unexpected blowout! Please keep an eye on your inner rear tires especially and confirm that your tires are wearing evenly! Also please follow our alignment specs. In areas of the world that use salt on the roads we recommend re-greasing the sockets of your links annually to keep them moving freely. With the new clipless RSX-3 design, annual greasing is not necessary.
Our RSX series ride height adjustment lowering links are not difficult to install for the home mechanic and the installation can be completed within 30-40 minutes. Your kit comes with 4 links in total. The two shorter links are for the front of the vehicle and the two longer links are for the rear. Please note that on the TARTAN PLAID version, all 4-links are the same size. The links come preset to 0 which is the same length as the OEM links that came on your Tesla. Making the links longer than 0 will cause the suspension to lower. If your purchase of the lowering links was simply to help prevent premature front axle wear and corresponding acceleration shudder, then we recommend pre-setting all 4 links to -4 and then setting your air suspension to always remain in the “Low” position by default for the majority of your driving. Of course you can still set your Tesla to raise higher than that when needed and use your GPS settings to raise the vehicle in your preset areas. The low setting in combination with the RSX series links helps greatly to reduce the wear on your front axles and helps prevent the onset of acceleration shudder. If your purpose for installing the RSX series lowering links is to lower the vehicle then preset the links to your desired height and then make additional adjustments after you see the results with the vehicle on the ground. One of the nice things about the N2itive lowering links is that you do not need to remove the links to make fine turning adjustments.
We recommend checking your results while the car is preset to the “Low” setting. This way you can maintain more height adjustability for situations when you need to raise the car higher, such as a high curb when parking. For every millimeter you turn the adjustment sleeve the car will lower or raise about 4-5mm. So if you set your lowering links to -5 then the car will drop about 20-25mm or approximately 3/4 to 1 inch. N2itive’s RSX series ultra precise ride height lowering links will work with Tesla’s factory rear camber arms as well as N2itive’s SX series adjustable camber arms. If your Tesla is currently suffering from acceleration shudder then install our Alignment Kit 1, also know as our acceleration shudder kit (which includes these RSX links) at the same time that you have your front axles replaced. This will help to greatly reduce the wear on your new axles.
Before you can turn the height adjustment sleeve on the links you need to slightly loosen the 1.5mm Allen setscrew on the side of the sleeve. Do not remove the setscrew. Simply use the included Allen wrench to loosen the setscrew just enough so the sleeve can rotate freely. After choosing your setting, apply one small drop of blue Loctite and re-tighten down the setscrew to prevent the sleeve from rotating while driving. Do not over tighten!
Before we begin please look at the below image to see how the links will be positioned in the vehicle. For 2012 to 2020, the shorter links replace the factory Tesla links for the front suspension and the longer links replace the factory links in the rear suspension. If you ordered our lowering links for the 2021 or later Plaid you’ll notice that all links are the same size. It doesn’t matter which end of the links are attached to the sensor side or suspension side. Whatever direction is easier for you to read the built-in scale is fine. The links are reversible. It may be helpful to take some photos of your factory links installed before you proceed for later reference. The most common mistake installers make with the links is installing the rear links with the sensor swing arm facing up. The sensor swing arm must face down.

N2itive RSX-1 Ultra Precision Ride Height Lowering Links Installation
![]() Warning: Activate “Jack” mode on the touchscreen before raising and supporting the vehicle. Smart Air Suspension will automatically self-level, even when vehicle is powered off. You MUST disable this system by activating “Jack” mode prior to raising the vehicle, otherwise it may attempt to self-level, causing serious damage, bodily injury, or death. Jack mode will automatically cancel when the vehicle is driven over 5 mph (7 km/h)
Warning: Activate “Jack” mode on the touchscreen before raising and supporting the vehicle. Smart Air Suspension will automatically self-level, even when vehicle is powered off. You MUST disable this system by activating “Jack” mode prior to raising the vehicle, otherwise it may attempt to self-level, causing serious damage, bodily injury, or death. Jack mode will automatically cancel when the vehicle is driven over 5 mph (7 km/h)
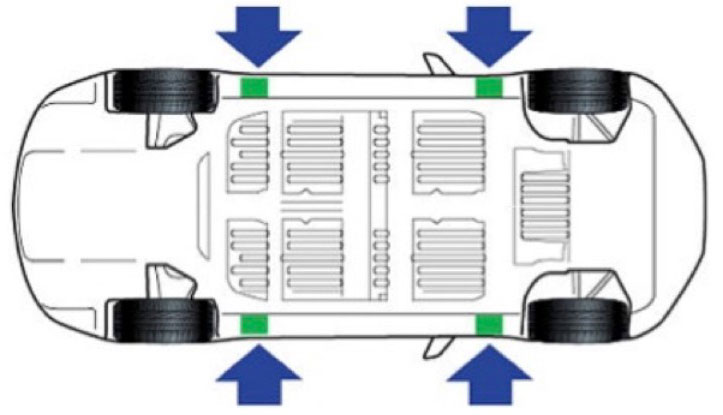
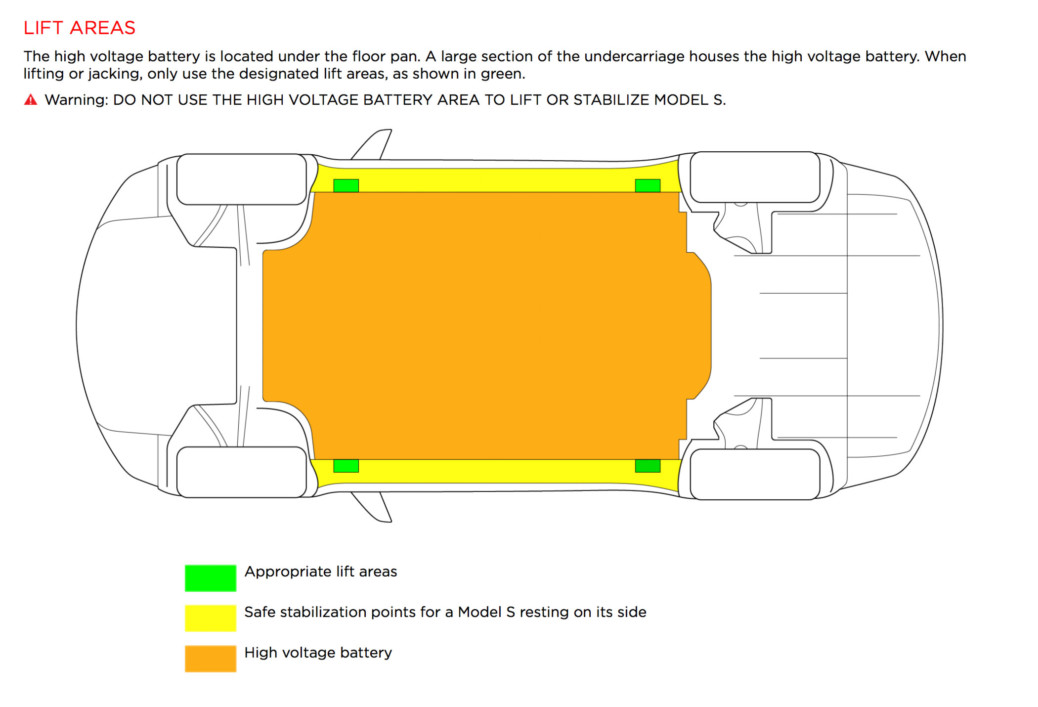
- After activating Jack Mode on the screen, begin by safely jacking up the rear side of the vehicle that you will be working on and supporting the vehicle with jack stands. Never put the jack or jack stands under the battery! The below image shows the 4 intended locations to jack up a Tesla S/X. We recommend using lift pads between your jack and the vehicle’s frame to prevent damage to the jack points, battery and surrounding areas. Do not work on an incorrectly supported vehicle. Doing so can cause serious damage, bodily injury, or death. On a personal note one of my client’s sons was killed many years ago when he supported his vehicle by using a cinder block instead of a jack stand. The cinder block crumbled under the weight of the vehicle while he was underneath. Furthermore, do not place anything between the floor and the jack stand such as carpet which can slip and cause the car to come off the jack stand.


- We’ll start with the rear links. Remove the wheel and set it to the side. Later when you reinstall the wheels they should be torqued to 129 ft./lbs. (175Nm) If you are performing the install on a lift then removing the rear wheels is not necessary. There is room to reach up from the bottom on the rear links. For the front you can reach over the front tires to remove and install the links but it may be easier to simply take the wheels off to give you easier access.
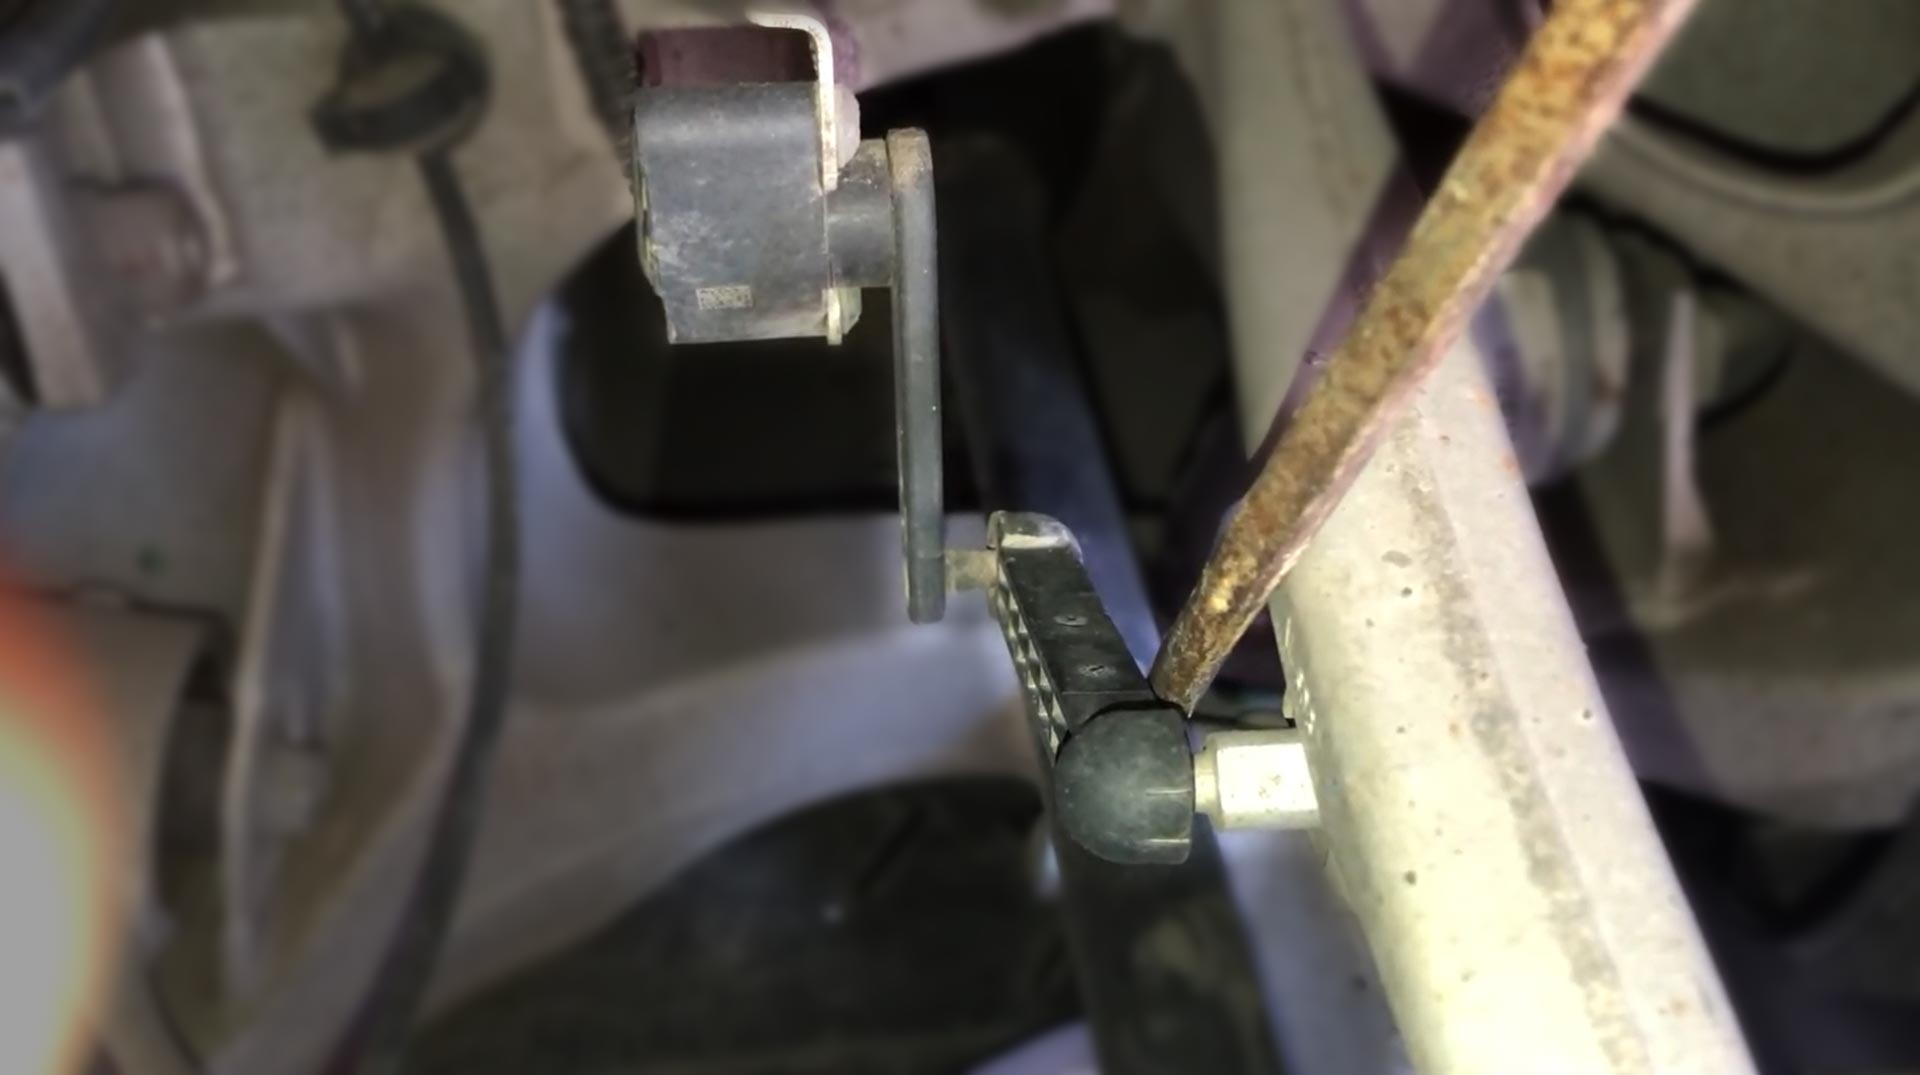
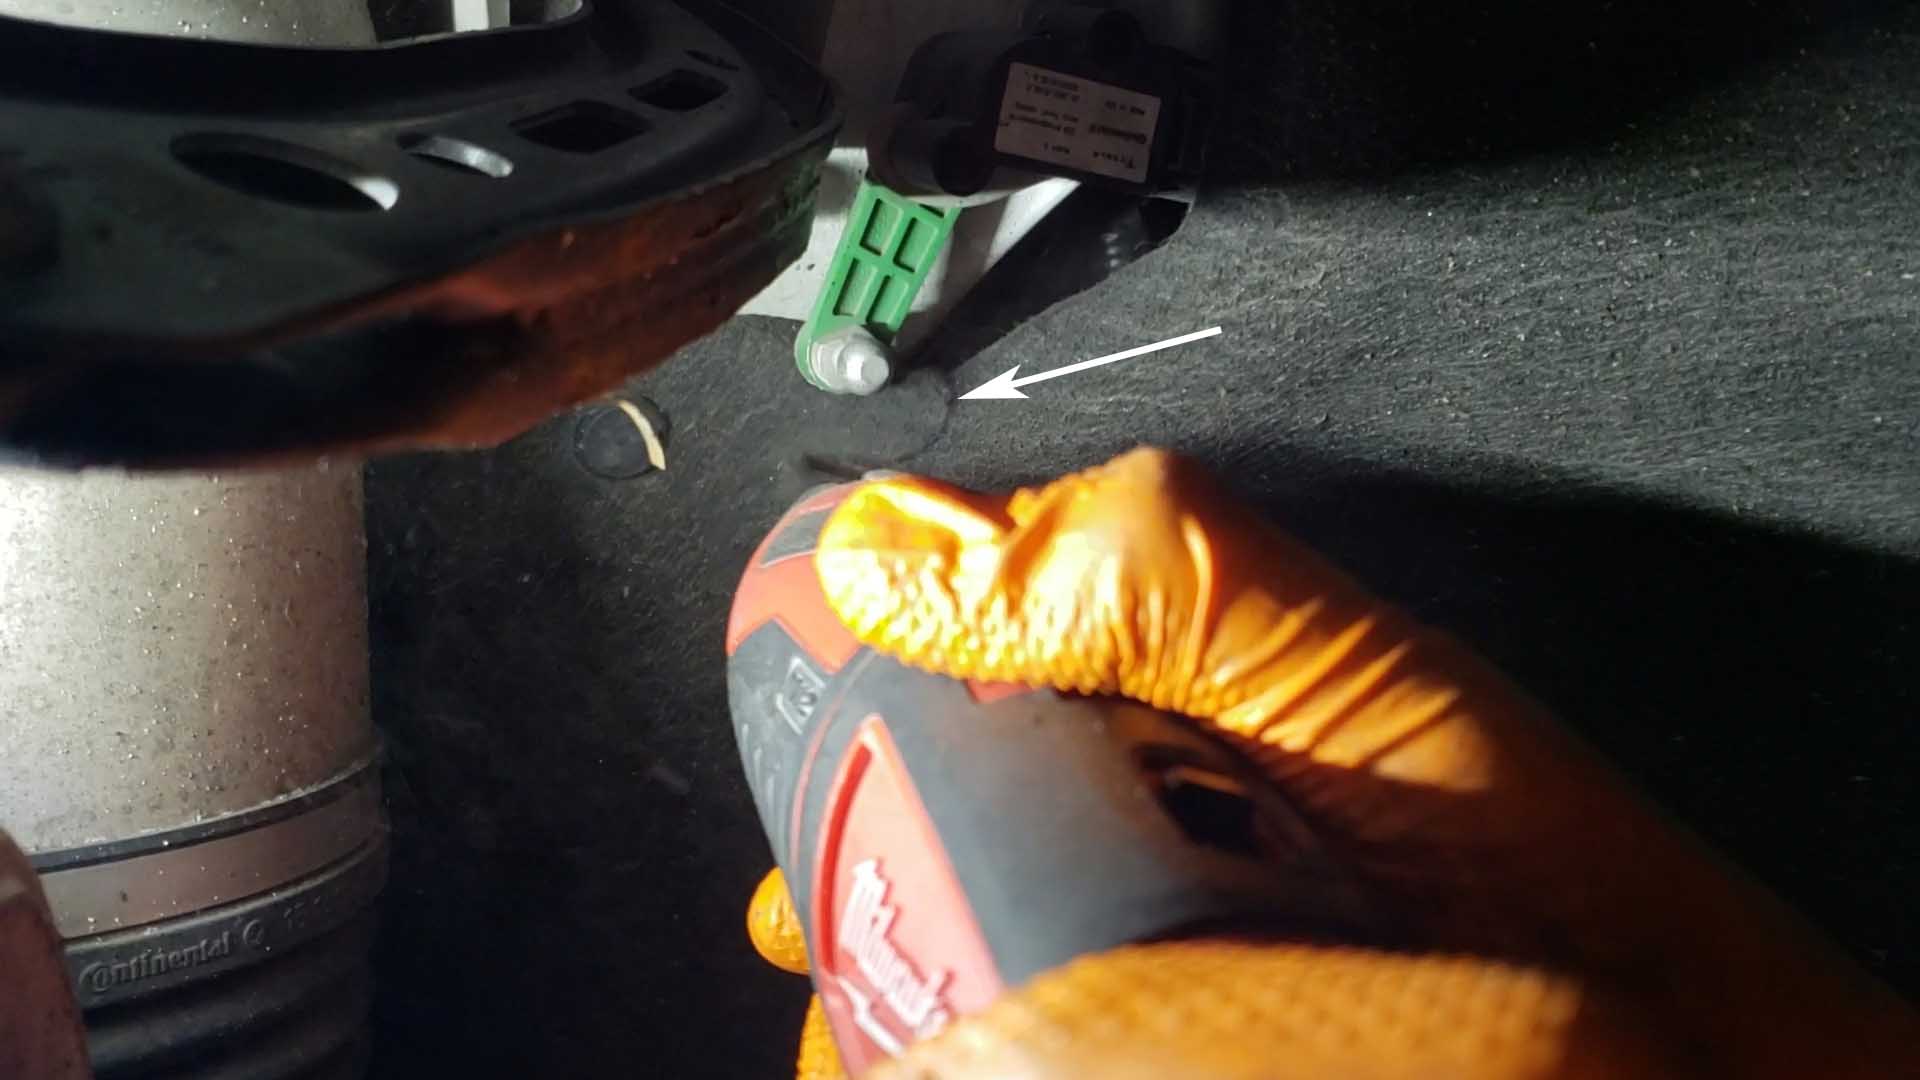
- Before you being, start by taking multiple photos of your current sensor links and suspension in case you need to reference it later during assembly. It’s important to start by removing the link on the camber arm side! If you try to start by removing the link on the sensor arm side you may damage or break your sensor or bend the OEM bracket. Gently pry the sensor link off of the camber arm ball with a large flat head screwdriver or really small pry bar. Use the original camber arm as a fulcrum point when prying off the sensor link. Set the screwdriver or pry bar as close as possible to the ball joint without rubbing against the ball joint.


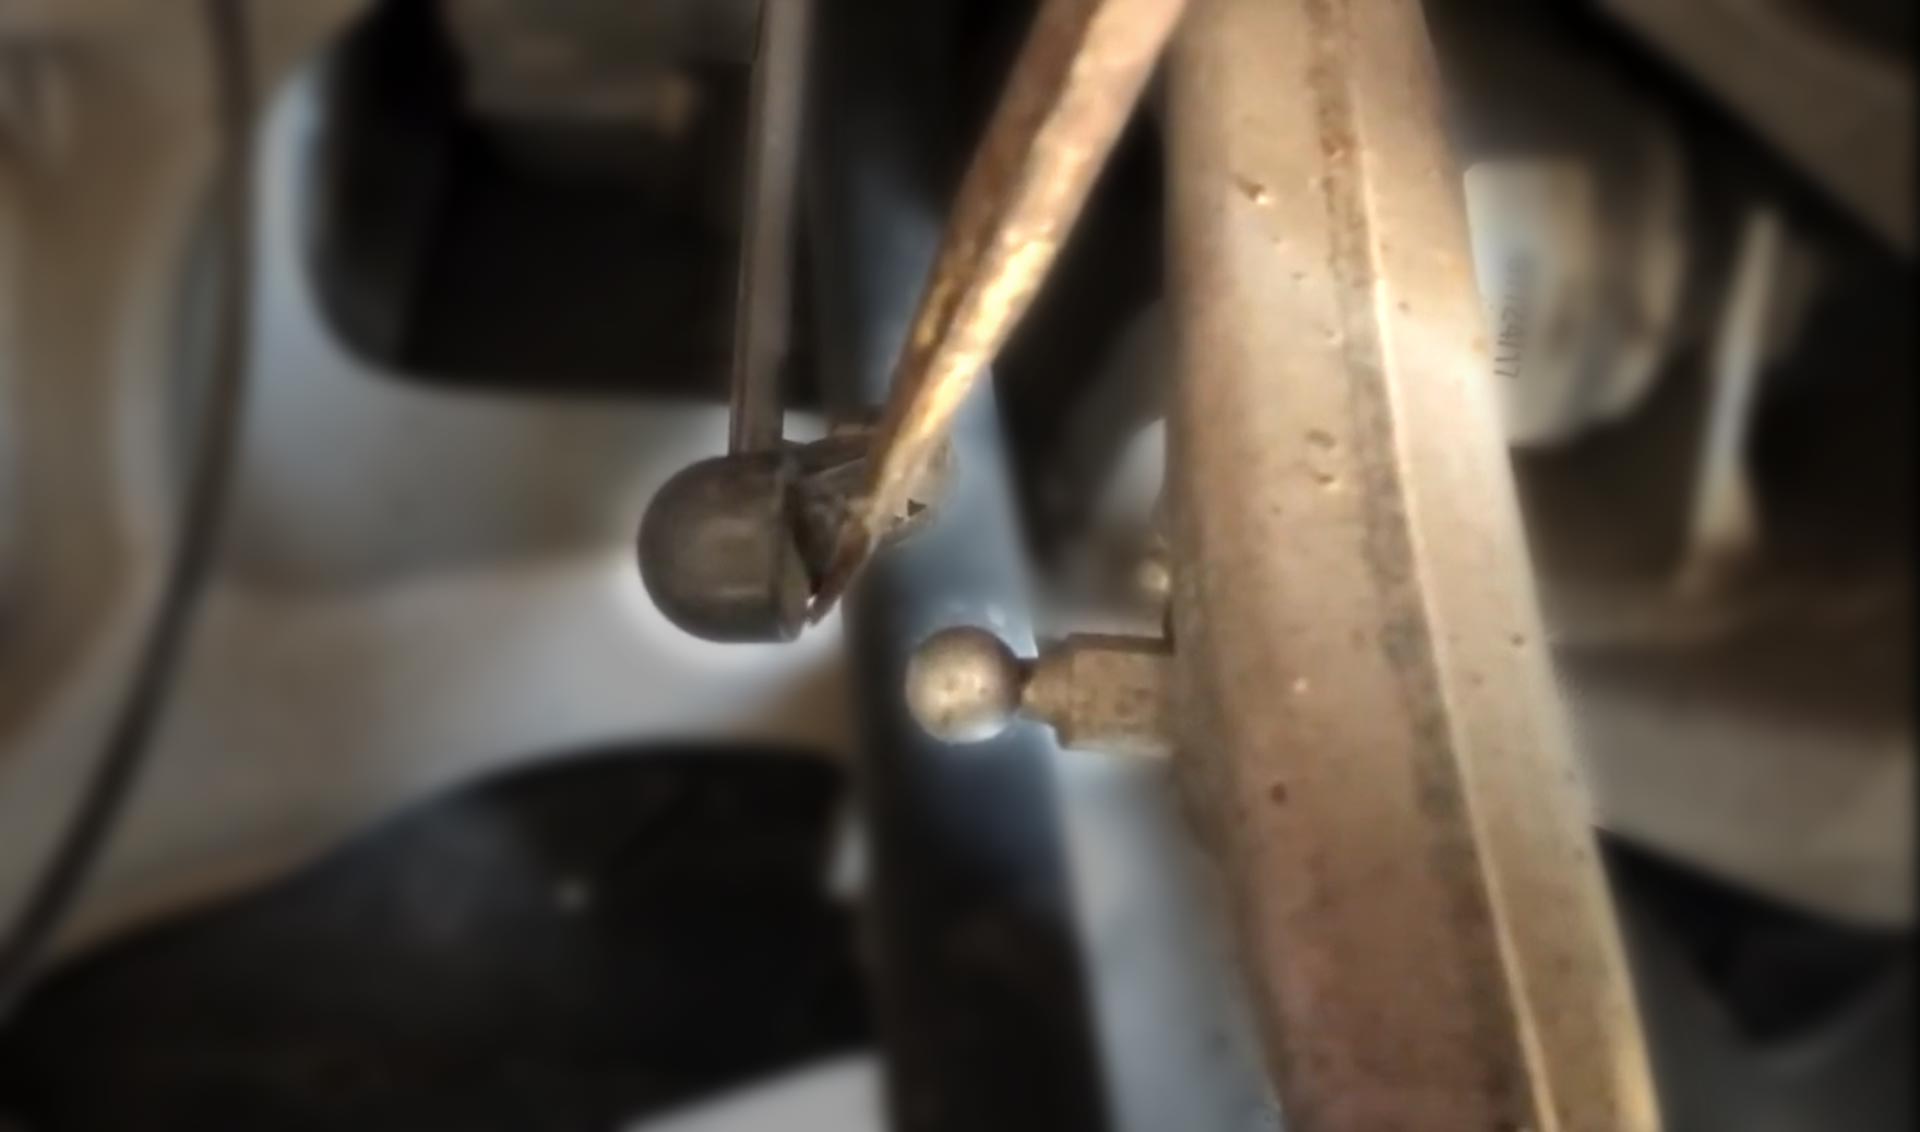
- To remove the other side of the link, hold the sensor’s swing arm with pliers or your fingers while you slowly and carefully remove the link by bending it back until it pops off the ball. The pliers should hold the swing arm in a neutral position so that it doesn’t bend or tweak when you pull the ball joint apart. This prevents stress on the sensor itself. Please use extreme caution here so you don’t break the ball off or damage the sensor. Please also note that many Tesla’s use a plastic front upper control arm. The plastic tabs that hold the ball on the underside of the arm are notorious for breaking so please use caution while removing the OEM sensor link from the ball!
 WARNING: Thick automotive grease needs to be inserted into the ball cavity to keep the ball joint lubricated and prevent it from seizing! If the ball joint seizes and gets stuck it could cause the ball to break off in some instances. Please re-lubricate the sockets annually for RSX links that have clips. The new clipless design does not require relubricating.
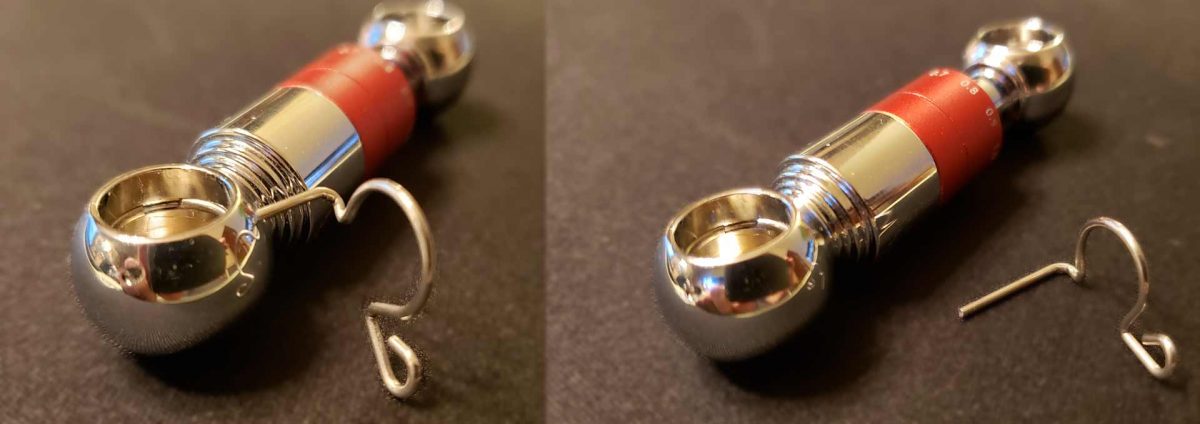
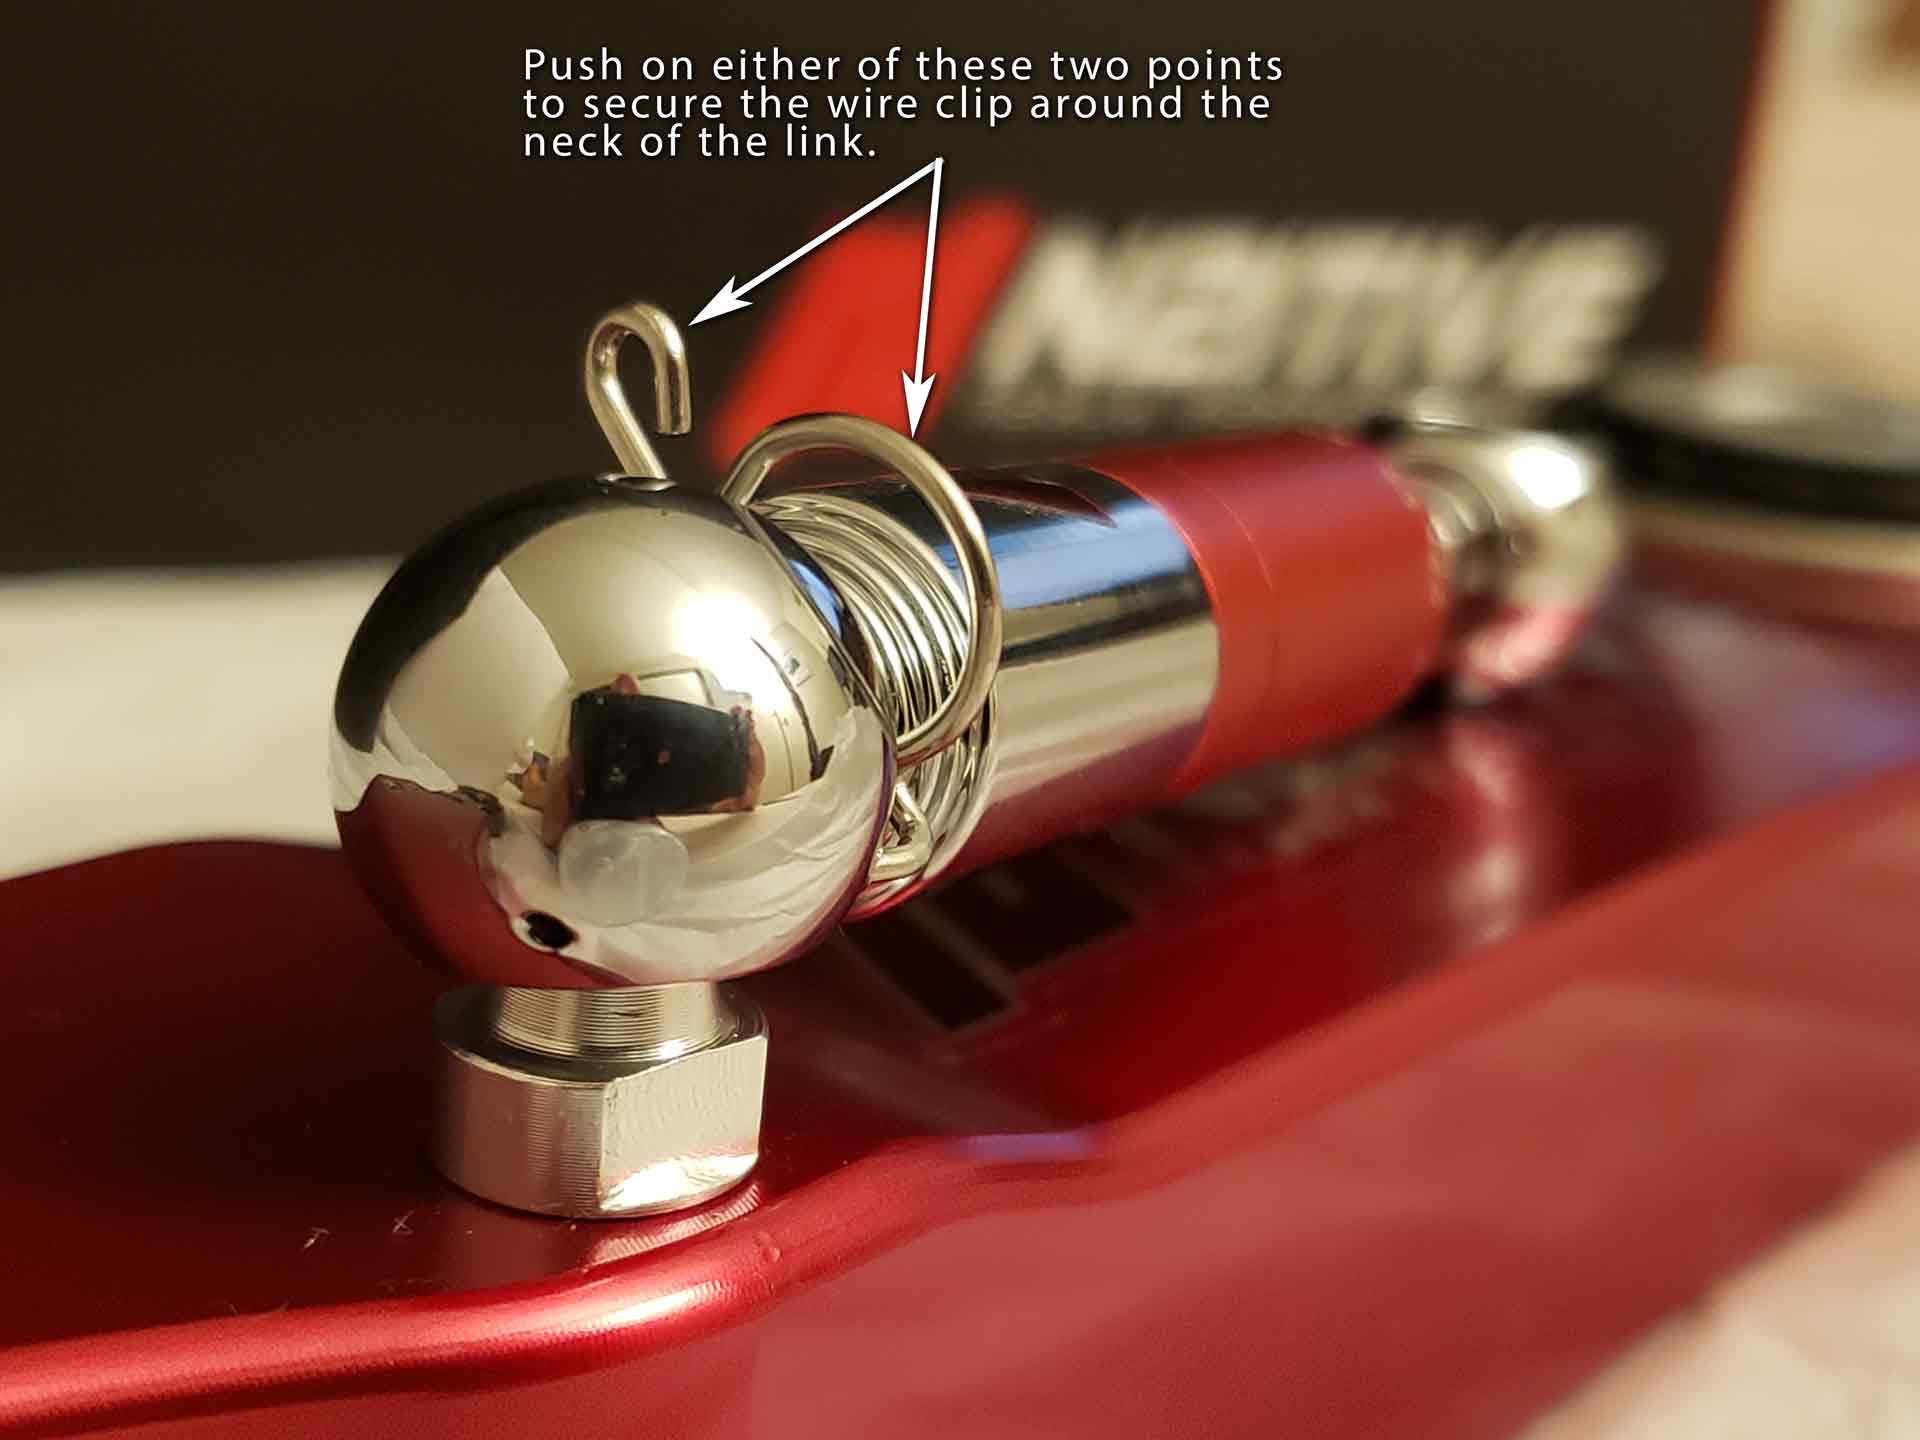
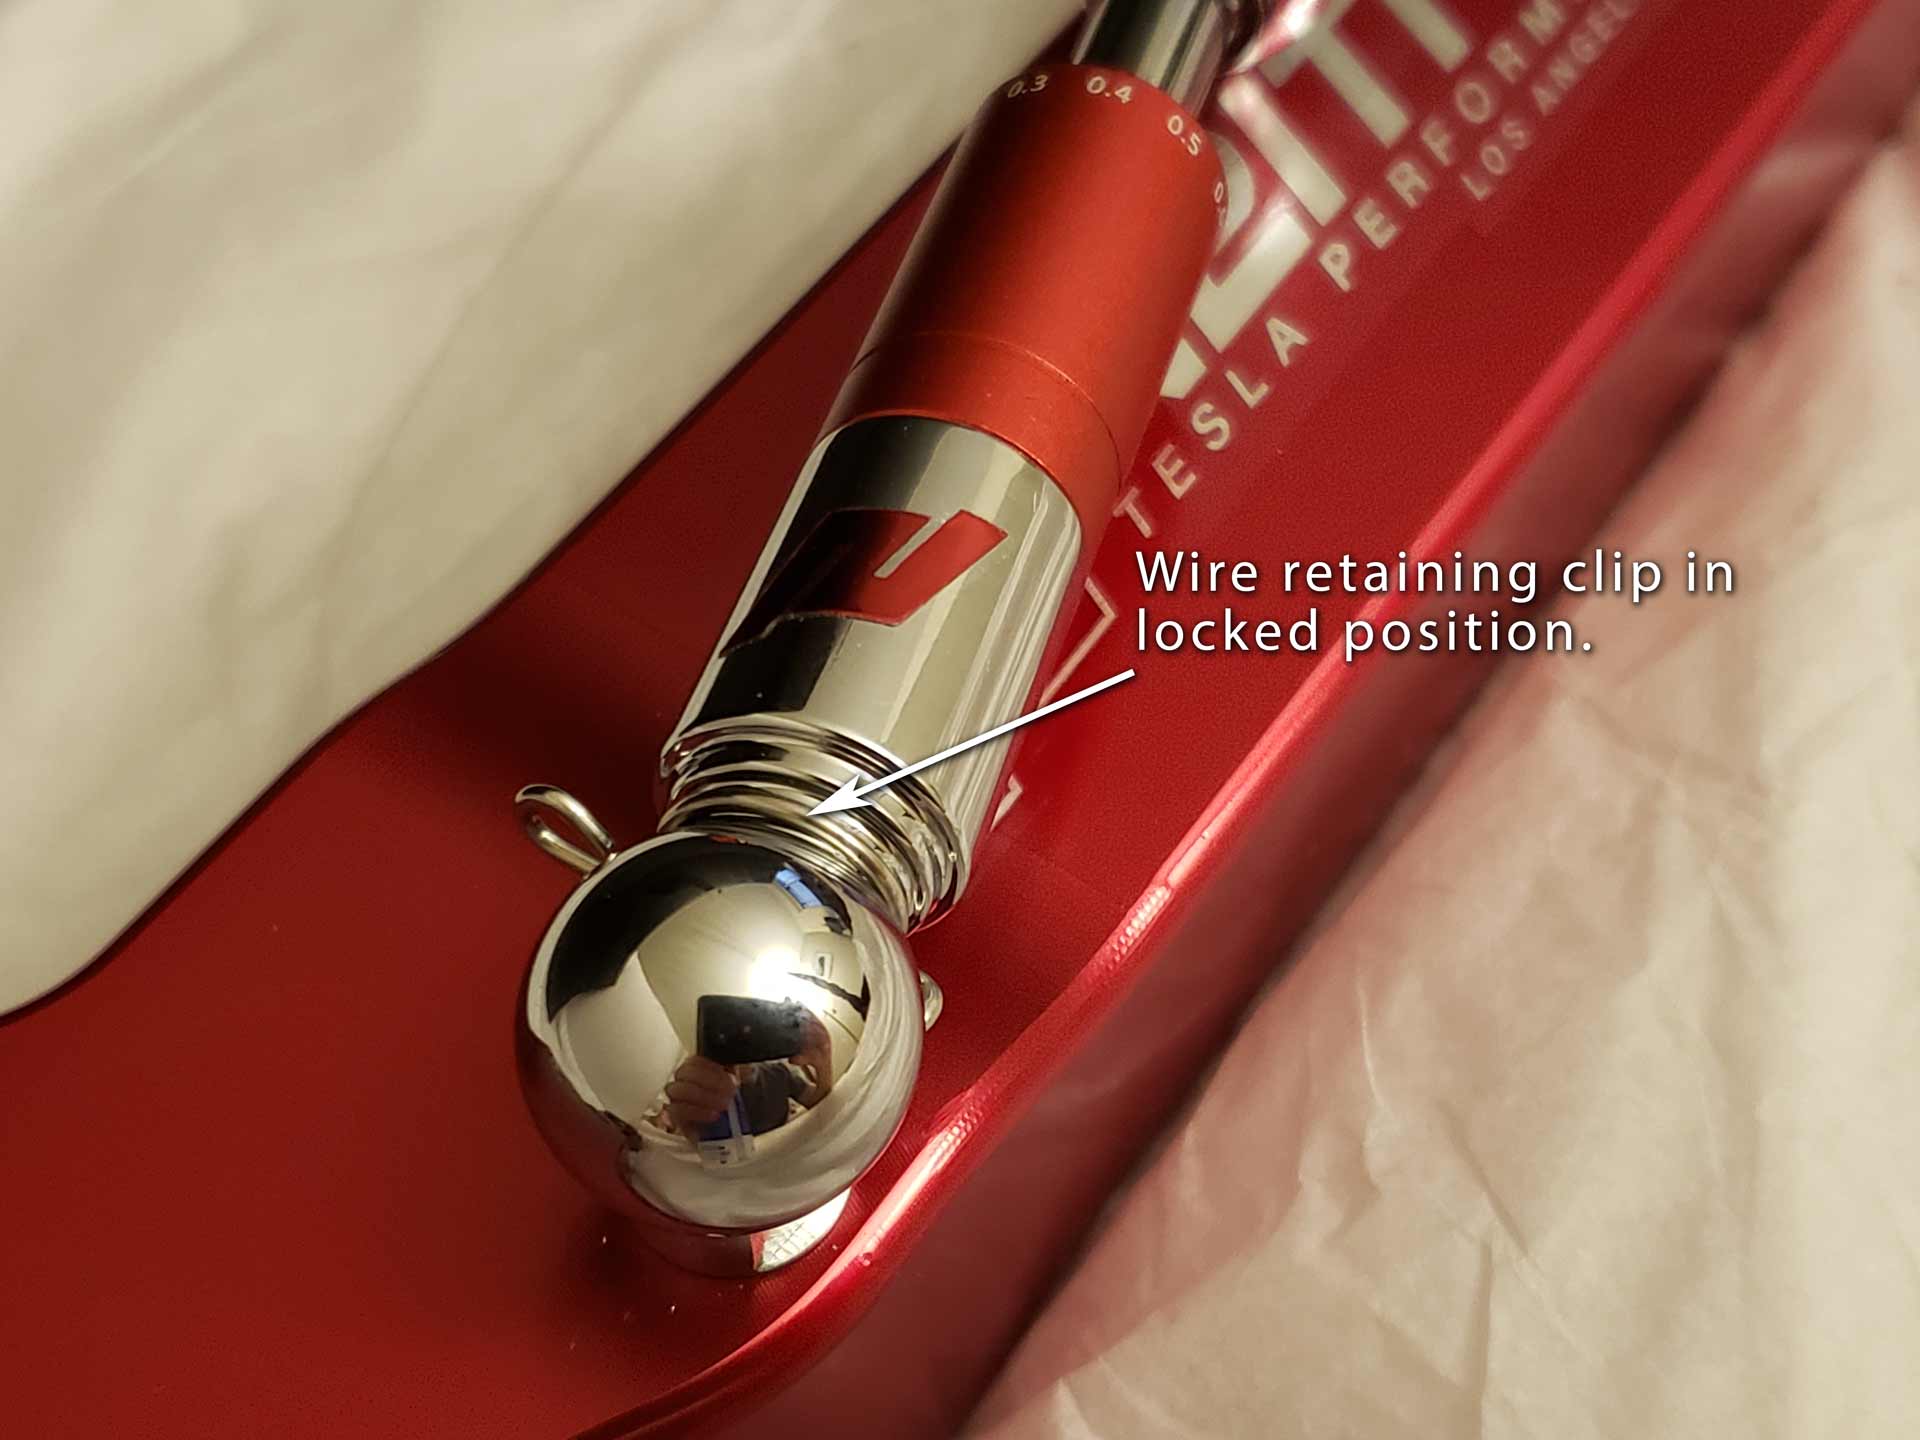
 - With the rear factory sensor links removed and the N2itive RSX series lowering links preset to the setting of your choice, we can now begin to install the lowering links. Note that after installation you can easily adjust the length of the links without having to remove them. You would just need to loosen the Allen setscrew, rotate the adjustment sleeve to your new setting and then tighten down the setscrew again to hold that setting in place. Some RSX series links come with a wire retaining clip around each of the links’ heads. These clips must be removed before you push them over the balls and then reinserted after the link is secured to the ball joint. To remove the wire clips, begin by pushing the wire loop at the end of the clip so that the clip is released from the neck of the link. Then rotate the wire clip back and forth as you pull the pin of the clip out of the head of the link.


- All N2itive lowering links now come pregreased from the factory for easy installation on your Tesla. Snap the RSX series lowering links into place by squeezing the ball and head together with your fingers. Then reinsert the wire retaining clips. The below photos show the RSX series ride height lowering links being put into place off of the vehicle for easier visual purposes. The newer design does not have clips at all.
- With the rear of the vehicle finished you can now move onto the front by following the same procedure for the rear. With the front suspension you can complete the install with the wheels on however you need to raise the suspension to the “Very High” position and set the settings to “Jack Mode”. Plaid and Long Range versions may find removing the links easier with the front wheels off.
- For some of the 2012 – 2020 pre-refreshed Tesla Model S or X, you may need to lightly trim away some of the excess sound dampening material from the inner wheel well so that the sensor’s swing arm and attached link can move freely. Please check the range of motion in your particular vehicle to see if this step will be necessary. You may not need to do it. You can use a cutting tool or razor but be careful not to cut any of the wires behind the material! You can use one hand to pull the material away from the wall to give yourself more clearance from any wires hiding behind the material. Please watch the installation video to assist. If you have a 2021 Long Range or PLAID refreshed S or X then you can skip this step as Tesla has since redesigned this dampening material making this step unnecessary.
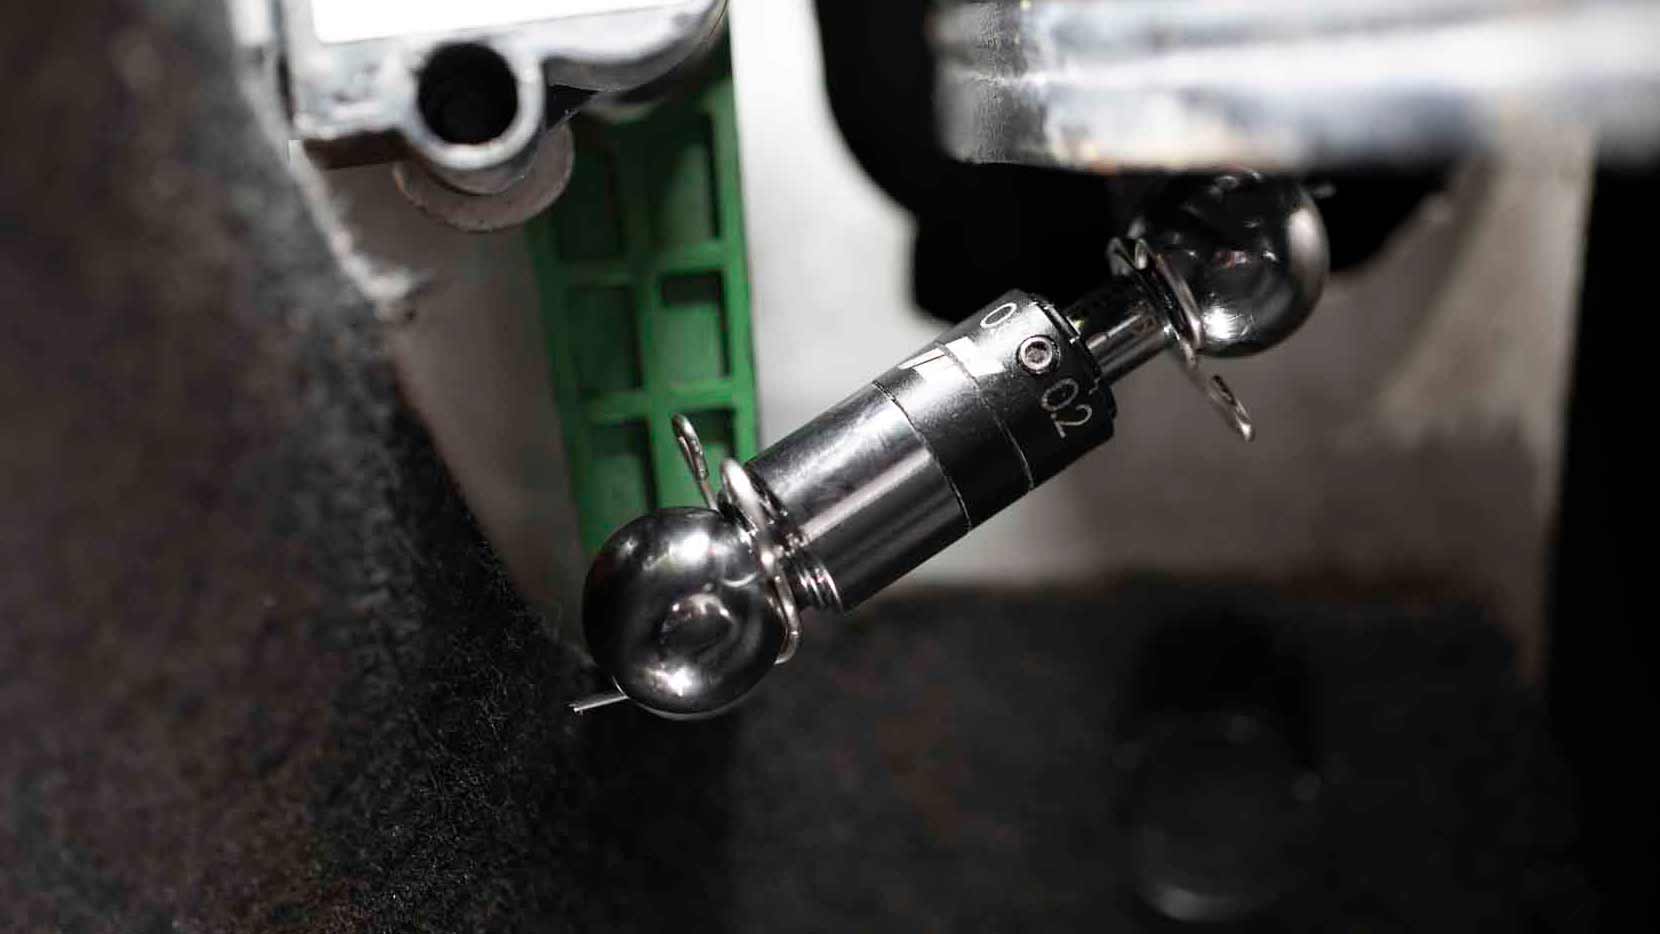
 WARNING: Many Tesla OEM front upper control arms are entirely made of plastic. The ball that the link attaches to on the front upper control arm is a part of this plastic mold. This ball can easily be broken off so please be careful since if you break it, you will need an entire new arm. The below image shows the RSX series lowering links installed on the front suspension.


![]() WARNING: You need to make sure that the Allen screw is tight but also do not over tighten.
WARNING: You need to make sure that the Allen screw is tight but also do not over tighten.
Please contact us with any questions or help you may need. We are here for you.
2021 Long Range & PLAID installation should watch the below quick video: