


Tesla SX-1 and TSX-1 Control Arm Installation
[fusion_builder_container hundred_percent=”no” equal_height_columns=”no” hide_on_mobile=”small-visibility,medium-visibility,large-visibility” background_position=”center center” background_repeat=”no-repeat” fade=”no” background_parallax=”none” parallax_speed=”0.3″ video_aspect_ratio=”16:9″ video_loop=”yes” video_mute=”yes” border_style=”solid” type=”legacy”][fusion_builder_row][fusion_builder_column type=”1_1″ layout=”1_1″ background_position=”left top” border_style=”solid” border_position=”all” spacing=”yes” background_repeat=”no-repeat” margin_top=”0px” margin_bottom=”0px” animation_speed=”0.3″ animation_direction=”left” hide_on_mobile=”small-visibility,medium-visibility,large-visibility” center_content=”no” last=”true” hover_type=”none” first=”true” min_height=”” link=”” background_blend_mode=”overlay”][fusion_text hide_on_mobile=”small-visibility,medium-visibility,large-visibility” sticky_display=”normal,sticky” animation_direction=”left” animation_speed=”0.3″]
N2ITIVE ALIGNMENT KIT 1 & 2 INSTALLATION GUIDE

PLEASE NOTE THAT THE BELOW INSTRUCTIONS ARE FOR THE ORIGINAL SX-1 CAMBER AND TSX-1 TOE ARMS. DO NOT FOLLOW THESE INSTRUCTIONS FOR THE REVISED ARMS BEING RELEASED IN DECEMBER OF 2022. THE INSTALLATION OF THE CAMBER ARMS IN PARTICULAR ARE INSTALLED IN THE OPPOSITE DIRECTION OF THE ORIGINALS. NEW INSTRUCTIONS/VIDEOS ARE COMING FOR THOSE PARTS VERY SOON.
N2itive’s Alignment Kit 1 and 2 are not too difficult to install for the experienced home mechanic and can be completed within 2-4 hours. However we would recommend having your local independent alignment shop complete the installation since they can immediately perform a necessary alignment afterwards. Alignment Kit 2 is the same as Alignment Kit 1 but without the 4 small RSX-1 lowering links. The below instructions cover the installation of both kits. Also since these kits consist of the SX-1 adjustable camber arms, the TSX-1 adjustable toe arms and the RSX-1 adjustable lowering links you can learn how to install those as well if you purchased those parts individually.
Please note: installing our parts or any other aftermarket car part does not void your warranty as is often misunderstood. Please check our FAQ section for much more detail on that common question.
Below we have a great new installation video by EVfixMe, a local shop in Costa Mesa, California. In this video you’ll learn step by step how to install our kit properly so either you or your mechanic can do the job right. If you’re in the southern California area you can purchase our kit and bring it to them for installation in a couple hours. If you need help finding an installer near you we will do the research and find a shop after you purchase your kit.
[/fusion_text][fusion_text columns=”” column_min_width=”” column_spacing=”” rule_style=”” rule_size=”” rule_color=”” hue=”” saturation=”” lightness=”” alpha=”” content_alignment_medium=”” content_alignment_small=”” content_alignment=”” hide_on_mobile=”small-visibility,medium-visibility,large-visibility” sticky_display=”normal,sticky” class=”” id=”” margin_top=”” margin_right=”” margin_bottom=”” margin_left=”” fusion_font_family_text_font=”” fusion_font_variant_text_font=”” font_size=”” line_height=”” letter_spacing=”” text_transform=”none” text_color=”” animation_type=”” animation_direction=”left” animation_color=”” animation_speed=”0.3″ animation_delay=”0″ animation_offset=”” logics=””]
Since we’ve received so many questions wondering what is the optimal alignment settings after the arms are installed, we decided to include this at the beginning of the installation instructions rather than the end where it can be overlooked. Please share this with your alignment shop! It is critical that they follow this and not just do the alignment as usual!
After you or an alignment shop installs our alignment kit, or individual control arms and lowering links you will want to align the wheels immediately. We recommend the following steps:
ALIGNMENT KIT 1 SETTINGS
Please have your alignment shop technician read this and confirm these settings before beginning the alignment!
- Extend all four RSX-1 lowering links to the -5 setting. This is the minimum setting that we recommend to help reduce the binding and wear of the half-shafts. You can set them even lower if you wish by extending them longer which will further reduce the stress on your half-shafts.
- Set the vehicles suspension to the “MEDIUM” position on the screen. The alignment needs to be performed in this position even if you drive mostly in the low ride height! If the alignment is done this way then you will have even tire wear, regardless of the ride height you choose on the screen.
- Have your alignment tech set the alignment to the specs in the chart below! These settings will provide a combination of the least rolling resistance, the best all around tire wear and performance for your Tesla and keep the alignment geometry within Tesla’s spec. Helpful note… If during the alignment you encounter too much negative front camber then you can add some positive caster to compensate for this and get the front camber back in range.
ALIGNMENT KIT 2 SETTINGS
Please have your alignment shop technician read this and confirm these settings before beginning the alignment!
- Set the vehicles suspension to the “MEDIUM” position on the screen. The alignment needs to be performed in this position even if you drive mostly in the low ride height! If the alignment is done this way then you will have even tire wear, regardless of the ride height you choose on the screen.
- Have your alignment tech set the alignment to the specs in the chart below! These settings will provide a combination of the least rolling resistance, the best all around tire wear and performance for your Tesla and keep the alignment geometry within Tesla’s spec. If during the alignment you encounter too much negative front camber then you can add some positive caster to compensate for this and get the front camber back in range.
The full range of Tesla’s wheel/tire alignment specs for the Model S and X are below. However, for the rear camber and rear toe please follow our much more finely tuned settings as listed![fusion_table fusion_table_type=”2″ fusion_table_rows=”” fusion_table_columns=”” hide_on_mobile=”small-visibility,medium-visibility,large-visibility” class=”” id=”” animation_type=”” animation_direction=”left” animation_speed=”0.3″ animation_offset=””]
| TESLA S | TESLA X |
|---|---|
| Front Camber: -0.3° to -1.2° | Front Camber: -0.3° to -1.2° |
| Front Caster: 3.5° to 4.5° | Front Caster: 3.7° to 4.7° |
| Front Toe: 0.0° to 0.10° | Front Toe: 0.0° to 0.15° |
| Total Front Toe: 0.0° to 0.20° | Total Front Toe: 0.0° to 0.30° |
| Steer Ahead: -0.05° to 0.05° | Steer Ahead: -0.05° to 0.05° |
| Rear Camber: -0.75° to -2.75° SET TO -0.75 TO -0.85° (CRITICAL) |
Rear Camber: -0.5° to -2.5° SET TO -0.5 TO -0.65° (CRITICAL) |
| Rear Toe: 0.05° to 0.35° SET TO 0.10° TO 0.20° (CRITICAL) |
Rear Toe: 0.05° to 0.35° SET TO 0.15° TO 0.20° (CRITICAL) |
| Total Rear Toe: 0.10° to 0.70° | Total Rear Toe: 0.10° to 0.70° |
| Thrust Angle: -0.20° to 0.20° | Thrust Angle: -0.10° to 0.10° |
[/fusion_table]
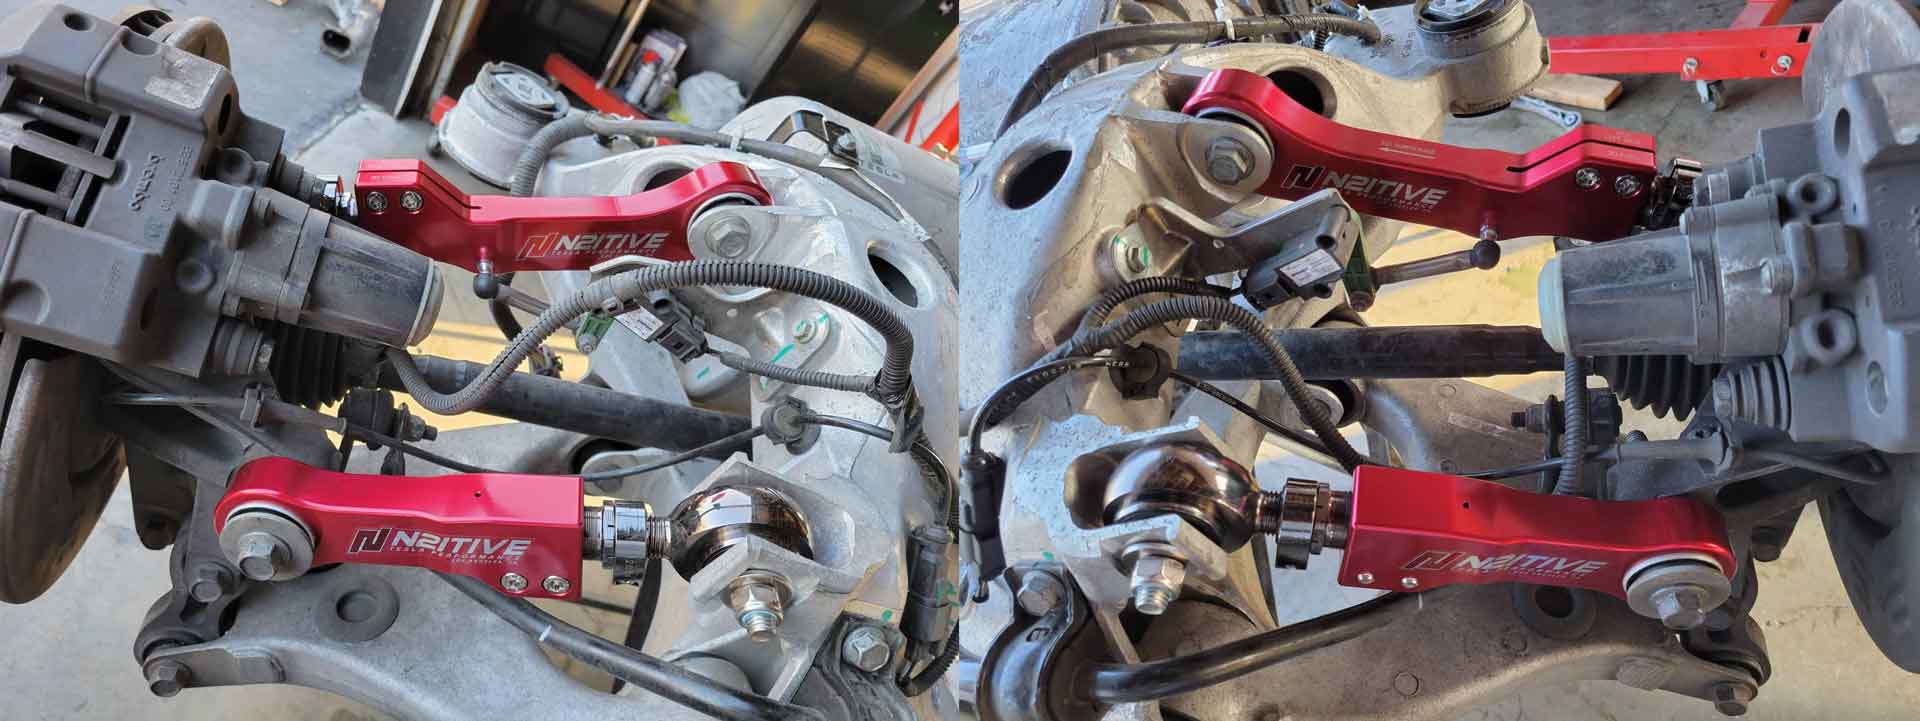
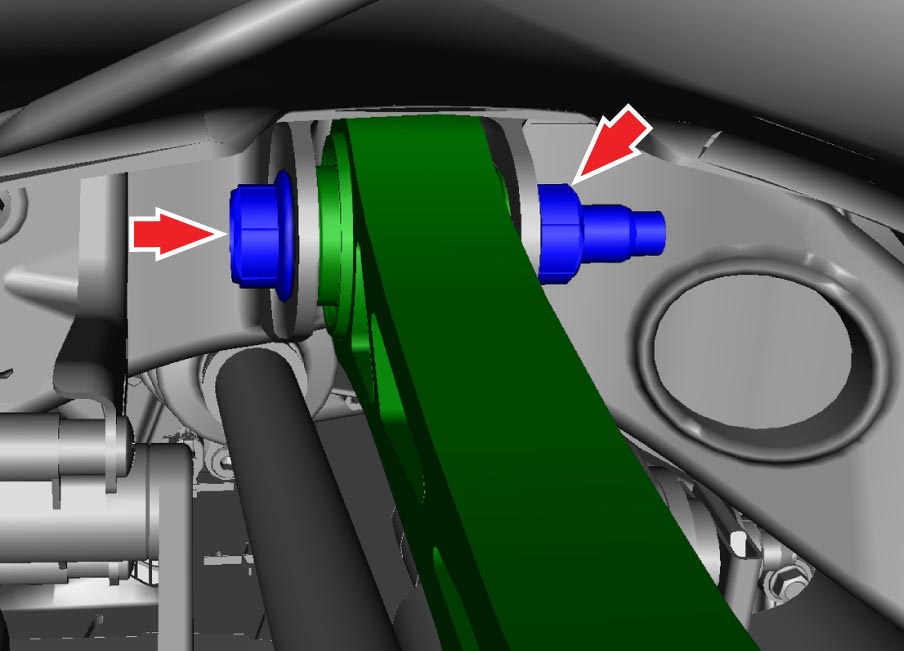
Before we begin please look at the below image to see how the arms will fit within the rear suspension. Notice how on the SX-1 adjustable camber arms, the small ball joint faces towards the front of the vehicle and the rod end side of the arm(side with the clamps and adjuster) attaches to the wheel side. With the adjustable TSX-1 toe arm we are now recommending that you install them with the rod end side connected to the subframe. This is backwards of what the laser etching on the toe arms say but we are finding it a little easier to adjust and align later on. Either way is ok on the TSX-1 toe arms but not on the SX-1 camber arms. The SX-1 camber arms need to be installed as marked on the arms and as seen in the images. It will helpful to take some photos as you proceed for later reference. Note that removing the subframe as shown in the photos below is not necessary. It just makes for clear photos of how the arms are installed.
The below instructions are intended to be followed by professional mechanic or experienced home mechanic. The installer assumes full responsibility for the safety and functionality of the installation of our suspension products.
N2itive SX-1 Camber Arm Installation
![]() Warning: If the vehicle has air suspension, activate “Jack” mode on the touchscreen before raising and supporting the vehicle. Smart Air Suspension will automatically self-level, even when vehicle is powered off. You MUST disable this system by activating “Jack” mode prior to raising the vehicle, otherwise it may attempt to self-level, causing serious damage, bodily injury, or death. Jack mode will automatically cancel when the vehicle is driven over 5 mph (7 km/h)
Warning: If the vehicle has air suspension, activate “Jack” mode on the touchscreen before raising and supporting the vehicle. Smart Air Suspension will automatically self-level, even when vehicle is powered off. You MUST disable this system by activating “Jack” mode prior to raising the vehicle, otherwise it may attempt to self-level, causing serious damage, bodily injury, or death. Jack mode will automatically cancel when the vehicle is driven over 5 mph (7 km/h)
REMOVAL
-
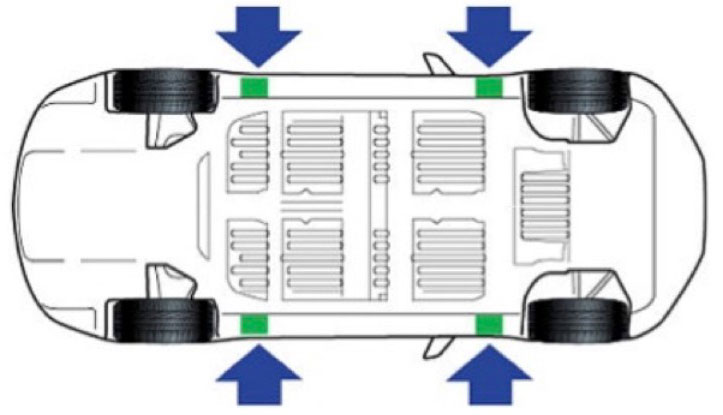
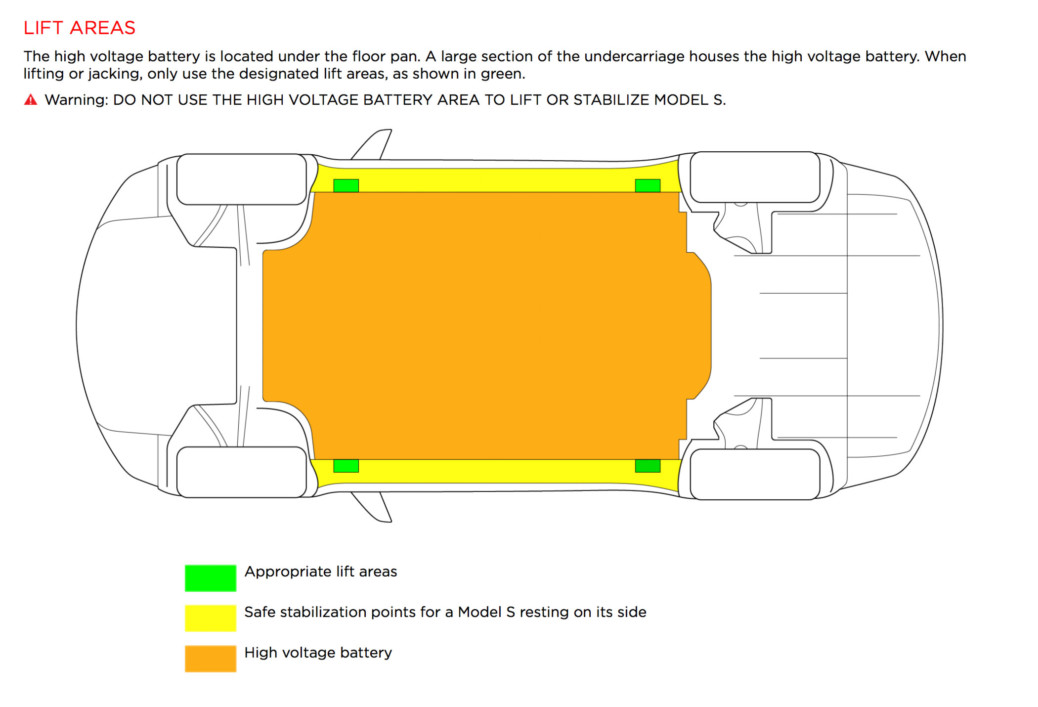
- Begin by safely jacking up the rear side of the vehicle that you will be working on and supporting the vehicle with jack stands. Never put the jack or jack stands under the battery! The below image shows the 4 intended locations to jack up a Tesla S/X. We recommend using lift pads between your jack and the vehicle’s frame to prevent damage to the jack points, battery and surrounding areas. Do not work on an incorrectly supported vehicle. Doing so can cause serious damage, bodily injury, or death. On a personal note one of my client’s sons was killed many years ago when he supported his vehicle by using a cinder block instead of a jack stand. The cinder block crumbled under the weight of the vehicle while he was underneath. Furthermore, do not place anything between the floor and the jack stand such as carpet which can slip and cause the car to come off the jack stand.


- Remove the wheel and set to the side. Later when you reinstall the wheels they should be torqued to 129 ft./lbs. (175Nm)
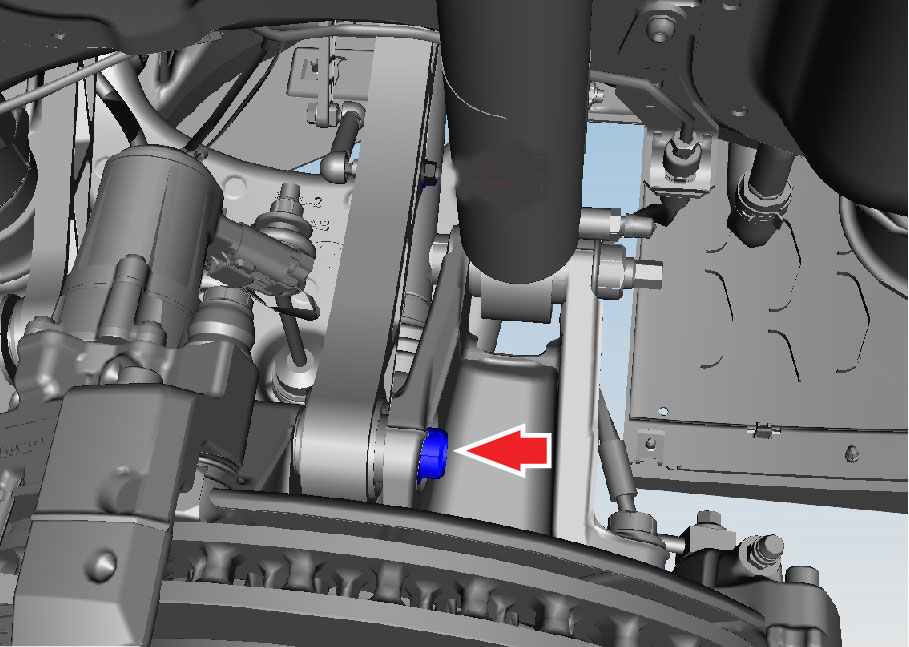
- Before you being, start by taking multiple photos of your current control arms and suspension in case you need to reference it later during assembly. Take notice of the positioning of the small sensor link. When you reassemble, you must install it the same way. Gently pry the short sensor link off of the ball with a large flat head screwdriver or really small pry bar. Use the original camber arm a fulcrum point when prying off the sensor link. Set the screwdriver or pry bar as close as possible to the ball joint without rubbing against the ball joint.

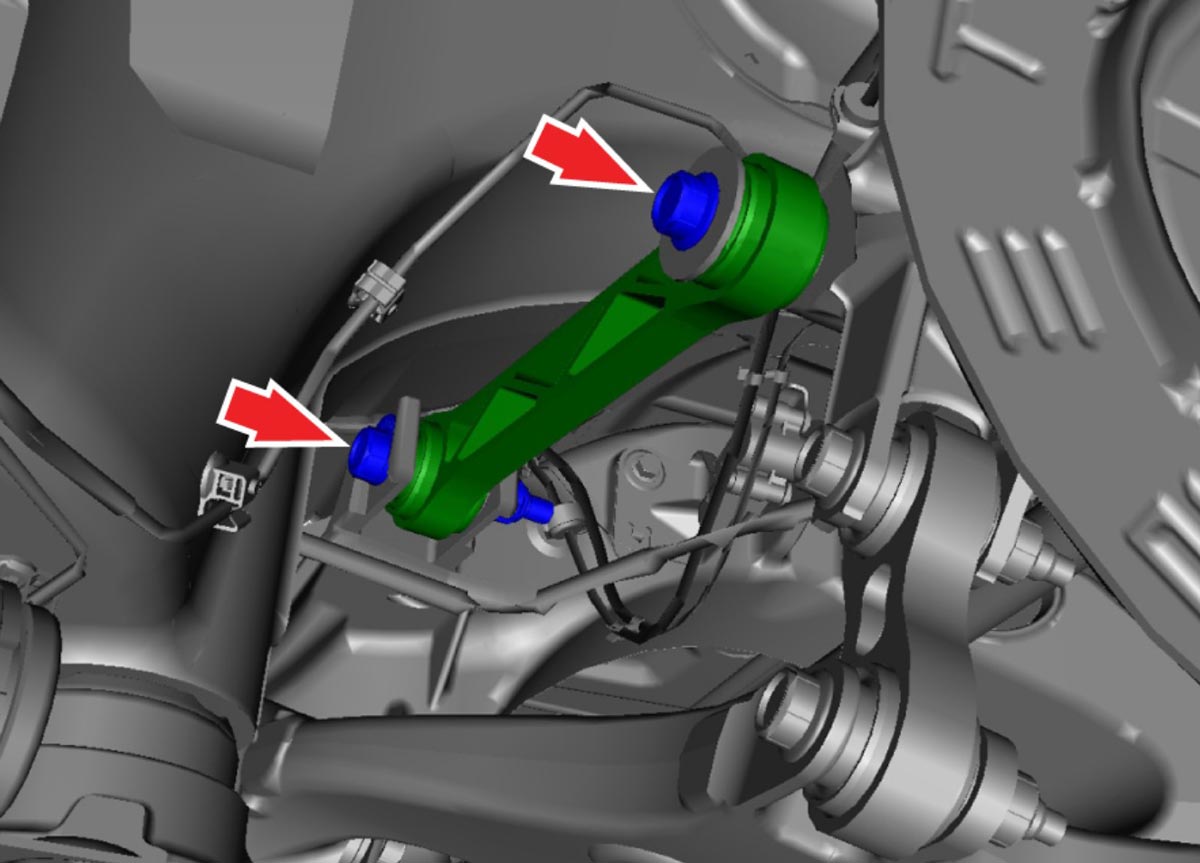
- Remove the bolt that connects the upper camber arm to the knuckle. (torque 103 ft./lbs – 140Nm)
- Remove the bolt and nut that connect the camber arm to the subframe. (torque 96 ft./lbs. – 130 Nm)

- Remove the camber arm from the vehicle.
- Installation of the new adjustable camber arm is similar to the reverse of the removal with some exceptions. Begin by placing the new N2itive SX-1 adjustable camber arm in place and insert the bolts. Confirm you have the correct direction and side in place. Note, the SX-1 arms are not the same. There is a left and right arm. See the image at the top to see how the arms are arranged in the vehicle. At this point lightly tighten both bolts by hand. If you’re installing the TSX-1 toe arms as well this would be the right time to do it. That is, before torquing down the bolts. Next, raise the suspension to ride height level and torque down both bolts for the SX-1 arm and TSX-1 arm if installed. You want to essentially push the wheel back up into the wheel well to your normal driving height. This is important! Do not tighten the bolts down before raising the suspension or you will ruin the bushings. The camber arm bolt that connects to the knuckle should be torqued down to 103 ft/lbs. (140 Nm). The bolt that connects the camber arm at the subframe needs to be torqued down to 96 ft./lbs. (130 Nm). If you haven’t already, remove the original aluminum ball from the ride height sensor link socket that we worked on in step 3. Add a small amount of white lithium or other appropriate automotive grease into the socket and carefully press the socket over the ball on the new arm.
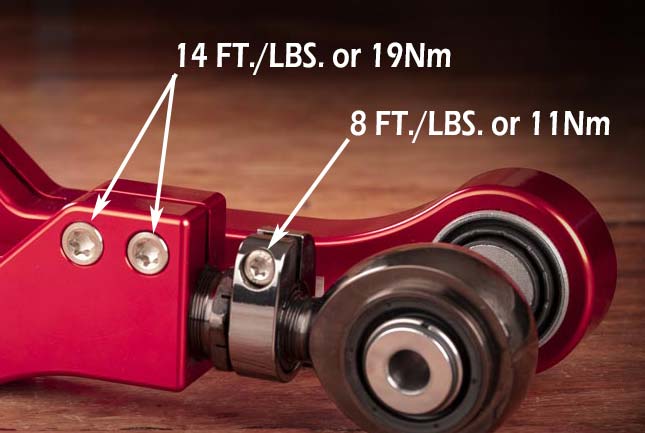
- To align or adjust the SX-1 camber arms you will need to loosen both clamping mechanisms using the appropriate size Torx drivers. That’s a T45 for the two larger Torx bolts and a T30 for the Torx bolt in the small clamp. Remove the bottom rear valance of the vehicle to gain clearance to adjust the arms while the wheels are still on the vehicle. Use a 30mm open end wrench to turn the double adjuster. Tightening or clockwise rotation will make the arm shorter and increase the negative camber. Loosening or counter clockwise rotation will lengthen the arm and increase positive camber. If your alignment technician has an off-wheel alignment adapter for their alignment rack, this would be the easiest option as it will allow the technician to quickly perform the alignment with the rear wheels off to provide the best access to the adjuster. Once your alignment technician has found the correct length the clamps need to be tightened down. For the clamp that’s built into the arm with the dual Torx bolts you will need to alternate torque these bolts a few times with a couple of drops of blue Loctite to 14 FT/LBS (19 Nm). This is important so the bolts have the correct torque and don’t come loose! Being that it is clamping mechanism if you were to tighten one bolt to 14 FT/LBS and then the other to 14 FT/LBS now the back tension on the first bolt has been greatly reduced to maybe only 5 FT/LBS since tightening the second bolt relieved so much tension from the first bolt! So alternate your tightening back and forth until you can get 14 FT/LBS on each bolt. The smaller clamp with the T30 Torx bolt will need to be torqued down to 8 FT/LBS (16 Nm) using a drop or two of blue loctite on the threads. Please note that we’ve updated the torque settings from what is laser etched on the arms themselves. The new torque settings will provide adequate torque for these clamps while preventing overzealous alignment techs from over torqueing.
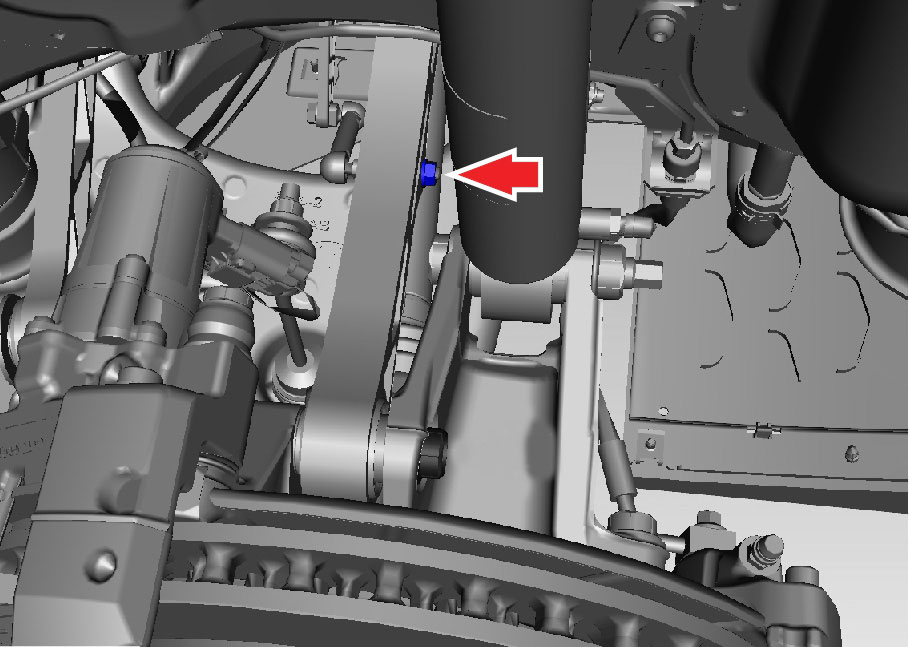
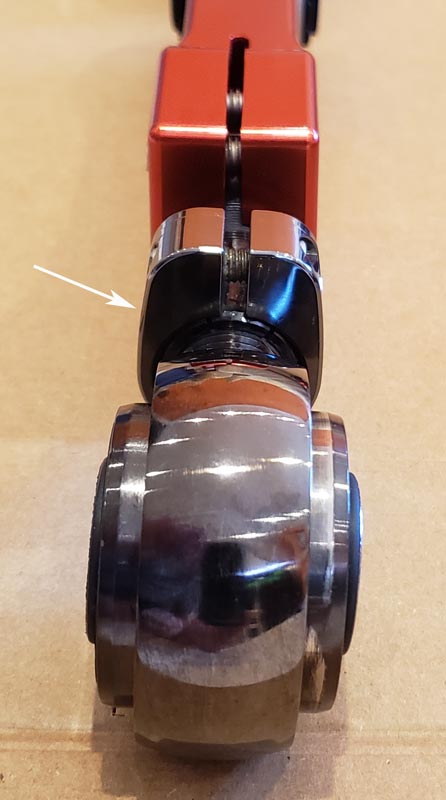
 Make sure that the small clamp remains in the straight up and down position and is not tweaked to the side. In this way the clamp will not make contact and become damaged while the arms articulate during driving. See image below.
 WARNING:
When tightening the two T45 Torx bolts they need to be alternately tightened at least 3-4 times each until each bolt reaches the correct torque tightness! Also for the small clamp on the rod end side it needs to be clamped down in an upright position as shown below! This is crucial for proper vehicle fitment! Do NOT tilt the clamp to the side at all! Keep the clamp straight up and in alignment with the arm as pictured below!

- Begin by safely jacking up the rear side of the vehicle that you will be working on and supporting the vehicle with jack stands. Never put the jack or jack stands under the battery! The below image shows the 4 intended locations to jack up a Tesla S/X. We recommend using lift pads between your jack and the vehicle’s frame to prevent damage to the jack points, battery and surrounding areas. Do not work on an incorrectly supported vehicle. Doing so can cause serious damage, bodily injury, or death. On a personal note one of my client’s sons was killed many years ago when he supported his vehicle by using a cinder block instead of a jack stand. The cinder block crumbled under the weight of the vehicle while he was underneath. Furthermore, do not place anything between the floor and the jack stand such as carpet which can slip and cause the car to come off the jack stand.
 Make sure that the small clamp remains in the straight up and down position and is not tweaked to the side. In this way the clamp will not make contact and become damaged while the arms articulate during driving. See image below.
![]() WARNING: Do not torque down the bolts until the suspension is pushed up back to ride height level! Doing so will strain and cause premature failure of the rubber bushing. This incorrect installation would not be covered under warranty.
WARNING: Do not torque down the bolts until the suspension is pushed up back to ride height level! Doing so will strain and cause premature failure of the rubber bushing. This incorrect installation would not be covered under warranty.
![]() WARNING :Check locking nuts to confirm they are still capable of gripping the bolt threads and that they cannot rotate by finger strength. If you are able to rotate the locking nuts with your fingers or if the locking nuts have been removed and tightened more than 4 times then discard them and purchase new locking nuts from Tesla.
WARNING :Check locking nuts to confirm they are still capable of gripping the bolt threads and that they cannot rotate by finger strength. If you are able to rotate the locking nuts with your fingers or if the locking nuts have been removed and tightened more than 4 times then discard them and purchase new locking nuts from Tesla.
Depending on your previous ride height levels in addition to the amount of negative camber from your original camber arms, it may be necessary to perform a ride height calibration after your alignment. You will need to have a 4-wheel alignment performed immediately which is why we suggest just having an alignment shop install the arms and then they can align it right away afterwards. Please show the alignment shop these installation instructions to avoid problems.
N2itive TSX-1 Toe Arm Installation
![]() Warning: If the vehicle has air suspension, activate “Jack” mode on the touchscreen before raising and supporting the vehicle. Smart Air Suspension will automatically self-level, even when vehicle is powered off. You MUST disable this system by activating “Jack” mode prior to raising the vehicle, otherwise it may attempt to self-level, causing serious damage, bodily injury, or death. Jack mode will automatically cancel when the vehicle is driven over 5 mph (7 km/h)
Warning: If the vehicle has air suspension, activate “Jack” mode on the touchscreen before raising and supporting the vehicle. Smart Air Suspension will automatically self-level, even when vehicle is powered off. You MUST disable this system by activating “Jack” mode prior to raising the vehicle, otherwise it may attempt to self-level, causing serious damage, bodily injury, or death. Jack mode will automatically cancel when the vehicle is driven over 5 mph (7 km/h)
REMOVAL
- Begin by following the instructions above to safely jack up the vehicle.
- Remove the wheel and set to the side. Later when you reinstall the wheels they should be torqued to 129 ft./lbs. (175Nm)
- Release the clip that attaches the electric parking brake wiring harness to the toe arm.
- Remove the bolt that attaches the toe arm to wheel knuckle.
- For some Teslas, it is not possible to remove the eccentric bolt that connects the toe arm to the subframe without dropping the subframe down to provide proper clearance. Dropping the subframe is a time consuming job so we suggest cutting out the old eccentric bolt with a vibrating saw and using the new bolt that we’ve included for you to use if you are not able to remove the bolts. The new bolt can be inserted from the opposite side. Remove the nut on the eccentric bolt that attaches the toe arm to the subframe. Now test to see if you are able to remove the eccentric bolt without cutting it first. Some tips to attempt to remove the original eccentric bolts without needing to cut them… First make sure to remove the washer after taking off the bolt to give you more range of motion. Next, you can hold the toe arm in one hand and lift it to position it in such a way to assist in the removal of the eccentric bolt. If you can remove it then great, otherwise proceed as follows. Using vice grips, pinch the tip of the eccentric bolt to prevent the bolt from rotating. Carefully saw off the head of the bolt on the opposite side being extremely careful not to accidentally cut the adjacent brake line! Now pull the cut bolt all the way out. If the bolt is seized from previous corrosion and cannot be pulled out, you may need to use lubricating spray and a punch to tap the bolt through and again cut the bolt when the bolt comes in contact with the chassis until the bolt is all the way out.

 WARNING: When cutting out the toe arm bolt take extreme caution not to accidentally cut the adjacent brake line.
INSTALLATION
- Place the new TSX-1 toe arm in position. Unlike the SX-1 camber arms the TSX-1 toe arms do NOT have a left and right side. Both TSX-1 arms are the same. Originally we labeled the rod end side of the TSX-1 toe arms to fit into the wheel knuckle. This is fine and you can still install the TSX-1 toe arms this way, however we are finding that the toe arms are easier to align and adjust when installed with the rod end side attached to the subframe as shown in the above installation video. Ultimately either way is fine. Furthermore, unlike the SX-1 camber arms, the hump on the TSX-1 toe arms must be face down. Fit the rod end side of the arm between the subframe clevis and suspend it with the new bolt, washer and nut we sent you or the original eccentric bolt, washer and nut if you were able to preserve those. If using the original eccentric bolt, washer and nut, first confirm that the original nylon locking nut is still good and will not rotate with your fingers. A working nylon locking nut will need a wrench to turn it with the threads engaged past the nylon lock. If you can rotate the nut with your fingers once past the nylon lock then do not use it. This could be extremely dangerous if the nut were to come loose. Install the washer and locking nut on to the bolt. The washer goes on the nut side. Again do not tighten down fully yet.
- On the knuckle side of the toe arm, screw the original Tesla bolt through the toe arm bushing and back into the knuckle to hold the arm in place. Lightly tighten it but don’t torque it down yet. The bushing should still be able to rotate.
- Next, raise the suspension to ride height level first and then torque down both bolts. You need to essentially push the wheel back up into the wheel well to be at your regular ride height. This is called pre-loading and is very important! Do not torque down the bolts down before raising the suspension or pre-loading. Doing so will twist the rubber inside the bushing and cause it to fail. If you’re also installing the SX-1 camber arms, now would be the time to torque down those bolts as well. The toe arm bolt that connects to the knuckle should be torqued down to 96 ft/lbs. (130 Nm). The bolt that connects the toe arm at the subframe needs to be torqued down to 59 ft./lbs. (80 Nm)
- Reattach the electric parking brake wiring harness to the SIDE of the toe arm with a new zip tie or similar. Do not attach the wiring harness to the top of the toe arm as it could become severed if the vehicle suspension were to bottom out from a speed bump or pothole or similar. Attach the wiring harness to the side of the toe arm. Trim the zip tie if necessary.
- Review all work performed and reattach wheel torqued to 129 ft./lbs. (175Nm)
- To adjust the TSX-1 toe arms you will need to loosen both clamping mechanisms just like on the SX-1 camber arms using the appropriate size Torx drivers. Remove the bottom rear valance of the vehicle to gain clearance to adjust the arms while the wheels are still on the vehicle. Use a 30mm open end wrench to turn the double adjuster. Tightening or clockwise rotation will make the arm shorter and increase the negative camber. Loosening or counter clockwise rotation will lengthen the arm and increase positive camber. Once your alignment technician has found the correct alignment, the clamps need to be tightened down.For the clamp that’s built into the arm with the dual Torx bolts you will need to alternate torque these bolts a few times with a couple of drops of blue Loctite to 14 FT/LBS (19 Nm). This is important so the bolts have the correct torque and don’t come loose! Being that it is clamping mechanism if you were to tighten one bolt to 14 FT/LBS and then the other to 14 FT/LBS now the back tension on the first bolt has been greatly reduced to maybe only 5 FT/LBS since tightening the second bolt relieved so much tension from the first bolt! So alternate your tightening back and forth until you can get 14 FT/LBS on each bolt. The smaller clamp with the T30 Torx bolt will need to be torqued down to 8 FT/LBS (16 Nm) using a drop or two of blue loctite on the threads. Please note that we’ve updated the torque settings from what is laser etched on the arms themselves. The new torque settings will provide adequate torque for these clamps while preventing overzealous alignment techs from over torqueing.Make sure that the small clamp remains in the straight up and down position and is not tweaked to the side. In this way the clamp will not make contact and become damaged while the arms articulate during driving.
![]() WARNING: Do not torque down the bolts until the suspension is pushed up back to ride height level! Doing so will strain and cause premature failure of the rubber bushing. This incorrect installation would not be covered under warranty.
WARNING: Do not torque down the bolts until the suspension is pushed up back to ride height level! Doing so will strain and cause premature failure of the rubber bushing. This incorrect installation would not be covered under warranty.
![]() WARNING: Check nylon locking nuts to confirm they are still capable of gripping the bolt threads and that they cannot rotate by finger strength. If you are able to rotate the locking nuts with your fingers or if the locking nuts have been removed and tightened more than 4 times then discard them and purchase new locking nuts from Tesla.
WARNING: Check nylon locking nuts to confirm they are still capable of gripping the bolt threads and that they cannot rotate by finger strength. If you are able to rotate the locking nuts with your fingers or if the locking nuts have been removed and tightened more than 4 times then discard them and purchase new locking nuts from Tesla.
To install our RSX-1 Lowering Links please see this installation page.
Please contact us with any questions or help you may need. We are here for you.
Below is the original home installation video created by one of our very first customers. This will be helpful to watch in addition to the video above for home installers since it was done with a jack and jack stands like most home installers will have access to. Thanks Steve for creating our first install video!
[/fusion_text][/fusion_builder_column][/fusion_builder_row][/fusion_builder_container]